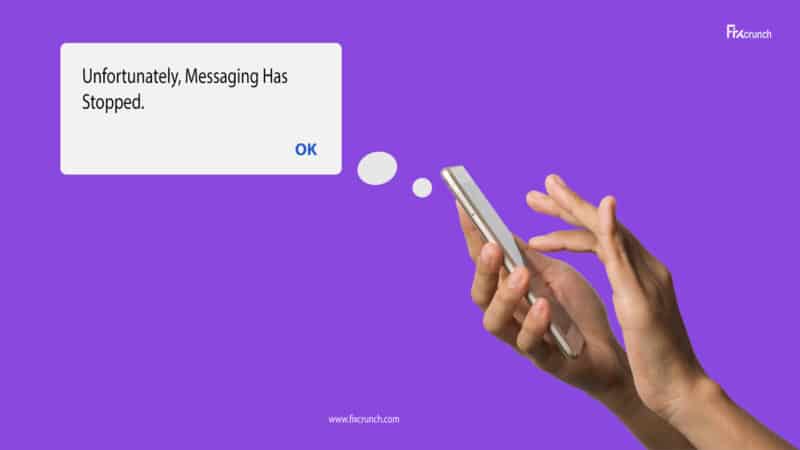
At times, we need to use the default messaging app to send text messages in an old-school way, although the usage of the messaging app is quite limited these days. However, don’t you feel annoyed when you launch the messaging app and get the “unfortunately, messaging has stopped” message?
You can easily fix an unresponsive messaging app by clearing the cache and rebooting your android device into safe mode. Besides, you also need to update the Android OS and the default messaging app to fix it. Many people recommended deleting the cache partition as well.
However, these are not all, as we have no less than fourteen different methods to resolve this issue from its root. But, before diving deep into the solution part, let’s understand the root causes behind this error to fix it from its core.
Table of Contents
- 1 What Are The Primary Reasons Behind The “Unfortunately, Messaging Has Stopped” Error?
- 2 7+ Easy Fixes For The “Unfortunately, Messaging Has Stopped” Error
- 3 7+ Advanced Fixes For The “Unfortunately, Messaging Has Stopped” Error
- 3.1 8. Clear The Cache Of Your Messaging App
- 3.2 9. Disable Battery Optimization For The Messaging App
- 3.3 10. Reset Your Network Settings
- 3.4 11. Update The Google Play Service App
- 3.5 12. Clear The Cache Of The Google Play Service App
- 3.6 13. Delete The Cache Partition
- 3.7 14. Factory Reset Your Smartphone
- 4 FAQs
- 5 Conclusion
What Are The Primary Reasons Behind The “Unfortunately, Messaging Has Stopped” Error?
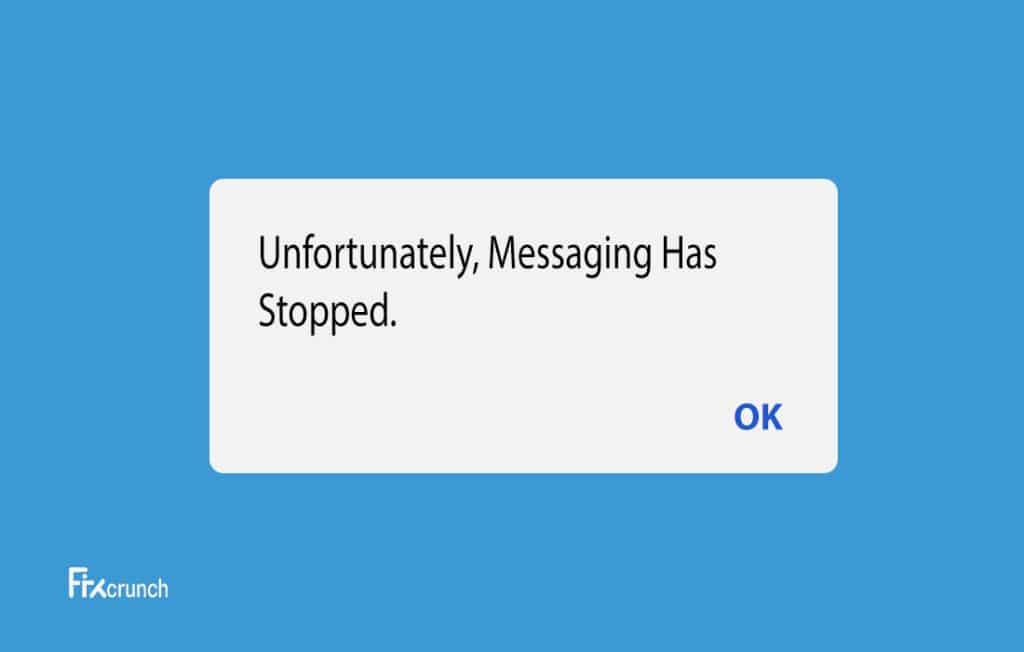
It is not uncommon to get the “unfortunately, messaging has stopped” error message on your android device, as it can trigger for so many reasons. However, if you consider a broader spectrum, this issue can typically trigger for seven main reasons that are as follows.
- There is cache congestion on your device that is hampering the overall user experience.
- Too many apps are running on your device, which interferes with each other.
- There is a glitch in your network parameter for which the default messaging app fails to establish a secured connection.
- There is an outdated version of the Android OS installed on your device.
- You are using an outdated default messaging app that needs an urgent update to function properly.
- There is an obsolete version of the “Google Play Service” app installed on your device.
- The battery optimization feature is causing an interference issue with the default messaging app.
Although these are the seven main reasons, there can be many other reasons for which you can get this error message. It can even occur on your device if you have installed any third-party or malicious apps on your smartphone. Besides, it can also happen if the antivirus installed on your android device restricts the messaging app from establishing a connection.
7+ Easy Fixes For The “Unfortunately, Messaging Has Stopped” Error
Before trying anything advanced that needs pro-level tweaks on your android device, you must try all the generic methods mentioned below to resolve the “unfortunately, messaging has stopped” error. And in more than 90% of cases, these generic methods are enough to fix this issue in no time.
1. Reboot Your Smartphone
The stock android or any custom UI based on Android uses several cache files to ensure an optimum user experience. However, if there is too much cache accumulation, or if there is any error in those cache files, you may get an unresponsive messaging app. So, you need to just reboot your smartphone first to flush your background cache files.
- Step 1: Locate the “Power” switch either on the right or left side of your smartphone, depending on your device type.
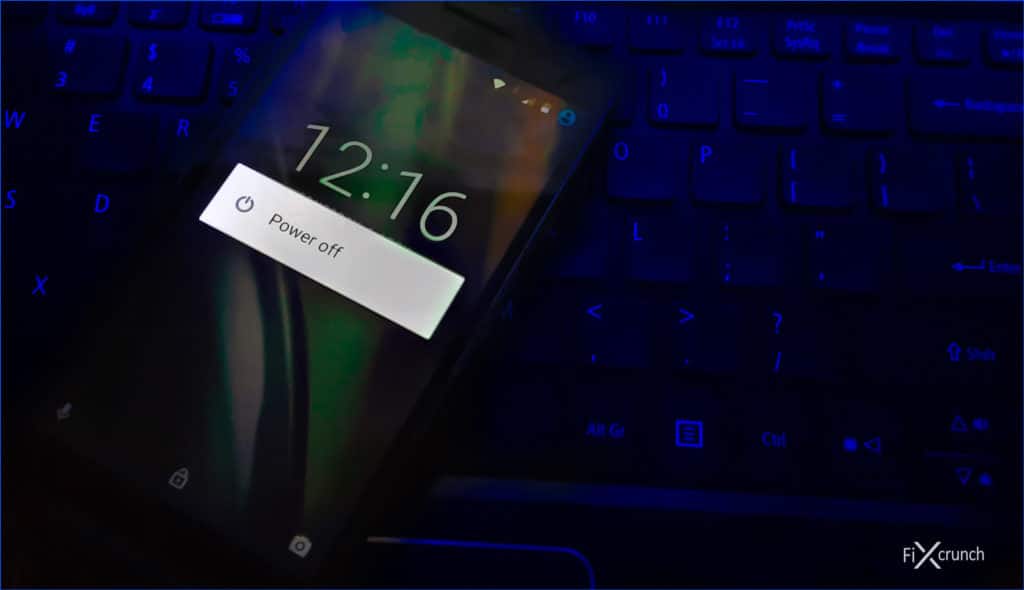
- Step 2: Now, press the “Power” button and hold it until a new selection menu appears.
- Step 3: Tap on either the “Turn Off” or “Switch Off” option from the shutdown menu.
- Step 4: Once your device is completely turned off, keep it in idle mode for at least 2 minutes.
- Step 5: Once the cool-off time is passed, press and hold the “Power” button again until you get the Android welcome screen.
- Step 6: Once all the apps load on your device, launch the default messaging app and check whether you are still getting the same issue.
Some of our users have started getting an unknown app installation package error after they have erased all the cache files from their android devices. If you are also facing the same issue, follow our step-by-step guide to fix the “There was a problem parsing the package” error in Android devices.
2. Restart Your Android Device In Safe Mode
If there are multiple apps that run continuously in the background of your smartphone, rebooting the device may not solve it, as you may need to trigger the safe mode option. And if you don’t know about the ways to fix the “unfortunately, messaging has stopped error,” you must restart your device into safe mode first to eliminate any interference issue.
- Step 1: Locate and hold the “Power” switch either on the right or left side panel of your device, depending on the smartphone model.
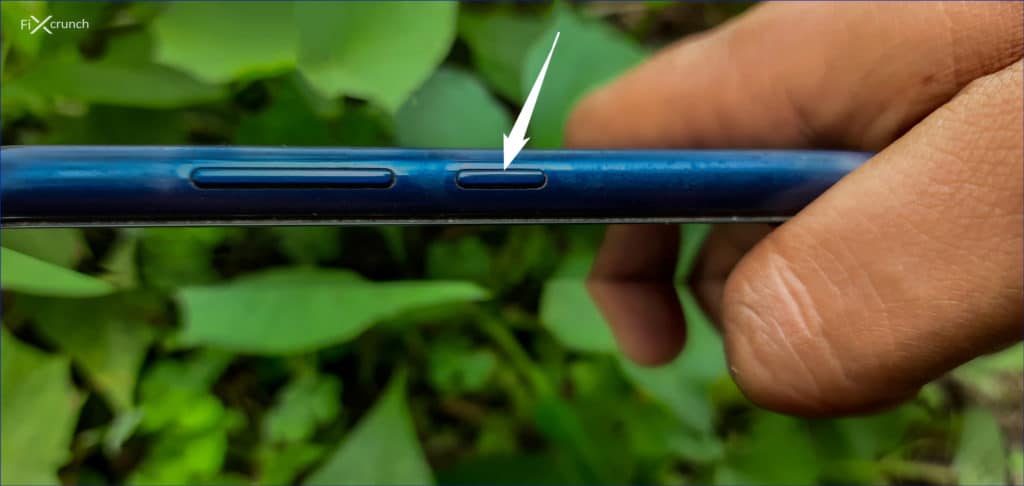
- Step 2: Release the “Power” switch once the new selection menu appears on your screen.
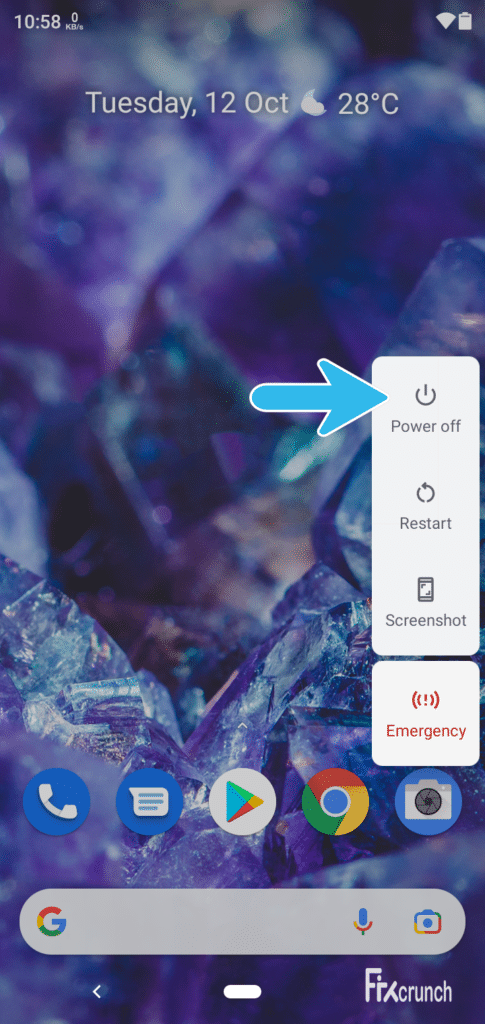
- Step 3: From the new menu, press and hold either the “Power Off” or “Turn Off” option.
- Step 4: Once you get a new popup box, tap on the “Safe Mode” option from the list.
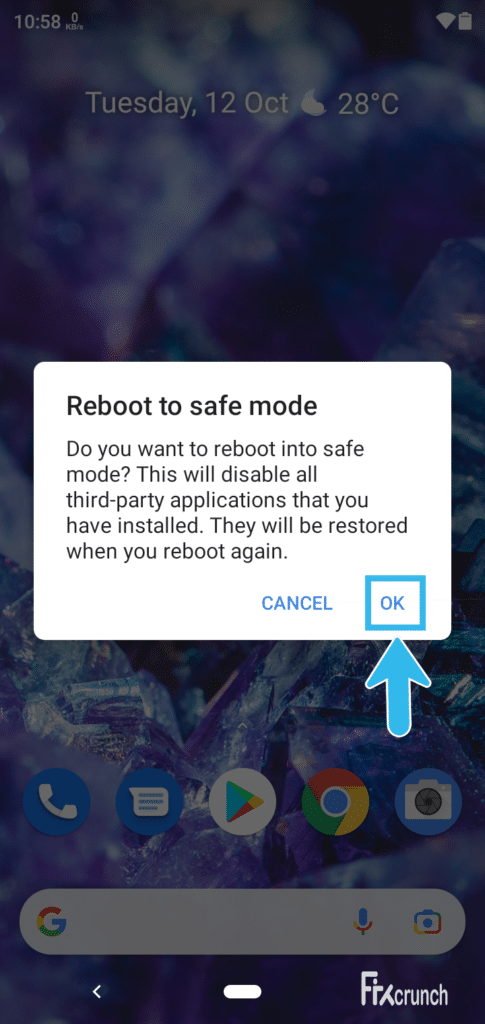
- Step 5: Now, tap on the “OK” button to initiate the safe mode.
- Step 6: Let your Android automatically enable the safe mode and wait until you get all the app icons on your home screen.
- Step 7: Launch your default messaging app and check if the issue still remains or not.
A few of our users have reported to us that their system UI crashed and stopped to respond entirely once they had turned on the safe mode on their device. If you are also witnessing the same thing, follow our comprehensive guide for the “System UI has stopped” error in Android devices.
3. Update Your Android OS
You may get an unresponsive messaging app if you are still using an obsolete variant of the Android OS itself. So, to fix this error, you need to update your UI as soon as possible. And updating the OS on a regular basis not only just fixes this issue but will also resolve all the minor glitches from the Android device.
- Step 1: Close all the background applications and navigate to your home screen, where all the app icons are displayed.
- Step 2: Tap on the “Settings” app (Gear icon) to launch it on your device.
- Step 3: Now, scroll down the newly launched page and tap on either the “About Phone” or “System Information” option, depending on your smartphone type.
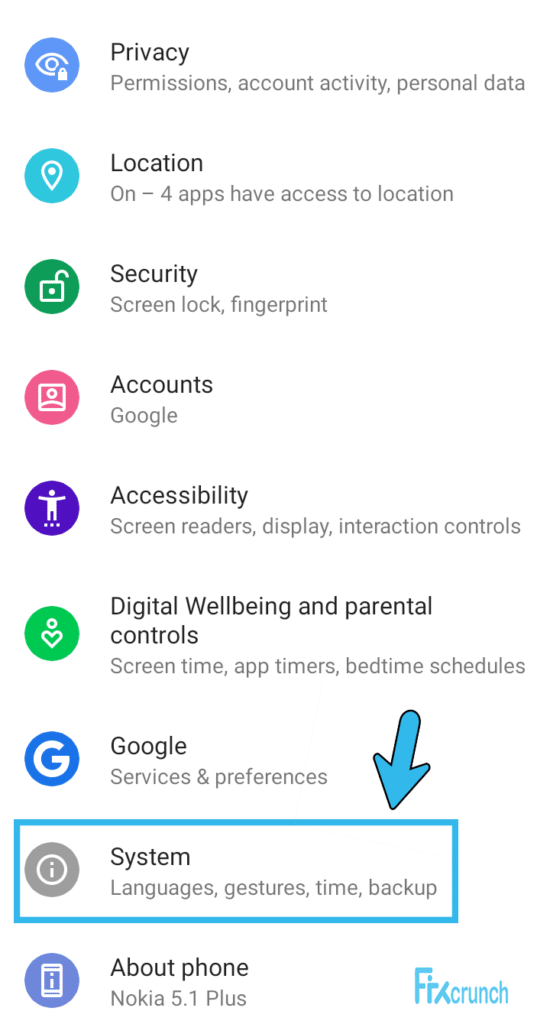
- Step 4: Once you get a new page, tap on the “System Updates” option from the list.
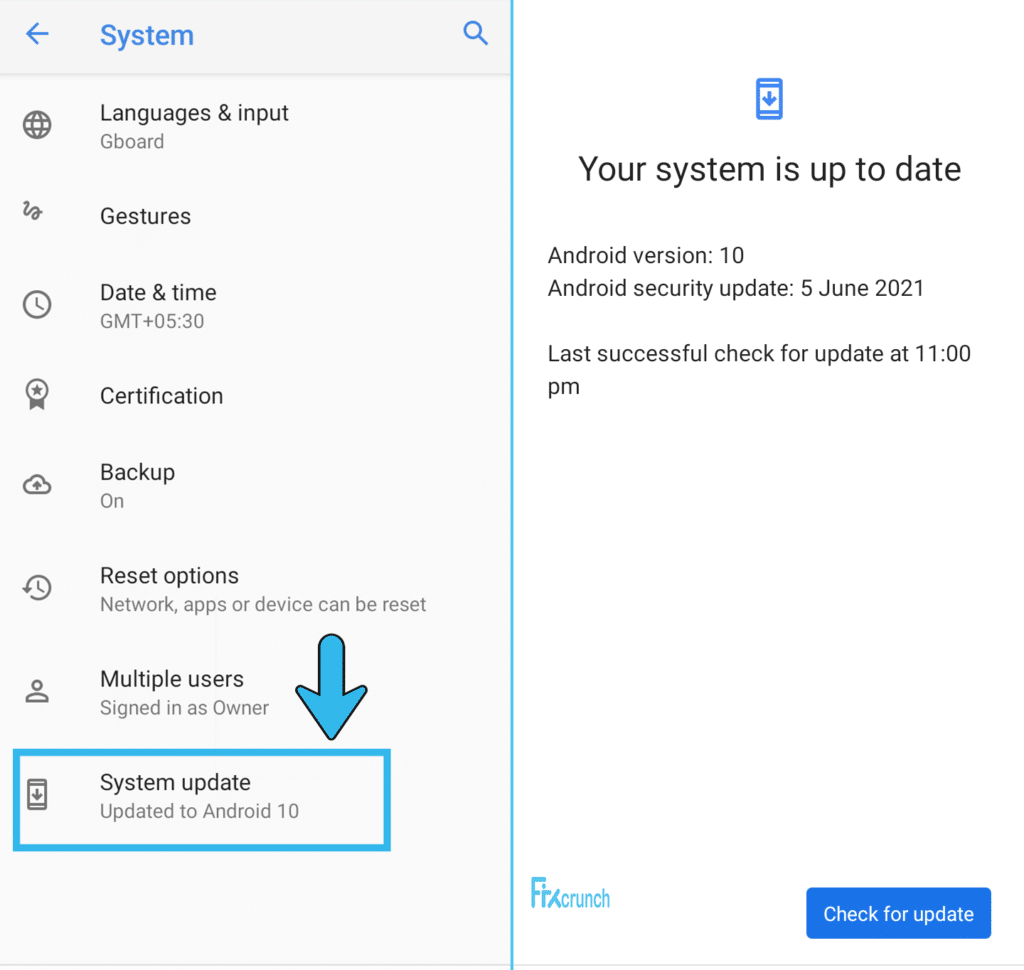
- Step 5: After you get a prompt message, tap on either the “Download” or “Install” button.
- Step 6: Now, let your Android automatically find and install the latest update pack.
- Step 7: Once the Android OS is fully updated, reboot your device, and relaunch the messaging app again to check whether you are still getting the same issue.
If you are using an old smartphone or tablet, the latest update patch may not be supported by your device. In that case, you must install the last supported pack on your device to fix this error. But yes, you need to manually check for the available updates at a timely interval to ensure an optimum user experience.
4. End All The Background Apps On Android
You may not know, but several linear processes and background apps constantly run on your Android device to ensure an optimum user experience. However, if you are running too many apps on your device, you may witness that the messaging has stopped on Android. In that case, you need to end all the background processes first.
- Step 1: Navigate to your Android home screen, where all the installed app icons are displayed.
- Step 2: Press and hold the “Home” button on your device to launch the “Task Manager” app on your smartphone.
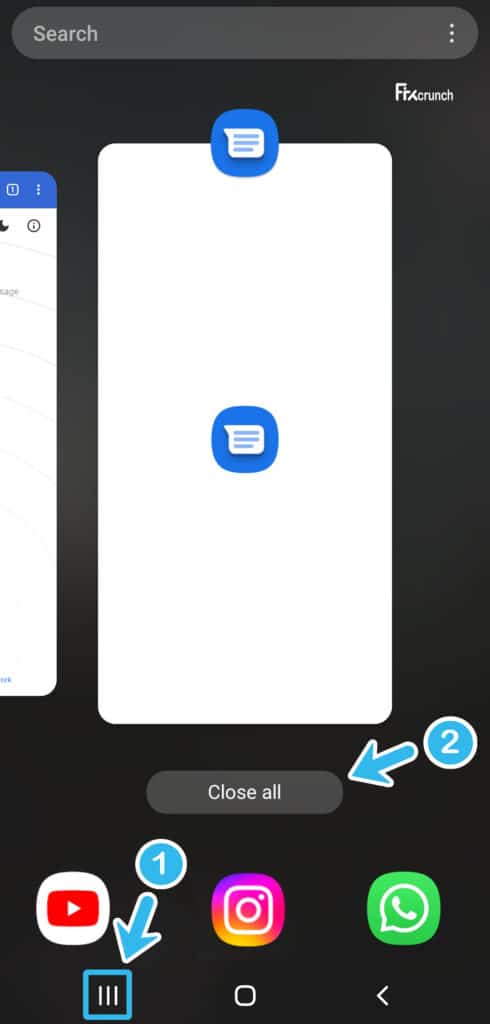
- Step 3: Now, tap on the “Clear All” button to end all the running applications in the background.
- Step 4: Come to your home screen again and tap on the “Settings” app (Gear icon) to launch it.
- Step 5: From the new selection menu, tap on the “Apps” button to get the complete list of installed apps.
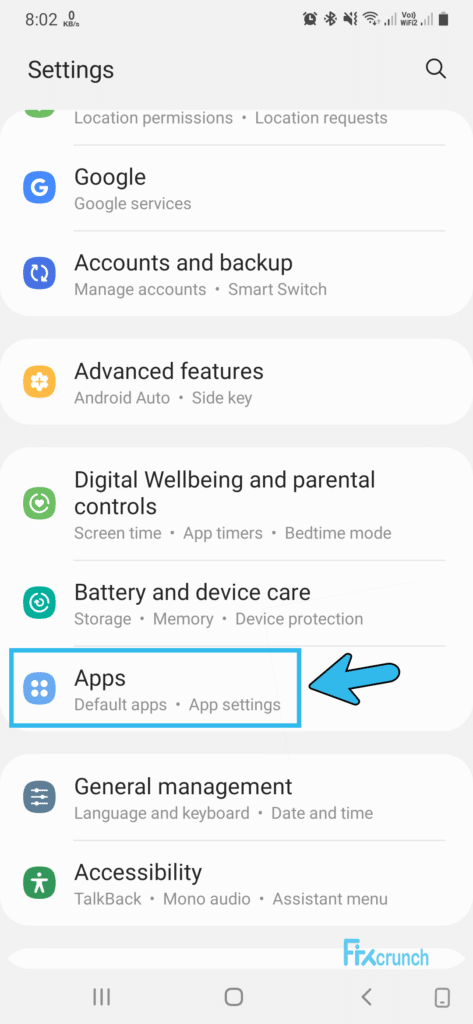
- Step 6: Now, select all the applications from the list and tap on the “Force Stop” option to close all programs at once.
- Step 7: Once all the apps are closed, launch your default messaging app and check if you are still getting the same issue or not.
A few of our users have brought to our notice that their apps were not installed once they had ended all the background processes from their devices. If you are also getting the same error on your device, follow our detailed guide to fix the “App not installed” error on Android devices.
5. Set Messages As The Default Messaging App
The default messaging app that comes preinstalled with the Android phones is tweaked in a way to perfectly complement the UI. Besides, it is also designed to use minimal resources to eliminate any chance of sluggish responses. So, to get the best experience, you must set the messaging app as your default app.
- Step 1: Close all the background processes from your android device and navigate to your home screen, where all the installed app icons are displayed.
- Step 2: Now, tap on the “Settings” app (Gear icon) to launch it on your smartphone.
- Step 3: Once the app launches, scroll down to the new page, and tap on the “Apps & Notifications” option from the list.
- Step 4: Now, once you get a new menu, tap on the “Advanced” option.
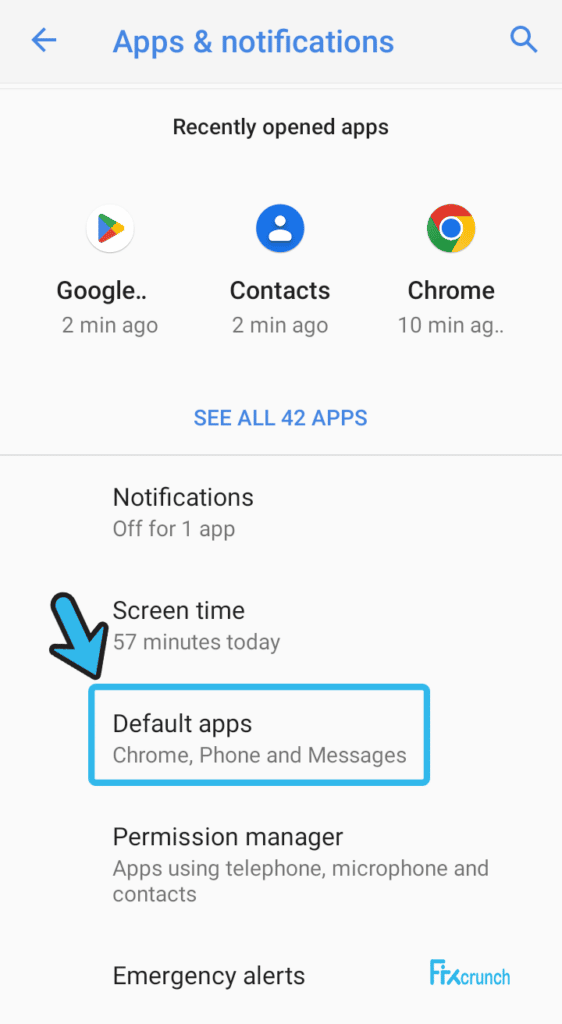
- Step 5: Tap on the “Default apps” option from the new selection menu.
- Step 6: Tap on the “SMS app” option and then select the “Messages” option from the menu.
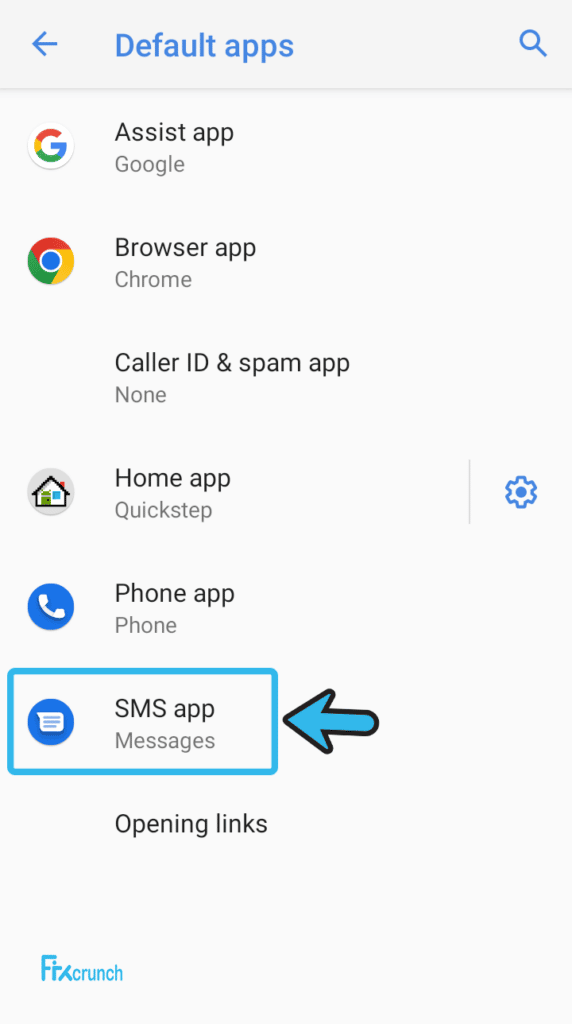
- Step 7: Now, exit from the “Settings” app and restart your android device.
Some of our existing users have already reported to us that they are getting an error code R008 once they have shifted from a third-party messaging app to the default preinstalled one. If you are facing the same issue on your device as well, follow our comprehensive guide to fix the “Error code R008” in Android devices.
6. Update The Default Messaging App
If you are using an outdated version of the default messaging app, you may get an unresponsive messaging app on your device. And to fix this issue, you need to manually check and update the default messaging app first. And updating it will fix all the minor glitches and bugs from the app.
- Step 1: Close all the background processes and come to your home screen, where all the app icons are displayed.
- Step 2: Now, tap on the “Google Play Store” icon to launch it on your device.
- Step 3: Once you get a new page, navigate to your default messaging app from the menu.
- Step 4: Now, long-press on the messaging app until you get a new set of options.
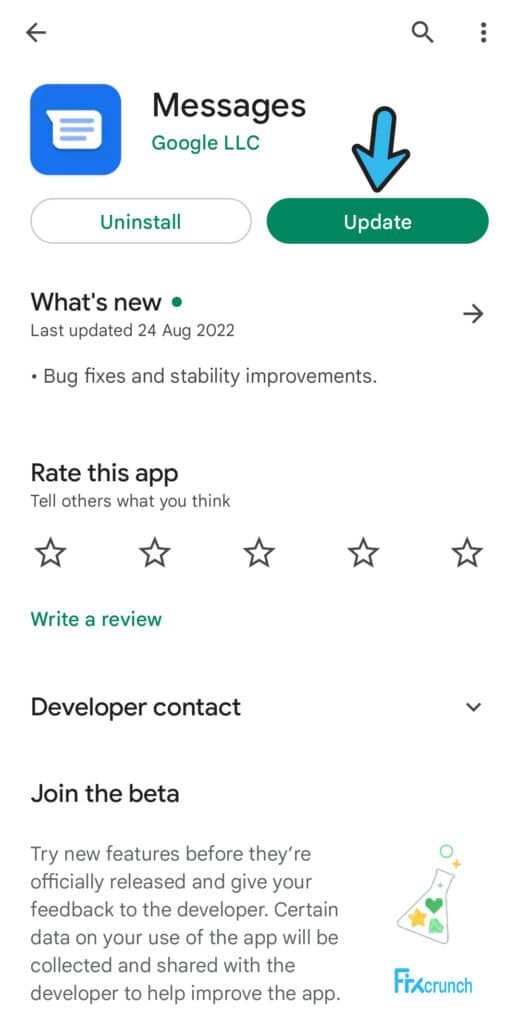
- Step 5: Tap on the “Update” button from the new menu to initiate the process.
- Step 6: Let your Android automatically find and install the latest update pack for the messaging app.
- Step 7: Once it is fully updated, reboot your device and check whether you are still getting the same error or not.
Some of our users told us that their settings app stopped abruptly once they tried to update the default messaging app on their devices. If you are encountering the same problem on your device as well, follow our step-by-step guide to fix the “unfortunately, the settings app has stopped” error in Android devices.
7. Force Stop Your Default Messaging App
If there is any glitch in the cache files of the default messaging app installed on your smartphone, you may face a situation where messages keep stopping on android devices. And in that case, you need to manually force stop the default messaging app and give it a fresh restart to eliminate the cache issues.
- Step 1: Close all the running applications and navigate to the android home screen.
- Step 2: Locate the icon on your default messaging app and long-press it until you get a new popup menu.
- Step 3: Now, tap on the “i” button and select the “Force Stop” option from the new menu.
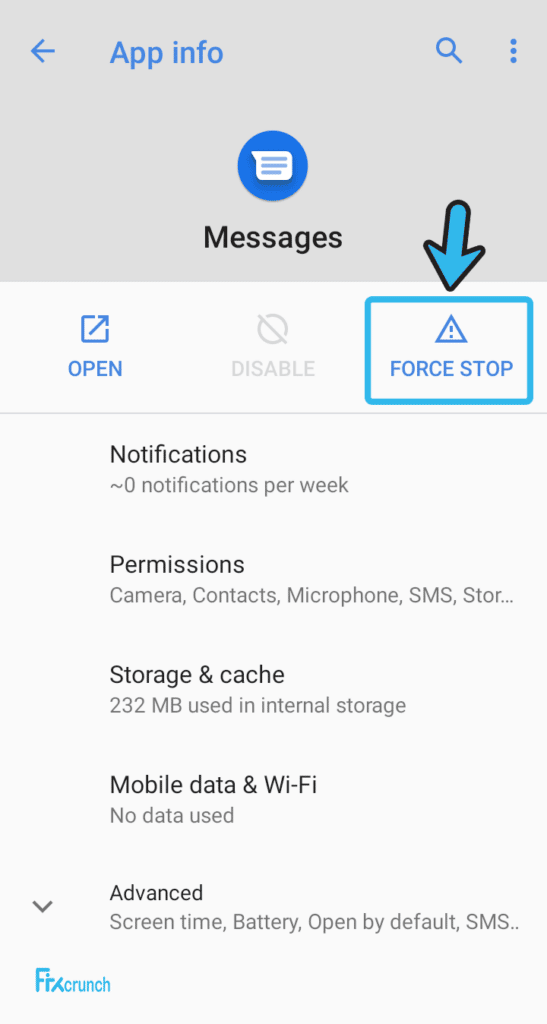
- Step 4: Alternatively, you can also launch the “Settings” app on your device and then tap on the “Apps & notifications” option.
- Step 5: Once you get a new set of menus, tap on either the “App info” or “See All Apps” option, depending on your smartphone variant.
- Step 6: Tap on your default messaging app again and press the “OK” button.
- Step 7: Once the messaging app is fully reset, launch it again and check if you are still getting the same error.
In most cases, restarting the default messing app will sort out the issue. However, you may need to give your android device a fresh reboot once you have reset the default messaging app. And in that way, you can effectively flush all the accumulated cache files from the messaging app.
7+ Advanced Fixes For The “Unfortunately, Messaging Has Stopped” Error
If you are still getting the “unfortunately, messaging has stopped” error message even after trying the generic fixes mentioned above, the problem may lie deep within the system or setup files. And in that case, resorting to advanced fixes is the only option left to resolve it.
8. Clear The Cache Of Your Messaging App
If your default messaging app only uses the text messaging service to send SMSs, the problem may be in the cache files of your default messaging app. And if there is too much cache congestion on the app, it may start malfunctioning. So, you need to manually clear all the cache files first from your messaging app.
- Step 1: Close all the background apps on your device and navigate to the home screen.
- Step 2: Tap on the “Settings” app (Gear icon) to launch it on your device.
- Step 3: Once the app opens, scroll down to the new page, and tap on the “Apps & Notification” option.
- Step 4: Tap on the “App info” button from the new menu.
- Step 5: Now, tap on the “Messages” app and then tap on the “Storage & Cache” option.
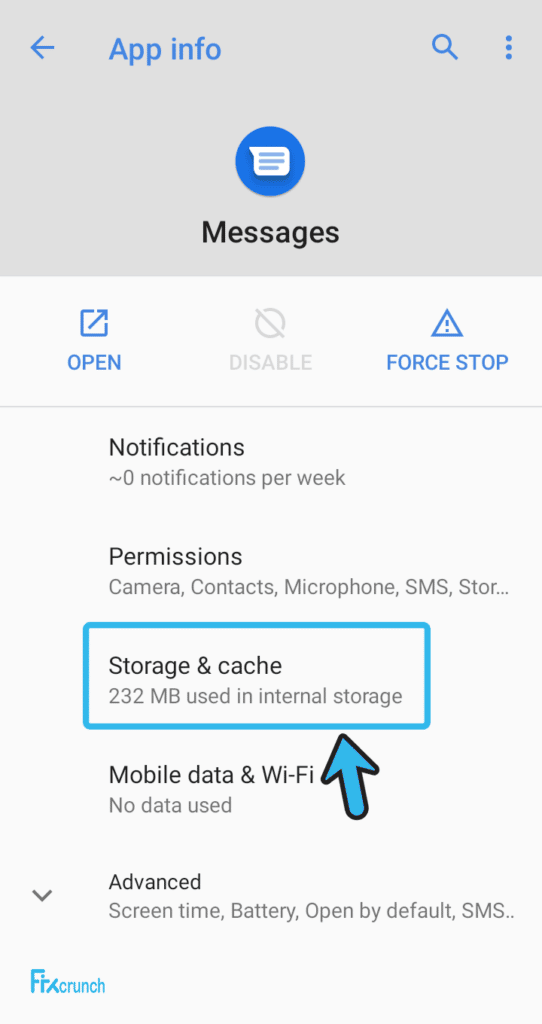
- Step 6: Tap on the “Clear Cache” option from the list to delete all the cache files from your default messaging app.
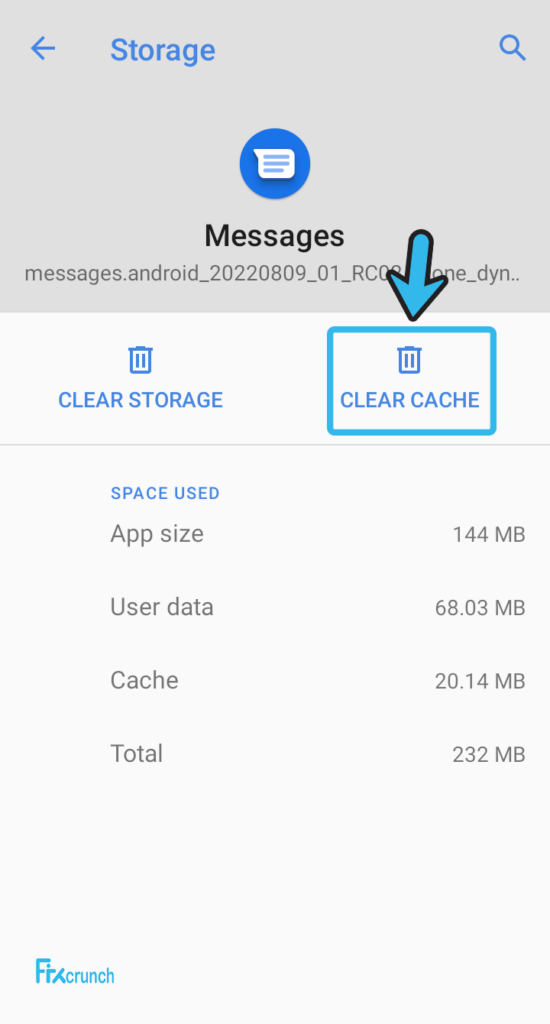
- Step 7: Once all the cache files are cleared, relaunch your messaging app and check whether you are still getting the same issue or not.
On many devices, you may get a popup warning to secure all the stored data from your default messaging app while you try to clear the cache files. In that case, you must enable it and keep a backup of all your important messages in the cloud. And in that way, you can retrieve the messages later on.
9. Disable Battery Optimization For The Messaging App
Battery optimization is a new feature that now comes preinstalled with all the latest android smartphones. It helps all the installed apps on your device to optimize the power requirement. And if you don’t know how to fix the “Messages has stopped” error, you must disable this feature first.
- Step 1: Close all the running applications and navigate to your Android home screen.
- Step 2: Tap on the “Settings” app (Gear icon) to launch it on your device.
- Step 3: Once a new page appears, scroll down, and tap on the “Apps & Notifications” option.
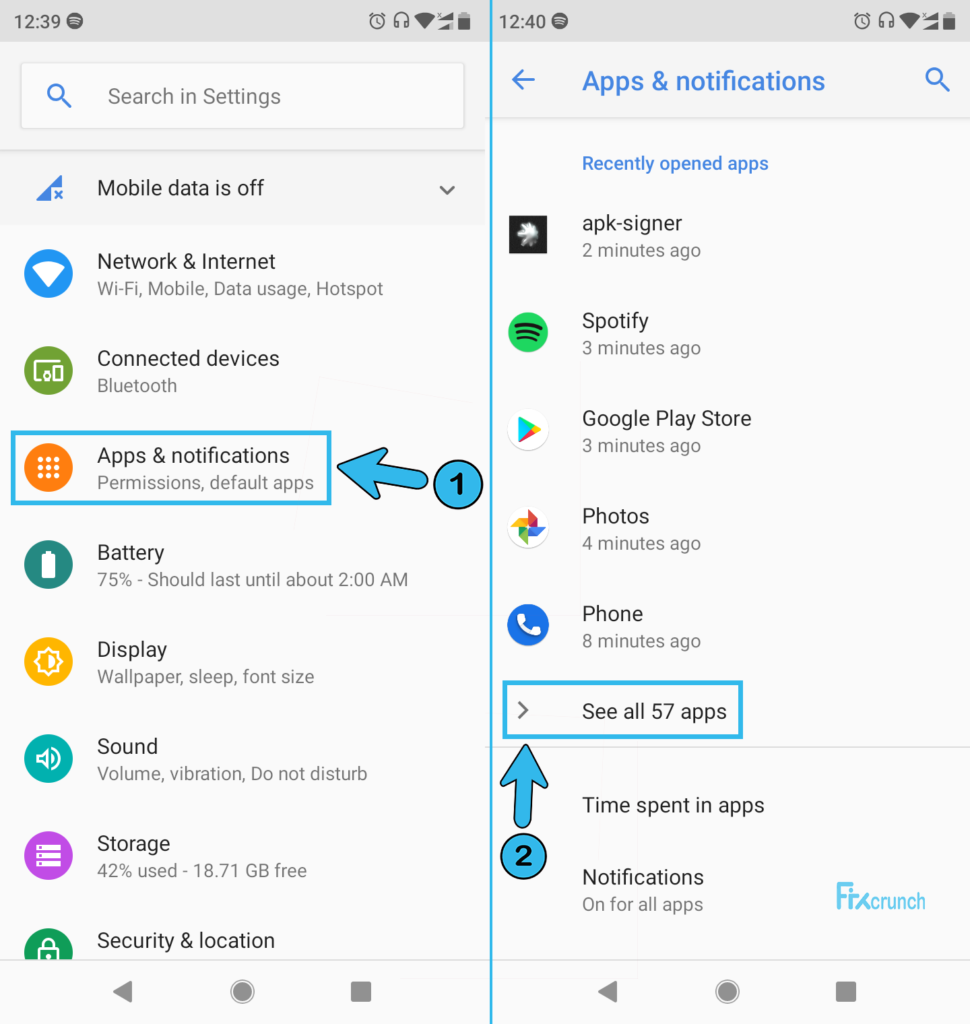
- Step 4: Tap on the “Apps” option from the list to fetch the full list of installed apps on your device.
- Step 5: Navigate to your default messaging app on the list and tap to select it.
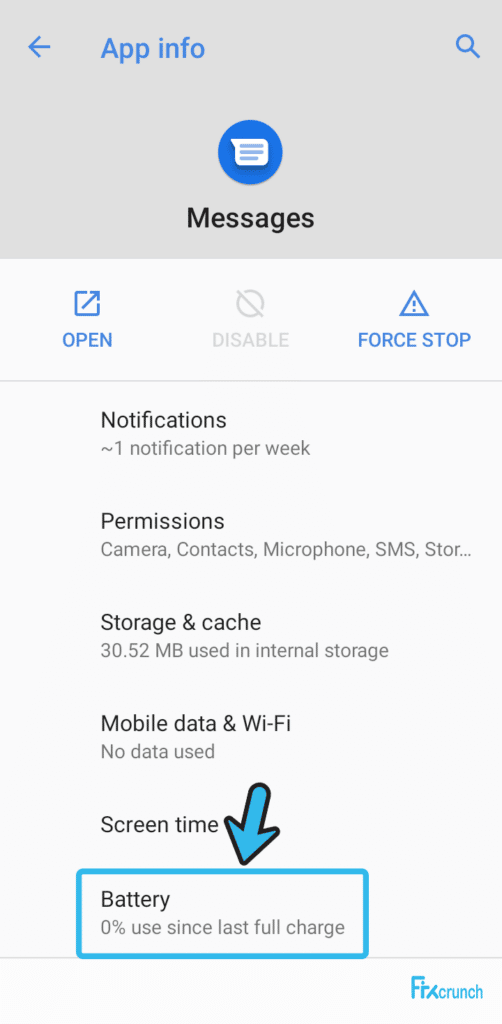
- Step 6: After the “App info” page launches on your device, tap on the “Battery” option from the new menu.
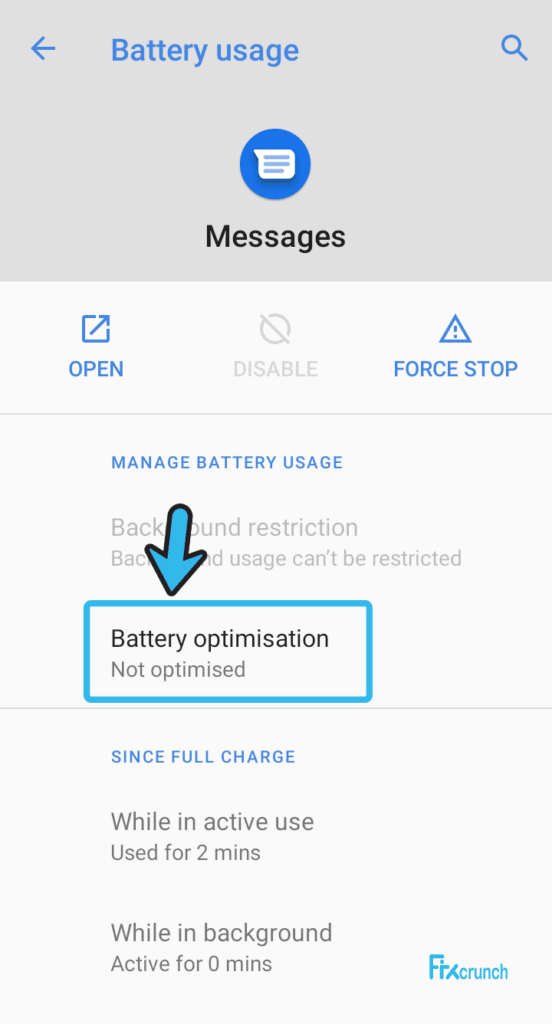
- Step 7: Tap on the “Not Optimized” button to disable the battery optimization feature.
- Step 8: Now, reboot your device and relaunch the default messaging app again.
Once you identify and fix the actual cause for the unresponsive messaging app, you must enable the battery optimization feature again on your smartphone. Otherwise, the overall user experience can be hampered, and you may not get optimum performance in the long run.
10. Reset Your Network Settings
A faulty or unresponsive network connection can be the root cause if you have an unresponsive messaging app on your android device. If your device fails to fetch the correct IP in a dynamic IP system, this error can even trigger. So, you need to reset the network parameters first manually.
- Step 1: Navigate to your home screen after closing all the background processes on your device.
- Step 2: Now, tap on the “Settings” app (Gear icon) to launch it on your smartphone.
- Step 3: Once you get a new page, scroll down, and tap on the “System” option from the list.

- Step 4: Tap on the “Reset” menu once you get a new menu on your device.
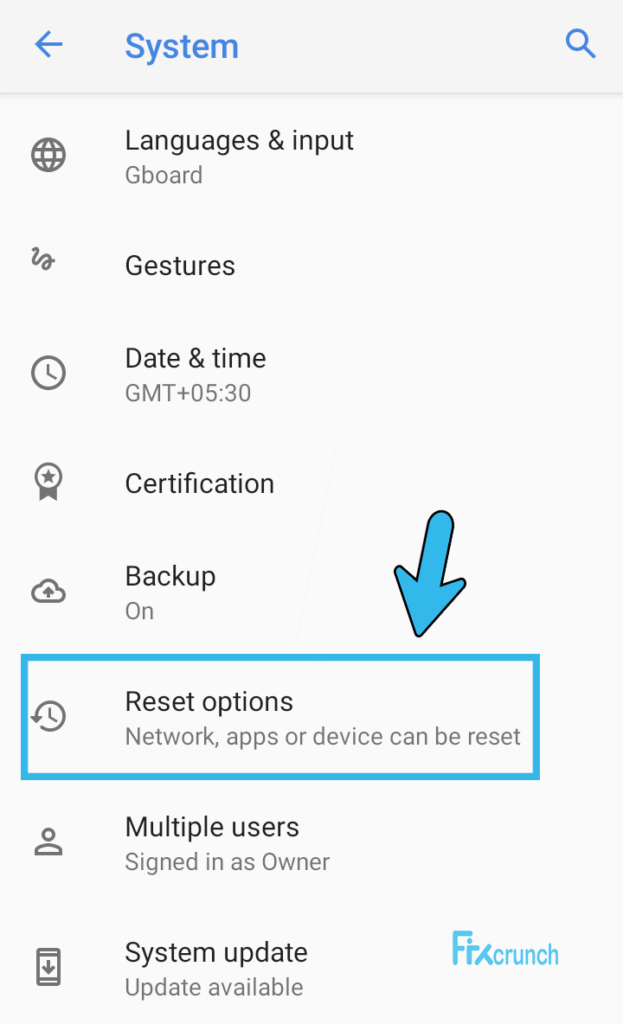
- Step 5: Once you get another menu, select the “Reset Network Settings” option from the list.
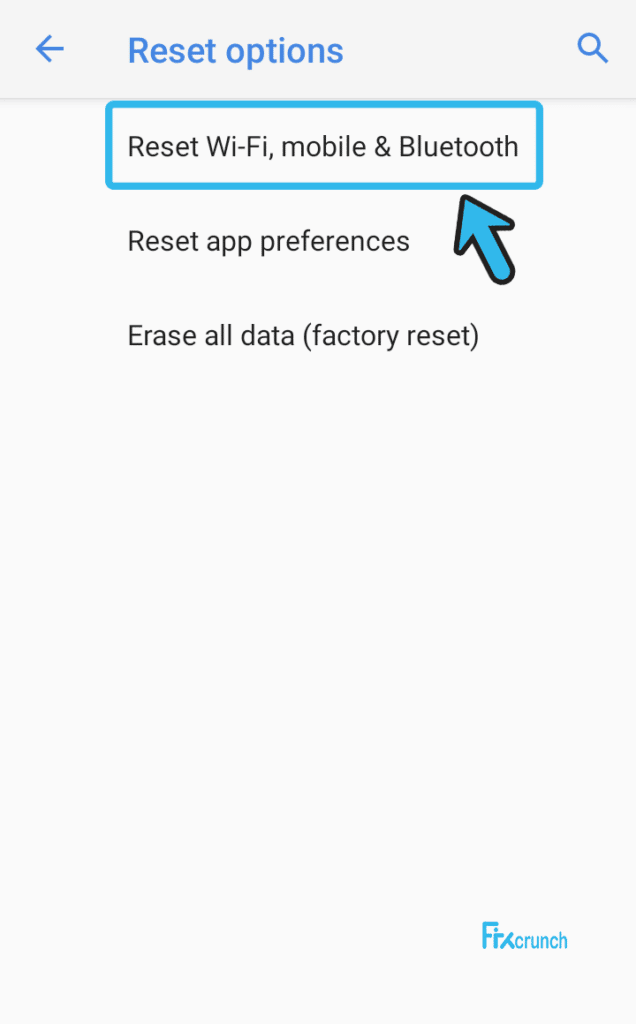
- Step 6: Let your Android automatically flushes all the network parameters to reset the settings entirely.
- Step 7: Once your network is reset, reboot your device, and relaunch your default messaging app.
A few of our existing users have told us that they have started getting an IP error once they have tried to reset their network parameters, especially when they are connected to a Wi-Fi network. If you are also facing similar situations, follow our comprehensive guide to fix the “Failed to obtain IP address” error on Android devices.
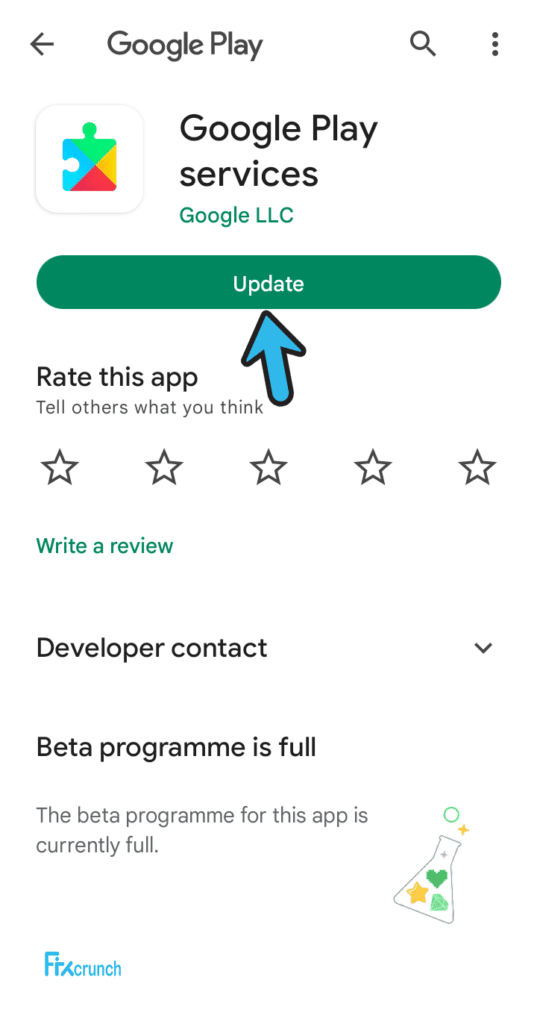
11. Update The Google Play Service App
If you are using an outdated version of the Google Play Service app, you may get an error message that reads, “unfortunately, messaging has stopped.” In that case, you need to manually update the Google Play Service app. Updating it will not only fix this glitch but will resolve all the minor glitches to ensure an optimum user experience.
- Step 1: Close all the background processes from your device and navigate to your home screen.
- Step 2: Tap on the “Settings” app (Gear icon) to launch it on your smartphone.
- Step 3: Once the new page appears, tap on the “Apps & Notification” option from the list.
- Step 4: Now, tap on either the “App info” or “See All Apps” option, depending on your smartphone model.

- Step 5: Now, navigate to the “Three Dots” icon located at the top-right corner of the new page.
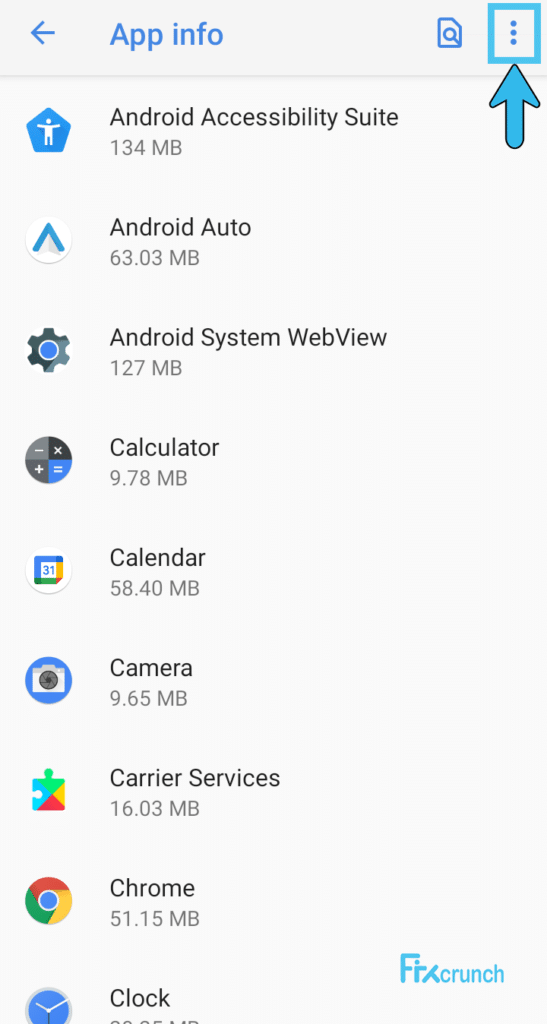
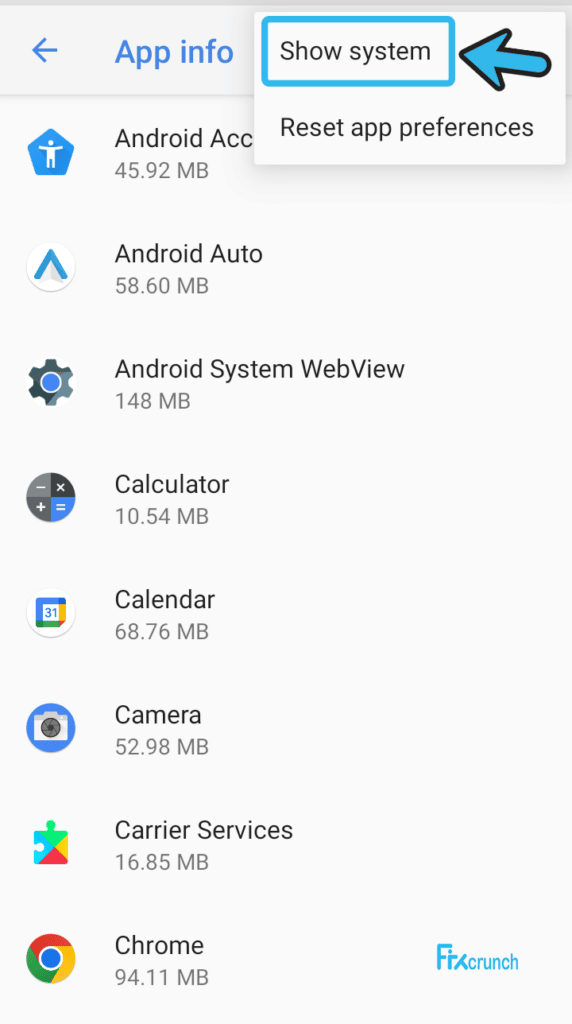
- Step 6: After you get a new menu, tap on the “Show System” option.
- Step 7: Tap on the “Google Play Service” option from the new list.
- Step 8: Scroll down the newly opened page and tap on the “Store” option.
- Step 9: From the new selection menu, tap on the “App Details” option.
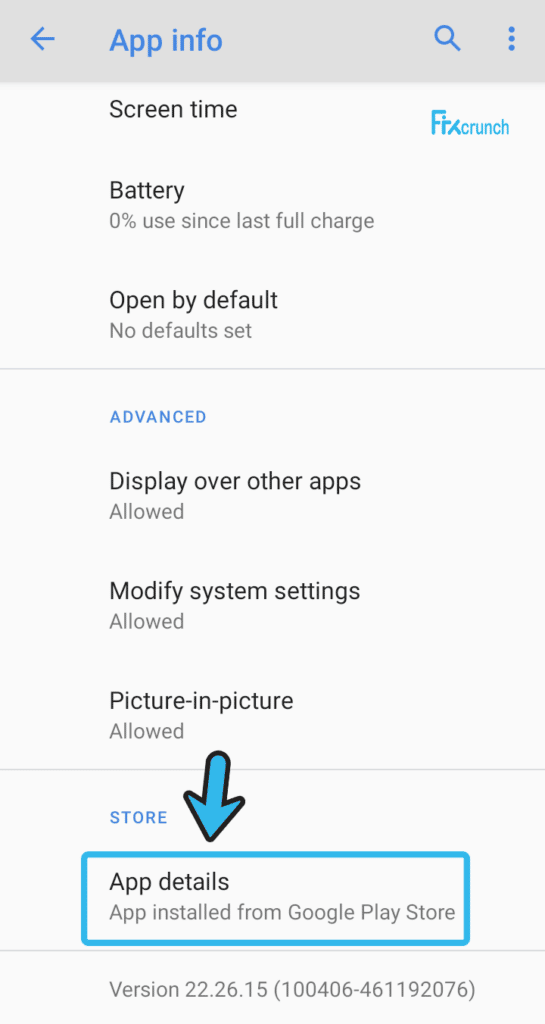
- Step 10: Now, tap on the “Update” option and let Android install the latest update patch for the Google Play Service app.
Many of our existing users have reported to us that their Google Play Service app stopped responding once they tried to install the latest update. If you are also facing the same problem on your smartphone, follow our detailed guide to fix the “Google Play Service has stopped” error in Android devices.
12. Clear The Cache Of The Google Play Service App
Updating the Google Play Service app alone will not sort out the issue if there are too many cache accumulations on the app. And if you have a cache error in this app, it can directly interfere with all the other installed apps on your smartphone. So, you need to clear the cache of your Google Play Service to resolve this issue from its root.
- Step 1: Close all the background processes from your device and navigate to all the android apps as in like previous steps.
- Step 2: Now, once you get the full list of installed apps, navigate to the “Google Play Service” app.
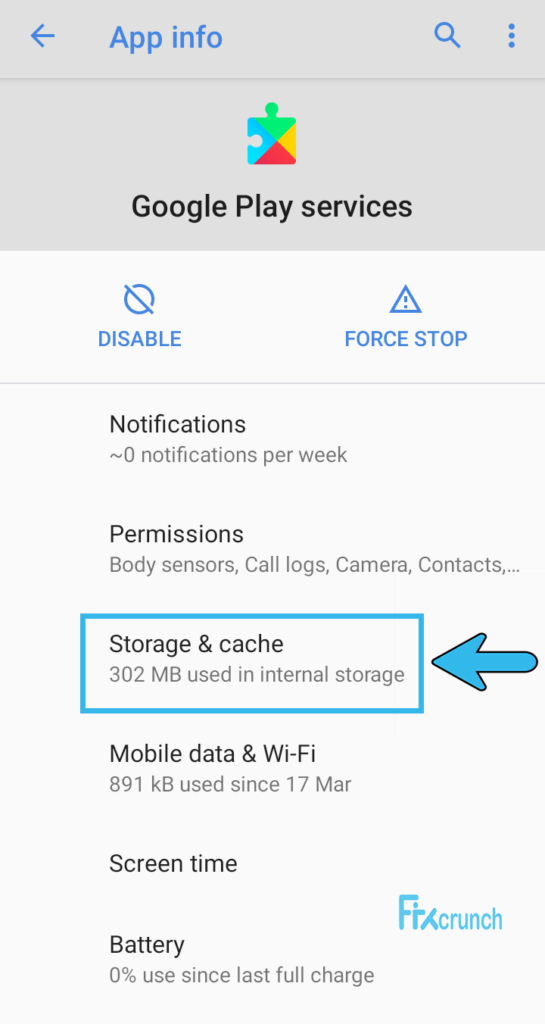
- Step 3: Tap on the “Storage & Caches” option from the new list.
- Step 7: After you get another menu, select either the “Clear Data” or “Clear Storage” option, depending on your smartphone variant.
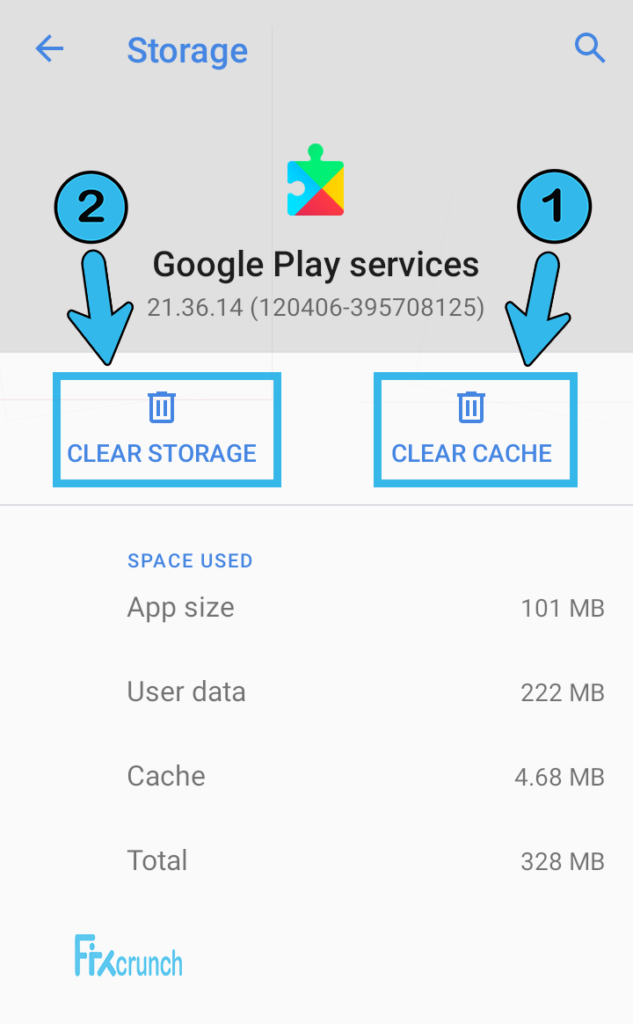
- Step 8: Once all the cache files are cleared, reboot your device, and relaunch the default messaging app.
Some Android users have reported to us that they are getting an Messages App Not Working error on their smartphones once they have cleared all the cache files from the Google Play Service app. If you are also facing the same issue on your device, follow our step-by-step guide to fix the “Messages App Not Working” on Android smartphones.
13. Delete The Cache Partition
If the messaging app is not working in Android, the problem may lie deep within the memory unit of your smartphone. And if there is any error in the cache partition inside the memory unit, this error can even trigger due to cache errors. So, you may need to delete the entire cache partition first to resolve it.
- Step 1: Press and hold the “Power” button located either on the left or right side panel of your device.
- Step 2: Select the “Turn Off” or “Switch Off” option to shut down your smartphone.
- Step 3: Let the android device remain in idle mode for at least two minutes.
- Step 4: Once the cool-off time is over, press the “Power” and “Volume Up” leys together until a new start-up menu appears on the screen.
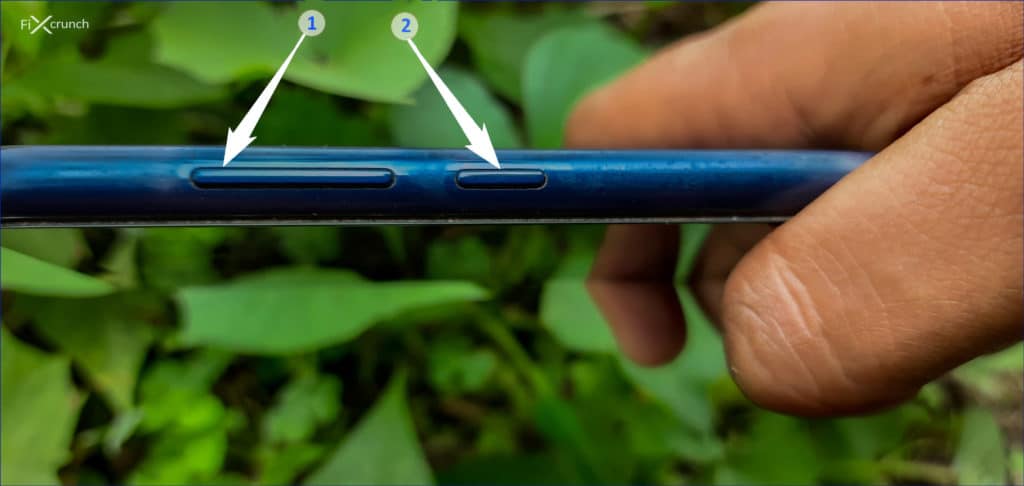
- Step 5: Use the “Volume Up” and “Volume Down” keys to navigate to the “Recovery Mode” option and select it by pressing the “Power” button.
- Step 6: Once you get a new menu, tap on the “Wipe cache partition” option from the list.
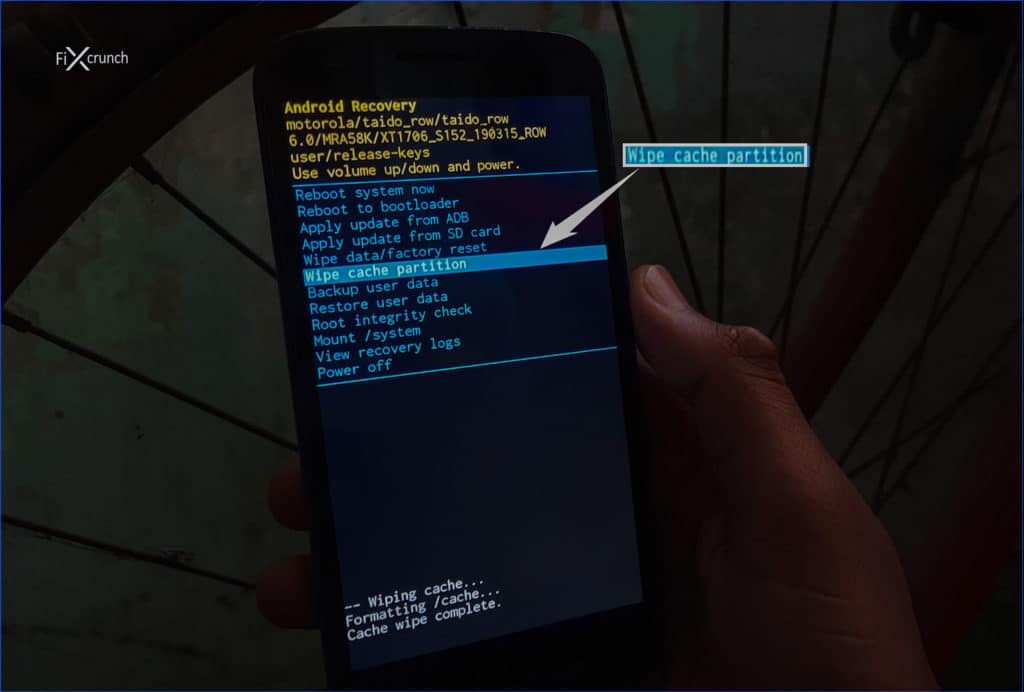
- Step 7: After the cache partition is completely deleted, reboot your device, and wait until all the app icons appear on the home screen.
- Step 8: Now, launch your default messaging app and check whether you are still getting the same issue or not.
Deleting the cache partition once or twice will not harm the overall experience of an android. However, you shouldn’t delete the cache partition too often. Otherwise, it can force you to log out from all the installed apps on your device. Besides, you may also lose some of your valuable files from your smartphone.
14. Factory Reset Your Smartphone
If none of the advanced methods we have listed above can effectively resolve the unresponsive messaging app on your smartphone, the problem may lie deep within the system files or core setup files. And in that case, there is no other option left than resetting the smartphone entirely.
- Step 1: Close all the running applications and come to your “Home Screen,” where all the app icons are displayed.
- Step 2: Tap on the “Settings” app (Gear icon) to launch it on your smartphone.
- Step 3: Once you get a new page, scroll down, and tap on the “System” option.

- Step 4: Now, select the “Reset” option from the new menu to start the procedure.
- Step 5: Once you get a new popup message, tap on the “Erase all data” option.
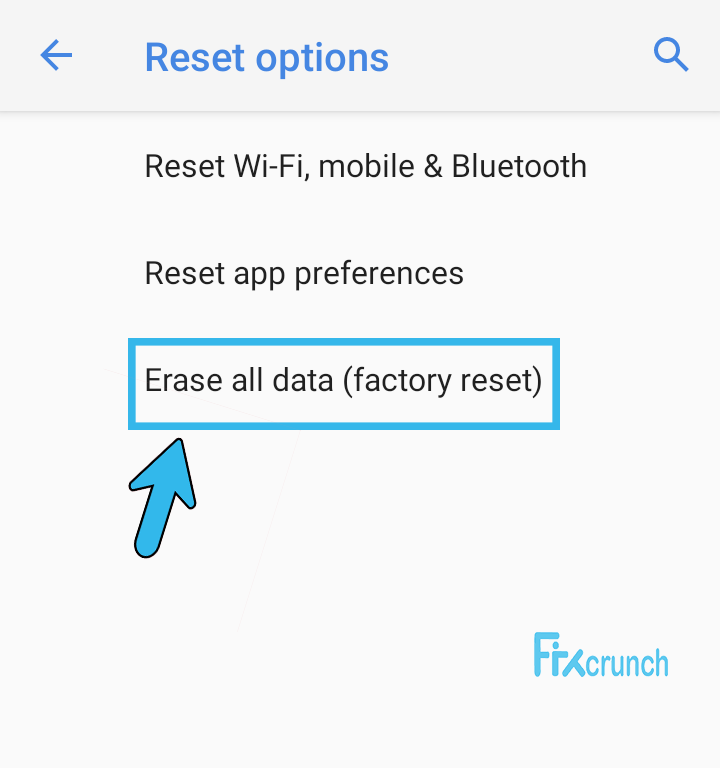
- Step 6: Scroll down to the bottom of the new page, and tap on the “Reset Phone” option.
- Step 7: Now, tap on the “Delete all data” option to factory reset your smartphone.
The steps can be a little different if you are using a Samsung device. It mainly happens as Samsung uses a different UI, although it is based on stock android. However, you can easily factory reset your Samsung devices by following the steps mentioned below.
- Step 1: Navigate to the “Home Screen” on your Samsung device and tap on the “Settings” app (Gear icon) to launch it.
- Step 2: Once you get a new page, tap on the “General Management” option.
- Step 3: Now, navigate to the bottom of the new page and tap on the “Reset” button.
- Step 4: Tap on the “Factory Reset” button to start the procedure.
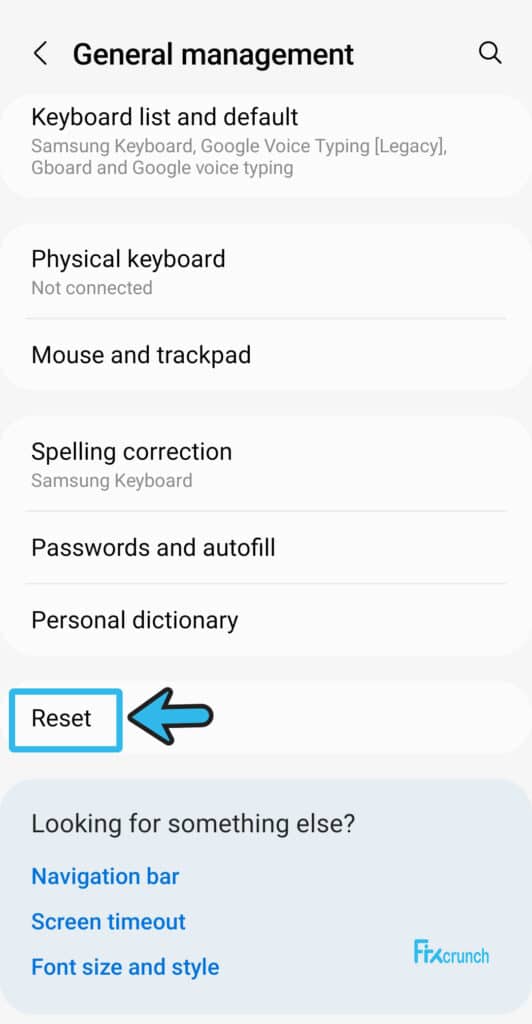
- Step 5: Now, tap on the “Reset” button at the bottom of the page.
You may need to remember your Samsung login credentials, such as the ID and password before you proceed with factory resetting your device. However, if you have forgotten the login credentials, you can easily retrieve them through the “Forget my password” option.
FAQs
Q. Why does my phone keep saying, “Unfortunately, Messenger has stopped?”
Your messaging app constantly stores data and cache files to ensure a smooth user experience on your Android device. And if there are too many cache accumulations on your smartphone, you may get this error frequently. It may even trigger if you have an obsolete messaging app installed on your device.
Q. Why is the text messaging not working?
There can be various reasons for which the messaging app may not work. If there is cache congestion or if you are using an outdated messaging app, this error can frequently trigger. Besides, this issue can also appear if there is any issue with your network parameters.
Q. How do I fix the “unfortunately messaging has stopped” error?
You should start by updating your Android OS and the default messaging app first. Besides, you must clear all the cache files from your device and also reset the app preference. If none of the methods are working, you may also need to factory reset your smartphone.
Q. How do you reset the messaging app on Android?
You should start by launching the “Settings” app on your android device. And then, tap on the “Apps and Notifications” option from the list and further tap on the “See All Apps” option. After getting the full list, scroll down to the bottom of the page and tap on the “Reset” button.
Conclusion
Before trying any of the advanced fixes, you must try all the generic fixes listed above, as they don’t need any expert supervision. However, if you have to resort to advanced fixes, it is better to take a backup of your stored files and data from your smartphone.
So, these are all the possible solutions we have if you are getting the “unfortunately, messaging has stopped” error message on your smartphone. But, if you think we have missed any effective methods, or if you know about any other ways to fix it, don’t forget to drop your suggestions and feedback in the comment box.
