
The taskbar is one of the most effective elements in Windows OS, where you not only find the date, time, or quick launches but can also navigate to the opened apps directly. However, things start to act buggy when the taskbar starts showing in fullscreen, isn’t it?
The taskbar fullscreen error can be solved by enabling the taskbar lock or enabling the autohide feature. You must temporarily disable Windows Antivirus to eliminate interference. Besides, you must also update your Windows OS. You can also disable the Windows Visual effects to resolve it.
However, there are many ways to resolve this issue in no time. But, before we dive deep into the solutions to fix this issue, let’s understand what taskbar actually is and what are the primary reasons behind this error.
What Are The Primary Reasons Behind The “Taskbar Showing In Fullscreen” Error?
Windows taskbar should hide in any program when you run it in full-screen mode. Otherwise, it will create a visual obstruction that will disturb your overall feel and experience. However, the “taskbar showing in fullscreen” error is pretty common these days. And this issue is mainly triggered for seven main reasons.
- You have enabled the “Taskbar lock” option from the settings that override the hiding feature.
- Any of the startup applications or background processes are interfering with the Windows taskbar.
- Windows Defender or any other third-party antivirus is overriding the taskbar settings.
- You are using an obsolete version of Windows OS that needs an urgent update.
- You have accidentally disabled the auto-hide feature of the taskbar from system settings.
- Windows Visual effects are too heavy for your computer and obstruct the proper display of the taskbar.
- The Windows Explorer process is corrupted or buggy, possibly due to a corrupt root file.
Besides these seven primary reasons, the taskbar error can also pop up whenever you open a web browser on your system. It mainly happens due to high DPI override and hardware acceleration of your browsers. However, these issues can be effectively solved with a few simple steps.
7+ Easy Methods To Fix The “Taskbar Showing In Fullscreen” Error
Before you try anything advanced that needs pro-level tweaks on your system, you should try the basic and generic steps to resolve the “taskbar showing in fullscreen” error on Windows devices. And in almost 90% of cases, these generic fixes alone are sufficient to resolve this bug in no time.
1. Reboot Your Device Into Safe Mode
At any point in time, there are several startup applications and background processes running in the background of Windows OS. And any among those can directly interfere with other Windows processes.
So, it is better to give your system a restart in safe mode to eliminate any interference issues from background processes.
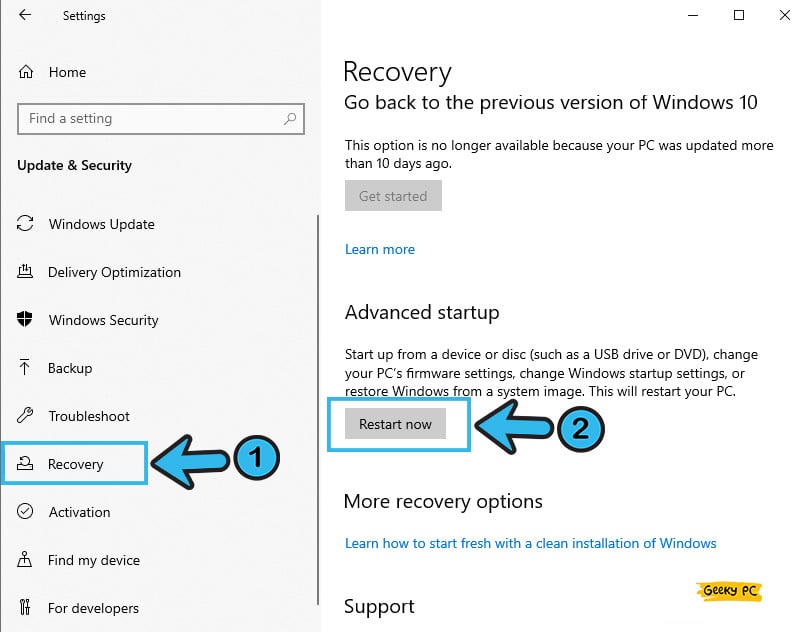
- Step 1: To launch the “Settings” app, press the “Windows Key + I” buttons together.
- Step 2: After the new window appears, scroll down and select the “Update & Security” option.

- Step 3: Navigate to the left panel once you get a new window and click on the “Recovery” option.
- Step 4: Now, navigate to the right panel, proceed with the “Advanced Startup” option, and click on the “Restart” button.
- Step 5: Once your Windows gets automatically restarted, select the “Safe Mode” option from the welcome screen.
- Step 6: Let your Windows OS load completely and check whether you are still getting the taskbar error.
Besides the taskbar, many of our users have also reported getting an unresponsive start button due to the interference issues of startup applications.
If you are also encountering similar problems on your system, follow our step-by-step guide to fix the “Start button is not working” on Windows devices.
2. Disable The Taskbar Lock
The taskbar can be locked in a particular position, as the latest Windows OS permits this function to tweak the visual appearance of the taskbar.
So, to disable the toolbar showing in fullscreen in Windows 10, you need to disable the taskbar lock manually. And disabling it will force the taskbar to work normally.
- Step 1: Navigate to the taskbar (if it is displaying at the bottom of your home screen).
- Step 2: Right-click anywhere on the taskbar to fetch the contextual menu.
- Step 3: Now, select the “Lock the taskbar” option from the menu.
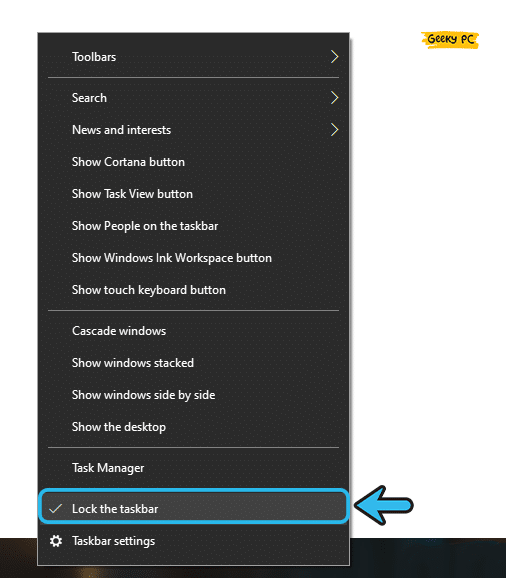
- Step 4: Check whether it is showing a tick mark beside the “Lock the taskbar” button.
- Step 5: Reboot your system with the locked taskbar and check whether you are still getting the same issue on your device.
The taskbar lock operation restricts the bar from hiding, moving, or resizing even if you unintentionally tweak it. So, if it is not necessary to hide the taskbar for a few applications, you better keep your taskbar locked all the time.
You should also check while opening a media player if the taskbar is still showing or not.
3. Change The Position Of The Taskbar
Even if you have enabled the “Lock the taskbar” option to tweak the settings, you may still get the error. However, you can change the position of the taskbar manually, such as from right to left or from bottom to up, to give the taskbar a positional tweak.
And in many cases, this tweak can effectively resolve the issue.
- Step 1: Navigate to the taskbar located at the bottom of your screen.
- Step 2: Now right-click on the taskbar to fetch the contextual menu that displays additional options.

- Step 3: Select the “Taskbar Settings” option from the contextual menu.
- Step 4: Once the new window appears, navigate to the right panel.
- Step 5: Scroll down and locate the “Taskbar location on screen” option.
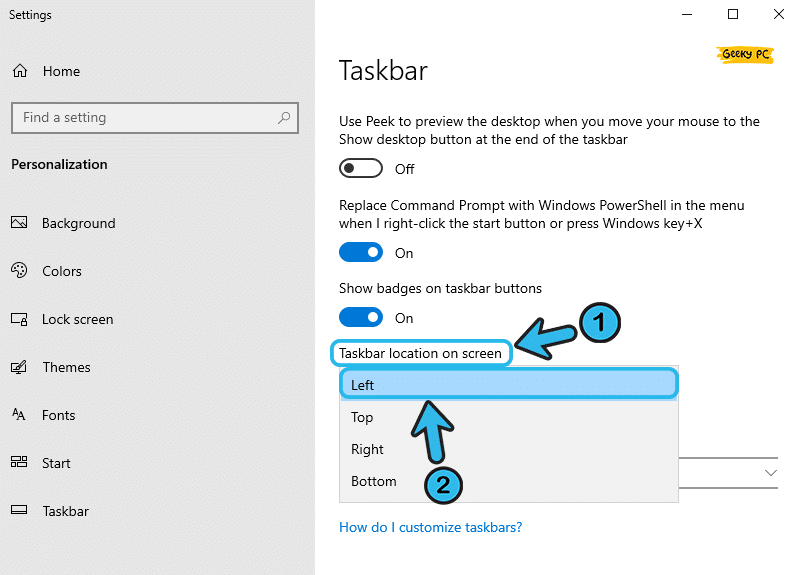
- Step 6: Now, click on the drop-down menu under the “Taskbar location on screen” option and select either “Right” or “Left,” depending upon your preference.
- Step 7: Reboot your system with the positional change and check if the issue still triggers on your system.
Once you have changed the taskbar position from the bottom to the left side or right side of the window, you need to change the position again once the issue is sorted.
Otherwise, it will be pretty problematic and unconventional to use the Windows taskbar in those positions.
4. Turn On The Auto-Hide Feature
Auto-hide feature for the taskbar now comes preinstalled on the latest variants of Windows OS, such as Windows 10 and 11. And this feature enables the taskbar to hide when not in operation to ensure a clean and aesthetic look of the Windows OS.
However, you may need to manually turn it on from the system settings.
- Step 1: Press the “Windows Key + I” buttons together to launch the “Settings” app on your device.
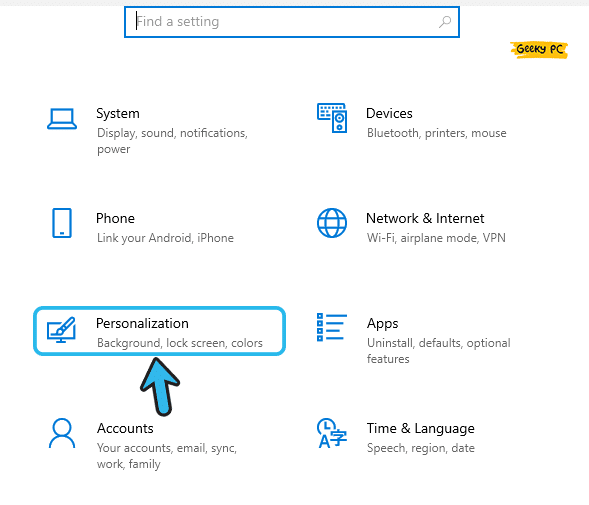
- Step 2: Once the new window popup, scroll down and click on the “Personalization” tab.
- Step 3: After you get a new menu, navigate to the left panel and select the “Taskbar” option.
- Step 4: Now locate and toggle the switch beside the “Automatically hide the taskbar in desktop mode” option.
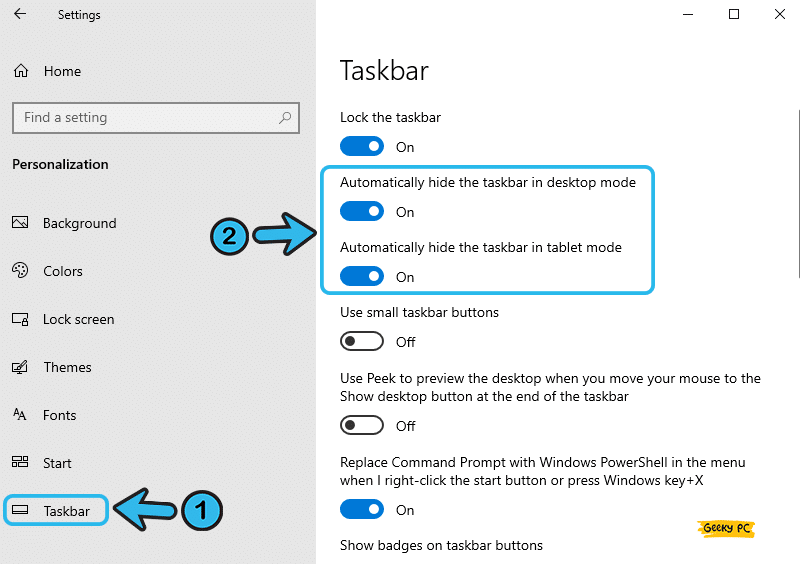
- Step 5: Also locate and toggle the switch beside the “Automatically hide the taskbar in tablet mode” option.
- Step 6: Save the settings and exit from the “Personalization” window.
- Step 7: Now, reboot your system and check whether the taskbar is still showing on full screen.
You can alternatively also use the “Use small taskbar button” option from the “Personalization” window of the “Settings” app if you are using the latest generation of Windows OS.
And if you do that, your taskbar will appear as a small bar in the position you select from the system settings.
5. Tweak Your Taskbar Settings
If disabling the “Automatically hide” feature in both the “desktop” and “tablet” modes can’t resolve the taskbar error in Windows OS, you may need additional tweaks in the system settings. However, you can easily do it in a few simple steps with the “Settings” app on your device.
- Step 1: Press the “Windows Key + I” buttons together to initiate the “Settings” app on your Windows device.
- Step 2: After the new window appears, navigate to the “Personalization” tab and click on it.
- Step 3: Once you get the new menu option, navigate to the left panel, and click on the “Taskbar” option.
- Step 4: Now, navigate to the right panel, and locate the “Use Peek to preview the desktop when you move your mouse to the Show desktop button at the end of the taskbar” option.
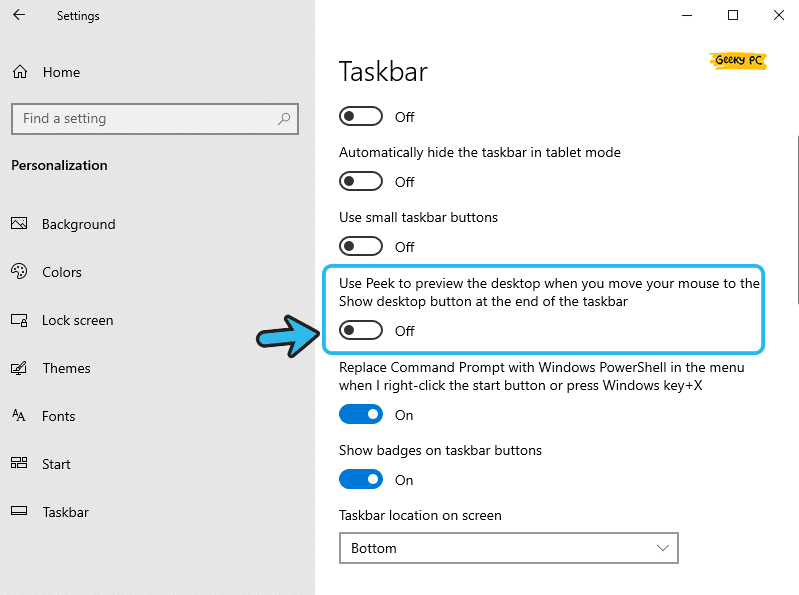
- Step 5: Toggle the switch under this option to switch it off.
- Step 6: Scroll down again and locate the “Combine taskbar button” option.
- Step 7: Click on the drop-down menu and select the “Always, hide labels” option from the list.
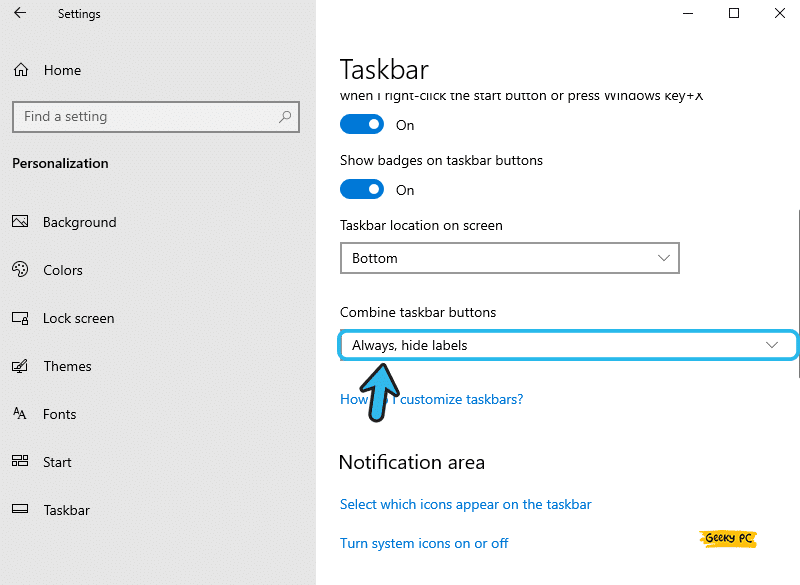
- Step 8: Save the settings and exit the “Personalization” app.
- Step 9: Reboot your device and check whether you are still getting the Fullscreen issue on your taskbar.
A few of our users have started getting a DISM error, especially the error code 87, once they have tweaked their taskbar settings.
If you are also encountering a similar situation on your system after trying this step, follow our comprehensive guide to fixing the DISM error 87 in Windows devices.
6. Turn Off The Windows Visual effects
Many people don’t even know that Windows now allows you to revamp all the visual effects completely to suit your mood and preference.
However, these visual effects often take too many system resources. And in many cases, you may need to disable it manually to resolve the taskbar issue.
- Step 1: Press the “Windows Key + R” buttons together to launch the “Run” dialog box on your system.
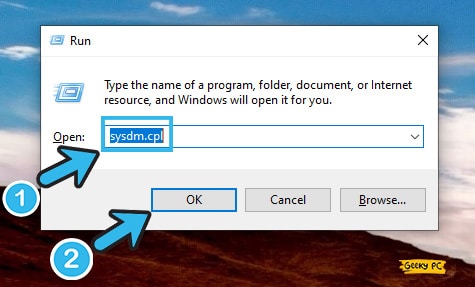
- Step 2: Type “Sysdm.cpl” in the designated box and click on the “OK” button.
- Step 3: Once the “System Properties” window appears, navigate to the header menu.
- Step 4: Click on the “Advanced” menu from the header selection option.
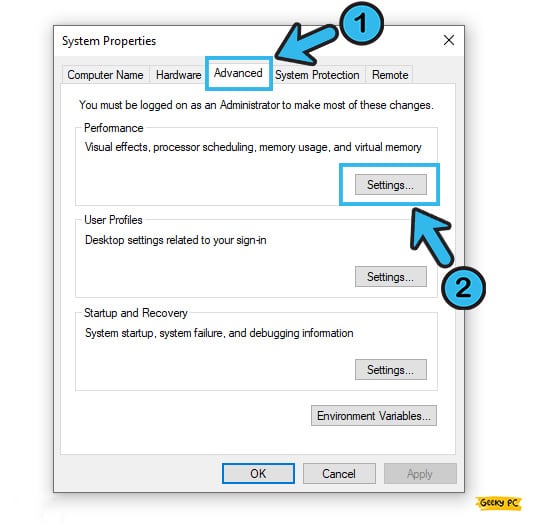
- Step 5: Now, locate the “Performance” tab and click on the “Settings” button inside it.
- Step 6: Once you get a new menu, click on the “Adjust for best performance” option under the “Select the settings you want to use for the appearance and performance of Windows on this computer” tab.
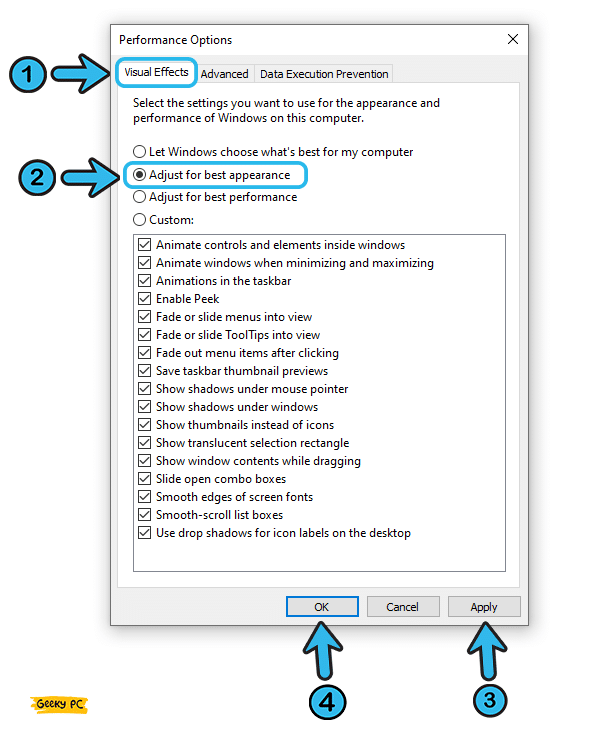
- Step 7: Now, click on “Apply” to save the settings and then “OK” to exit from the app.
- Step 8: Reboot your system with the new performance settings and check if you are still getting the same issue.
If you are using Windows 11 on your device, you can simply navigate to the “Performance” app by clicking the “Windows Key + I” buttons first.
And then, you need to select the “System” tile and then the “About” tab, and finally, the “Related Settings” option. If you can’t find it there, you can select the “Advanced system settings” option from the menu.
7. Restart The Windows Explorer Process
The Windows Explorer itself can be corrupted or can act buggy at times. And for that, various taskbar issues can trigger if it directly interferes with Windows Explorer.
So, you may need to manually restart the Windows Explorer process to fix the windows taskbar showing in fullscreen error.
- Step 1: Press the “Ctrl + Shift Key + Escape” altogether to launch the “Task Manager” app on your device.
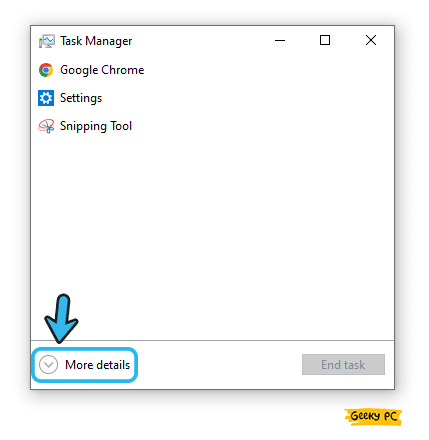
- Step 2: Once the app launches, click on the “More details” option located at the bottom of the window.
- Step 3: After the detailed view appears, you’ll see all the running processes on your system.
- Step 4: Now, navigate to “Windows Explorer” from the list and right-click on it to fetch the contextual menu.
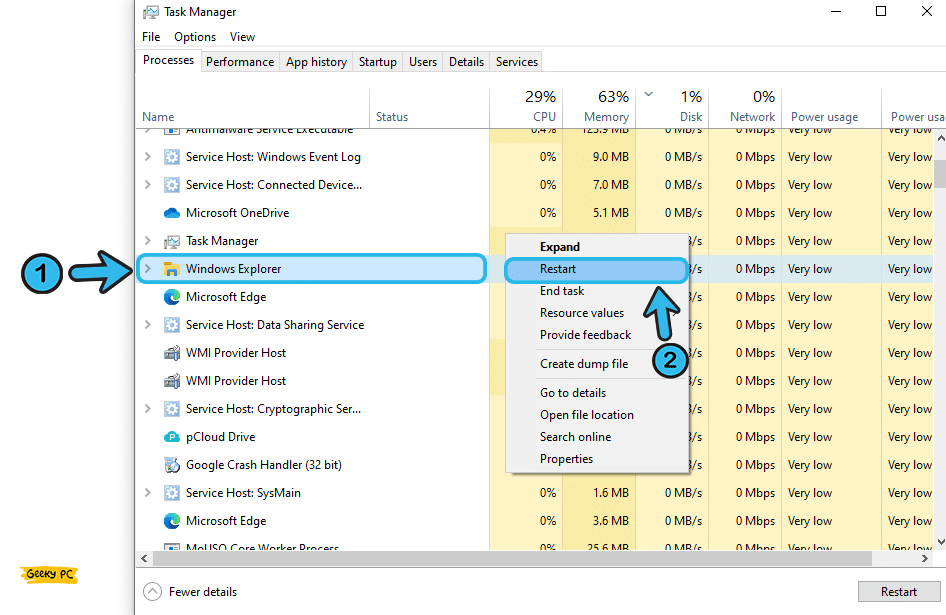
- Step 5: Select the “Restart” option from the contextual menu.
- Step 6: The “Windows Explorer” program will automatically end and will reappear after a few seconds.
- Step 7: Now, check the taskbar if it is still showing on full screen or not.
You can also alternatively just right-click anywhere on the taskbar to fetch the contextual menu and then select the “Task Manager” app to launch it.
However, it is not recommended to restart “Windows Explorer” too frequently. But yes, you can just give your Windows a clean reboot to execute the process.
7+ Advanced Fixes For The Taskbar Bug In Windows OS
If none of the generic methods are enough to fix the issue and your taskbar is still showing in fullscreen, the problem is deep down in your system.
And in that case, resorting to the advanced fixes is the only option left, which will sort it out in no time.
8. Update Your Windows OS
Not just various kinds of taskbar-related issues, several other problems can frequently appear on your system if you are using an outdated version of Windows OS that needs an urgent update.
So, to fix these minor glitches on your system, you should always keep your Windows updated.
- Step 1: Click on the “Magnifying Glass” icon on the bottom-left corner of your Windows taskbar.
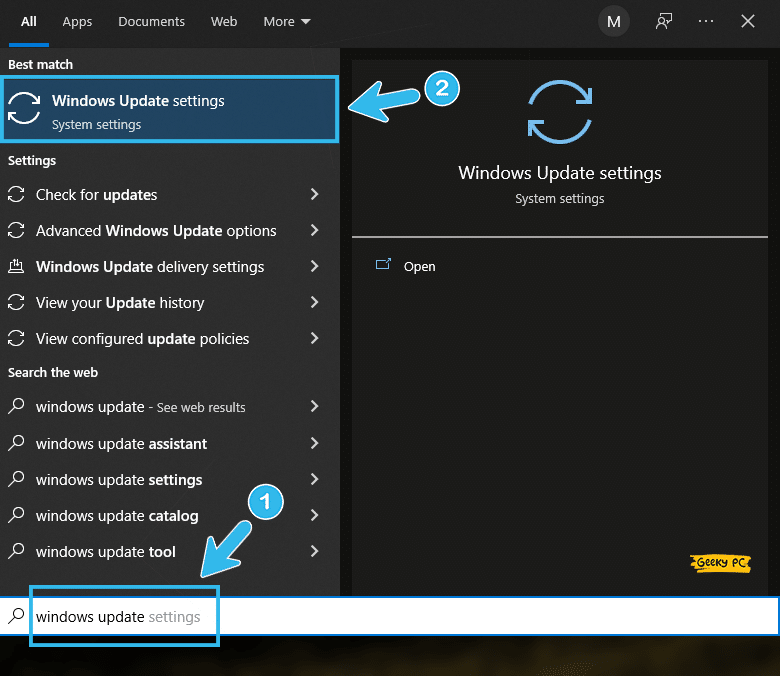
- Step 2: Type “Windows Update” in the designated search field and click on the very first option that appears on the result page.
- Step 3: Once the “Update” app launches, navigate to the left panel, locate the “Windows Update” button, and click on it.
- Step 4: Now, navigate to the right panel, and select the “Check for updates” option.
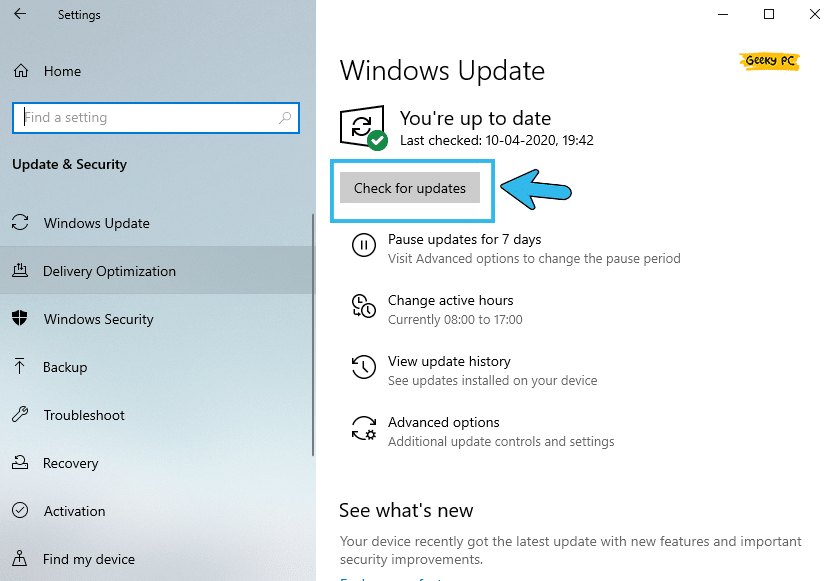
- Step 5: Let Windows automatically find the latest update from the Microsoft server and install it on your system.
- Step 6: Once your Windows OS is fully updated, reboot your system.
A few of our users have reported getting a Black Screen once they have rolled to the newest update of Windows OS, especially if they are using a cracked version. If you are also facing similar situations on your system, follow our comprehensive guide to fixing the Black Screen With Cursor Error in Windows 10 devices.
9. Repair The Faulty App
It may sometimes happen that the taskbar is not hiding in full screen for a particular app once you open it on your device, not throughout all the installed applications.
In that case, you need to repair that particular faulty app to resolve the taskbar issues in no time. However, you must have an active internet connection to execute this step.
- Step 1: Press the “Windows Key + R” buttons together to launch the “Run” dialog box on your device.
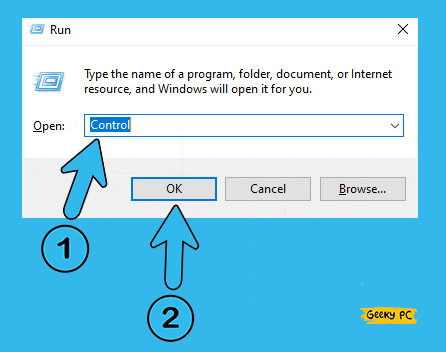
- Step 2: Type “Control” in the Run field and press the “OK” button to open the app with administrative privilege.
- Step 3: Once the “Control Panel” app launches, navigate to the top-right corner and select the “Category” view under the “View by:” option.
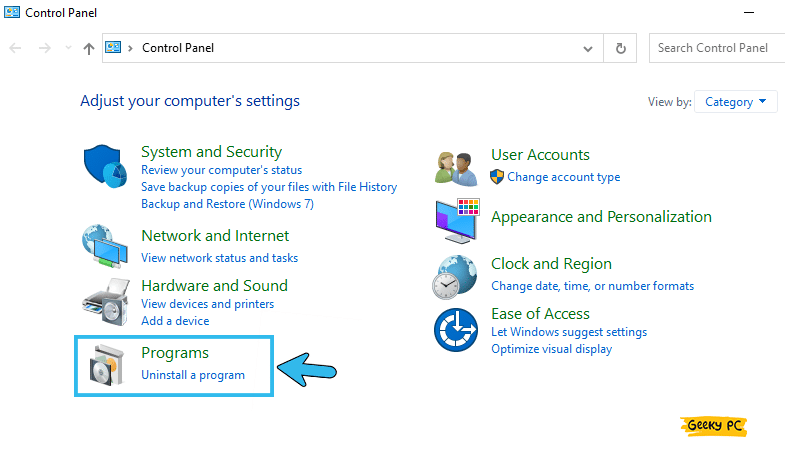
- Step 4: Now, scroll down the page and click on the “Programs” tab.
- Step 5: After the “Programs” window appears, navigate to the right panel and click on the “Programs and Features” option.
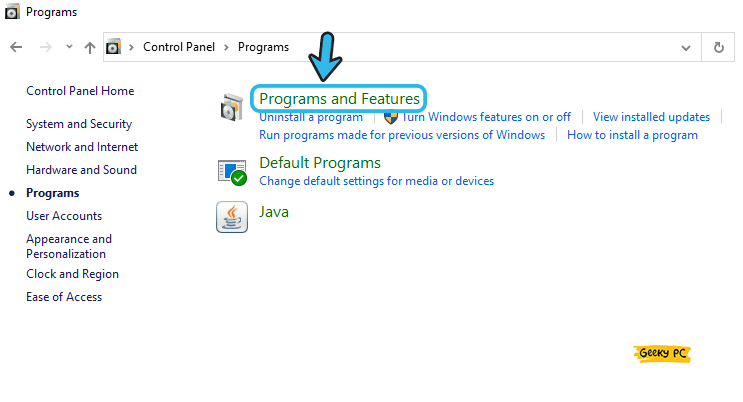
- Step 6: Once you get a list of all the installed applications on your device, select the problematic app.
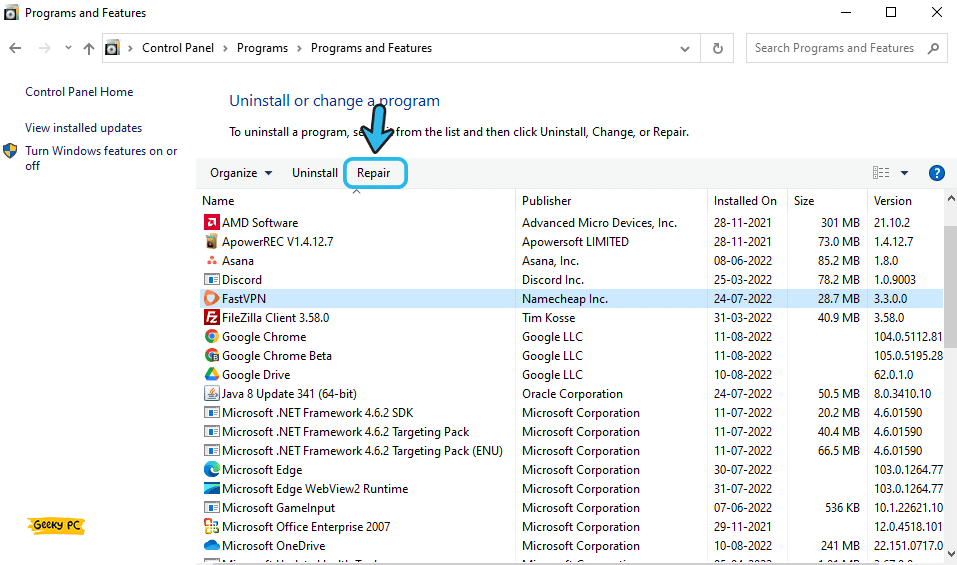
- Step 7: Now, select the “Repair” option from the header menu.
- Step 8: Follow the on-screen instruction and wait until Windows completely fixes the faulty app.
- Step 9: Once it is successfully repaired, restart your system.
Many of our users have started getting a Windows error code 0xe0434352 while using an Nvidia graphics card once they have restarted some particular apps on their systems.
If you are also encountering it on your system, follow our step-by-step guide to resolve the Error Code 0xe0434352 on Windows Devices.
10. Tweak With PowerShell
A new programming language called “PowerShell” was first introduced way back in 2006 from the house of Microsoft to empower the task automation industry.
This program mainly culminates and executes the command-line shells and various other related scripts to streamline all the operations in a Windows device.
- Step 1: To launch the “Run” dialog box on your device, press the “Windows Key + R” buttons together.
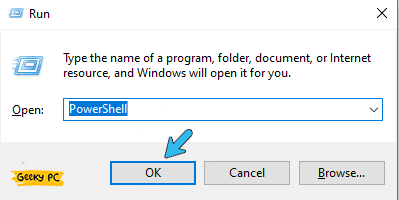
- Step 2: Type “PowerShell” in the designated field and press the “Ctrl + Shift Key + Enter” to launch the app with administrative privilege.
- Step 3: Once you get the “Do you want to allow this app to make changes on your device?” popup message, select the “Yes” button.
- Step 4: Once the blue PowerShell window launches, type the “taskkill /f /im explorer.exe && start explorer.exe” command and hit the “Enter” button.
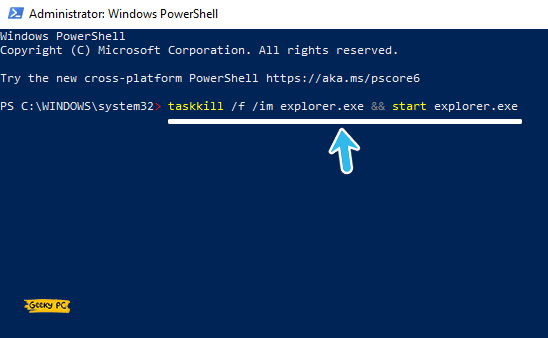
- Step 5: Once you get a popup message denoting the process is completed, exit from the “PowerShell” app.
- Step 6: Now, restart your device and check whether you are still getting the taskbar error.
PowerShell is an advanced programming tool that you shouldn’t use without having optimum computing proficiency. So, it is better to try this step only under strict supervision. Besides, you should also carefully enter the command lines, or various issues will trigger on your device in a cycle.
11. Disable Windows Defender
Windows Defender is one of the most robust security software that now comes preinstalled with the latest generation of Windows OS, especially Windows 10 and 11.
However, this antivirus can act buggy at times and can also interfere with other Microsoft processes. So, you should check the error after disabling it.
- Step 1: Press the “Windows Key + I” buttons together to launch the “Settings” app on your system.
- Step 2: Once the new window appears, scroll down at the bottom, and click on the “Update & Security” option.
- Step 3: Once you get a new window, navigate to the left panel, and select the “Windows Security” option.
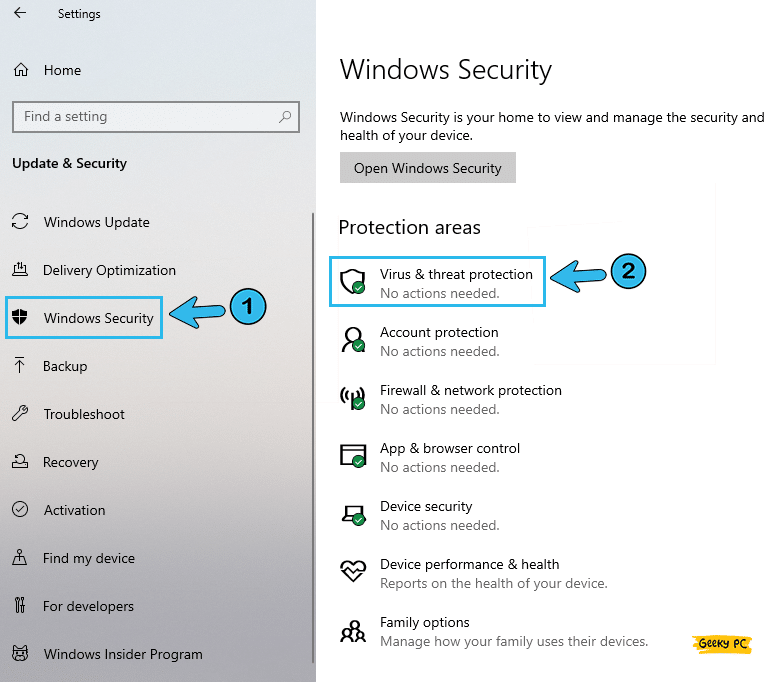
- Step 4: Now, click on the “Virus & threat protection” option located on the right panel.
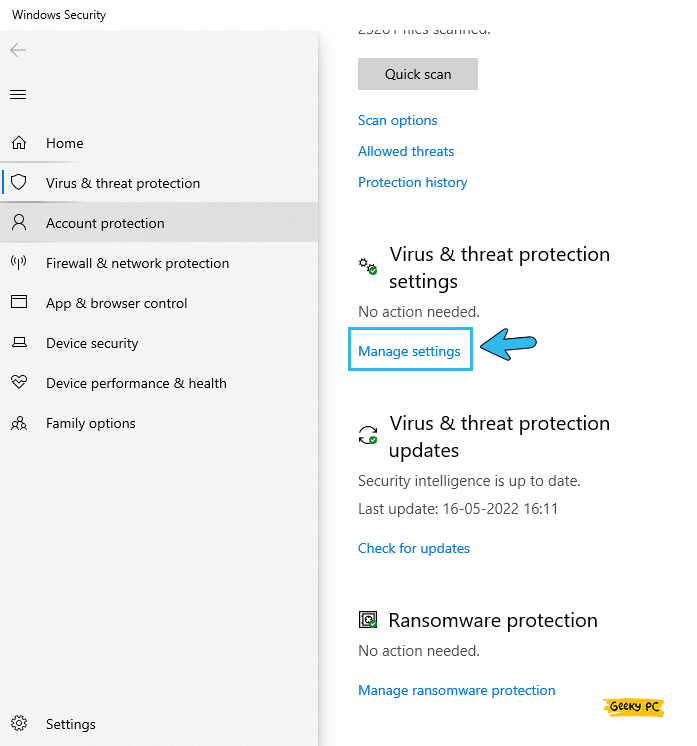
- Step 5: Once a new window popup, click on the “Virus & threat protection settings” option.

- Step 6: Locate and toggle the switch beside the “Real-time protection” option to disable it.
- Step 7: Now, click on the “OK” button to save the settings and then exit the app.
Many of our existing users have started getting a strange group policy error once they have disabled the Windows Defender antivirus on their systems, especially if they are using it under a network administrator.
If you are also facing the same, follow our step-by-step guide to resolve the “This program is blocked by group policy” error in Windows devices.
12. Override High DPI behavior (Google Chrome)
At times, the taskbar won’t go away in fullscreen while using some specific web browsers, such as Google Chrome. It mainly happens when the high DPI settings conflict with the Windows visual settings.
And in that case, you can manually override the high DPI settings from Chrome itself.
- Step 1: Locate the “Google Chrome” icon on your Windows home screen and right-click on it to fetch the contextual menu.
- Step 2: Select the “Properties” option from the contextual menu to open it.
- Step 3: Once the new window appears, select the “Compatibility” tab from the header selection menu.
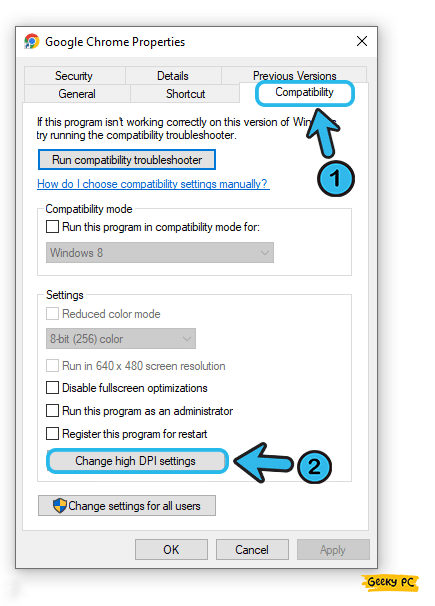
- Step 4: Now, click on the “Change high DPI settings” button at the bottom of the window.
- Step 5: After a new “Google Chrome Properties” window launches, tick the box beside the “Override high-DPI scaling behavior” option.
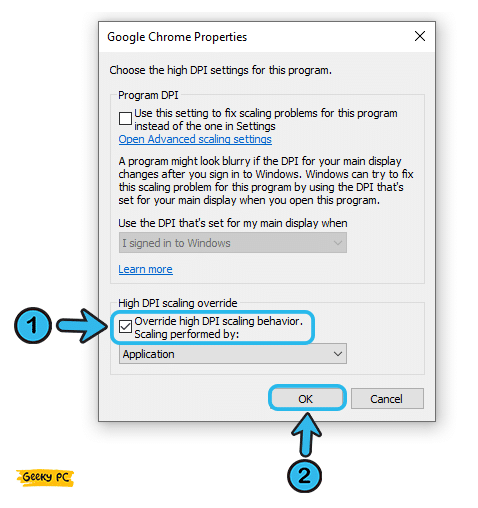
- Step 6: Now, click “OK” to save the settings and exit the app.
- Step 7: Relaunch “Google Chrome” with the new settings and check if you still get the taskbar issue.
There are three ways to override the high DPI behavior, which you can select from the “Google Chrome properties” window itself.
You’ll get a drop-down menu under the “Override high-DPI scaling behavior” with three options to choose from. And by default, it will be “Application,” which will override it.
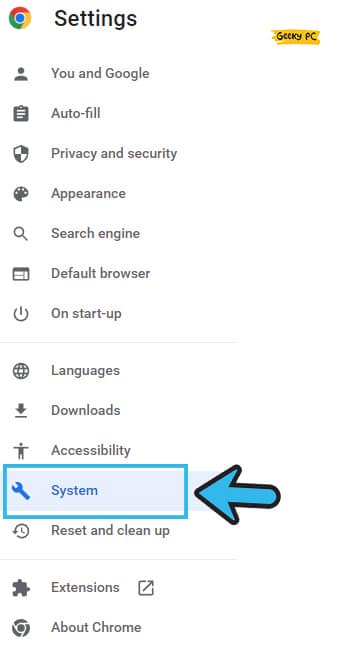
13. Disable Hardware Acceleration In Your Browser
Not just the high DPI behavior, the hardware acceleration settings on your web browsers can also cause interference issues with Windows background processes.
And to eliminate all the interference, you need to manually disable the hardware acceleration option from your browsers.
For Google Chrome users:
- Step 1: Open the Google Chrome browser on your device and click on the “Menu” button (three vertical dots) located at the top-right corner of the page.
- Step 2: After the full “Menu” appears, click on the “Settings” button.
- Step 3: Once you get a new page, navigate to the left panel, and select the “Advanced” option from the list.
- Step 4: Once it is expanded, scroll down, and select the “System” option.
- Step 5: Now, locate and toggle the switch beside the “Use hardware acceleration when available” option to disable it.
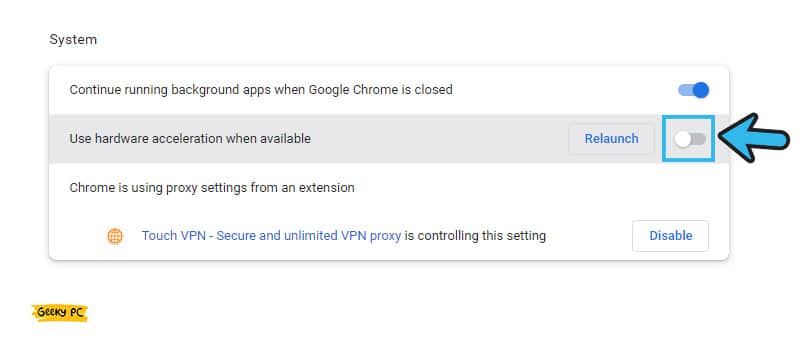
- Step 6: Cave the settings and restart Google Chrome to check whether the issue is resolved or not.
For Mozilla Firefox users:
- Step 1: Open the Mozilla Firefox browser on your device and click on the “Menu” button located at the top-right corner of the page.
- Step 2: Select the “Options” menu from the list and further click on the “General” tab.
- Step 3: Now, scroll down and uncheck the box beside the “Use recommended performance settings” option.
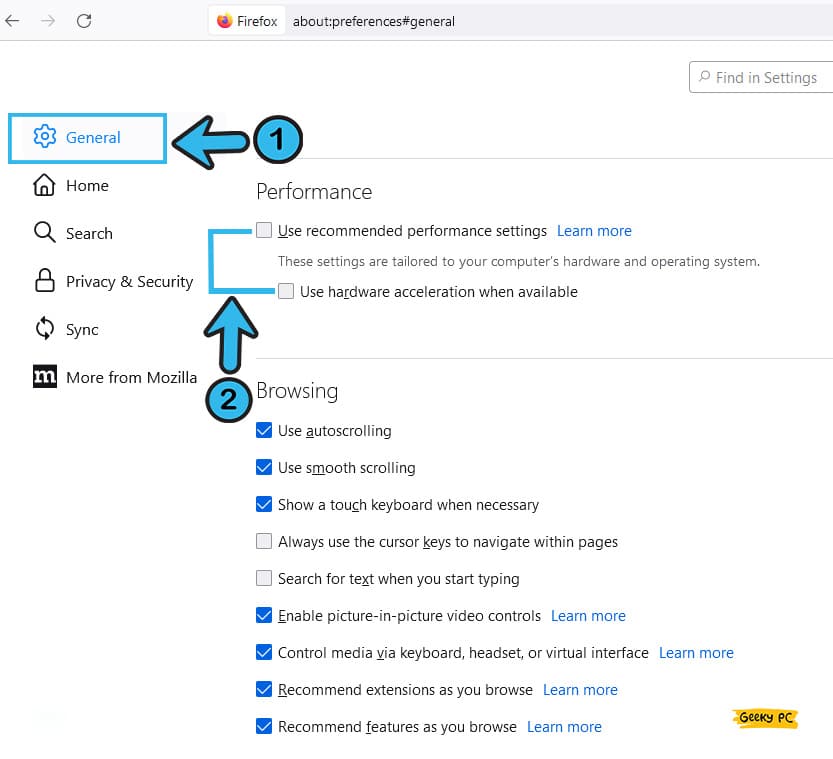
- Step 4: Scroll down one more time and uncheck the box beside the “Use hardware acceleration when available” option.
- Step 5: Restart the Firefox browser and check whether you are still getting the same issue on your device.
A few of our users have started getting a screen error on Twitch once they have forcefully disabled the hardware acceleration.
And, if you are also facing similar issues on your browser, follow our detailed guide to fix Twitch black screen error on Windows devices.
14. Reset Windows System
If, even after trying all the methods we have mentioned above, the taskbar is still showing in fullscreen, the problem may be way more deeply rooted than you can assume.
So, you may need to reset your Windows system completely to resolve this error from its root.
- Step 1: Press the “Windows Key + I” buttons together to initiate the “Settings” app on your system.
- Step 2: Once the app launches, scroll down and click on the “Update & Security” button.
- Step 3: After you get a new window, navigate to the left panel and click on the “Recovery” option.
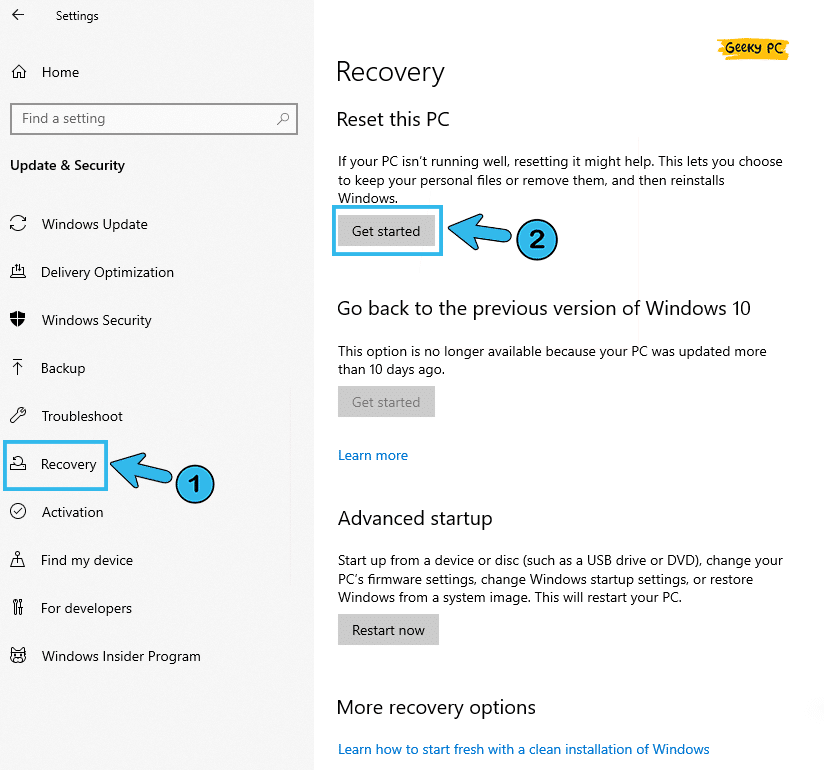
- Step 4: Now, navigate to the right panel, locate the “Reset this PC” header, and click on the “Get Started” button from the list.
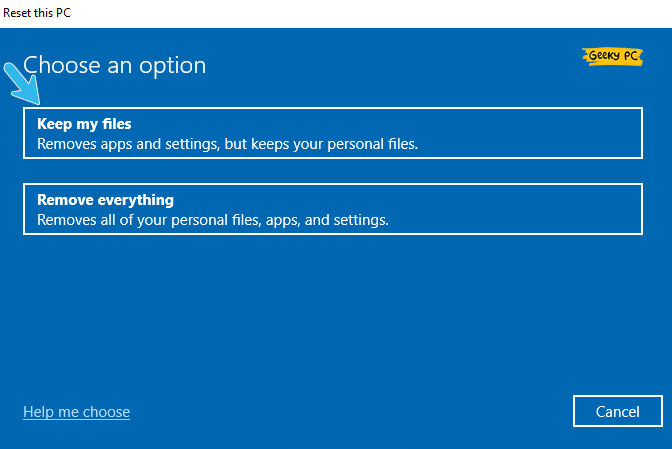
- Step 5: Once you get a new prompt, click on the “Keep my files” option and further click on the “Local reinstall” button.
- Step 6: Now, click on the “Next” button and then on the “Reset” button to initiate the process.
- Step 7: Once the Windows is completely reset, reboot your system and check whether you are still getting the same issue.
Many of our existing users have started getting an undefined network error with n yellow triangle once they have reset their Windows OS, especially while using a static IP connection.
If you are also facing the same, follow our step-by-step guide to fix the Ethernet Not Working in Windows devices.
What Is The Taskbar In Windows OS?
The taskbar is actually a Windows OS element that usually displays at the bottom of your screen. It mainly acts as a quick launch bar for all the installed apps, along with the start menu. Besides, it also displays the currently opened programs on your system.
However, the taskbar is actually divided into two main segments. The left one is mainly the app and the quick launch area, while the right one is dedicated to notifications. On the right side of the taskbar, you’ll see the date and time of your system as well.
The taskbar was first introduced in Windows 95. And since then, it has remained an integral part of the Windows OS. Microsoft first introduced the quick launch icons on the taskbar from Windows Vista OS. And Windows 7 and Windows 10 have quite the same look. However, Windows 11 has a taskbar that has an entirely different look and feels.
Conclusion
We are pretty sure that you’ll resolve the taskbar issue just by trying the generic methods we have listed above. However, if you really have to try the advanced methods, you should create a system restore point beforehand to roll back to the previous settings if anything goes wrong while tweaking your system settings.
So, these are all the possible solutions we have for the “taskbar showing in fullscreen” error. If you think we have missed any, or if you have any other practical solution, feel free to drop your suggestion and feedback in the comment box. And we will be happy to connect!
FAQs
Q. Why is my toolbar showing in full screen?
You may have disabled the taskbar lock on your system, which is creating this issue. And to enable it again, just right-click on your taskbar to fetch the contextual menu. You need to click on the “Lock the taskbar” option to enable it. But you should check if a tick mark is showing beside the “Lock the taskbar” option on the contextual menu.
Q. How do I unhide the taskbar in full screen?
You can unhide the taskbar simply by pressing the windows key. Besides, you can use either of the “Windows Key + T” or “Windows Key + B” shortcuts to unhide it when in full-screen mode. You can also unhide it by pressing either the “Alt + Tab” buttons together or the “Ctrl + Tab” buttons together.
Q. Why have my taskbar disappeared?
Most probably, you have accidentally dragged the taskbar at the bottom of your Windows home screen. And to restore it, move your mouse pointer to the bottom of your screen (at the border), and when it becomes a double-arrow, just drag it upwards.
Q. How do I make my taskbar visible?
Right-click anywhere on the taskbar to fetch the contextual menu first, and then select the “Taskbar settings” option. Once the new window opens, navigate to the right panel, and toggle the switch beside both the “Automatically hide the taskbar in desktop mode” and “Automatically hide the taskbar in tablet mode” options.