
LAN of Wi-Fi connections are necessary these days, as we can’t operate the computers normally without an internet connection, isn’t it? But things start to give us a headache when we frequently get the “no operation can be performed on local area connection while it has its media disconnected” error on our devices.
The media disconnection error can be solved just by power cycling your modem or router. You can also disable and reenable the network driver. Besides, you need to update your network adapter driver as well. Ensuring the correct TCP/IP parameters will also fix this issue in windows devices.
However, these are not all the possible solutions we have to fix this issue. But, before we dive deep into the solution part, let’s understand the primary reasons behind this media disconnection error to fix it even before it appears.
What Are The Primary Reasons Behind The “No Operation Can Be Performed On Local Area Connection” Error?
In the newer variants of Windows OS, such as Windows 10 or 11, the media disconnection error can frequently appear.
But, before you know how to fix the media state media disconnected error in Windows devices, you should know about the primary reasons behind it to eliminate it from the root. And there are six main reasons that are behind this problem.
- You have accidentally or unintentionally disabled the network adapter on your device.
- The network adapter parameters, such as IP and DNS, are misconfigured or faulty.
- You have entered the wrong TCP/IP parameters on your network adapter, causing interference.
- You have disabled the automatic IP option while connecting to a dynamic network.
- The network sharing option is enabled on your system, and any other device on the same system is causing interference.
- There are bugs or corrupted files in the root installation directory of your network adapter driver.
Besides these six primary reasons, the media disconnection error can also pop up if you are using an outdated network adapter driver or the Windows OS itself. So, you should keep all the available drivers at timely intervals to ensure the optimum performance of your device.
6+ Easy Fixes For The “No Operation Can Be Performed On LAN” Error
Before you try anything fancy to resolve the “no operation can be performed on local area connection while it has its media disconnected” error on your system that needs advanced controls, you must first try the generic fixes. And in almost 90% of cases, these methods are sufficient to fix the issue.
1. Restart Modem Or Router
Not just the no-operation error but any of the network-related issues can trigger if there is a bug in your physical router or modem installed on your system.
It can even happen due to misconfigured settings in the router as well. So, it is better to power cycle your router or modem first before trying anything fancy.
- Step 1: Locate the “Power” button (usually located on the front or the back panel) of your router.
- Step 2: Long-press the button to switch off the router/modem and check whether all the light indicators have gone off.
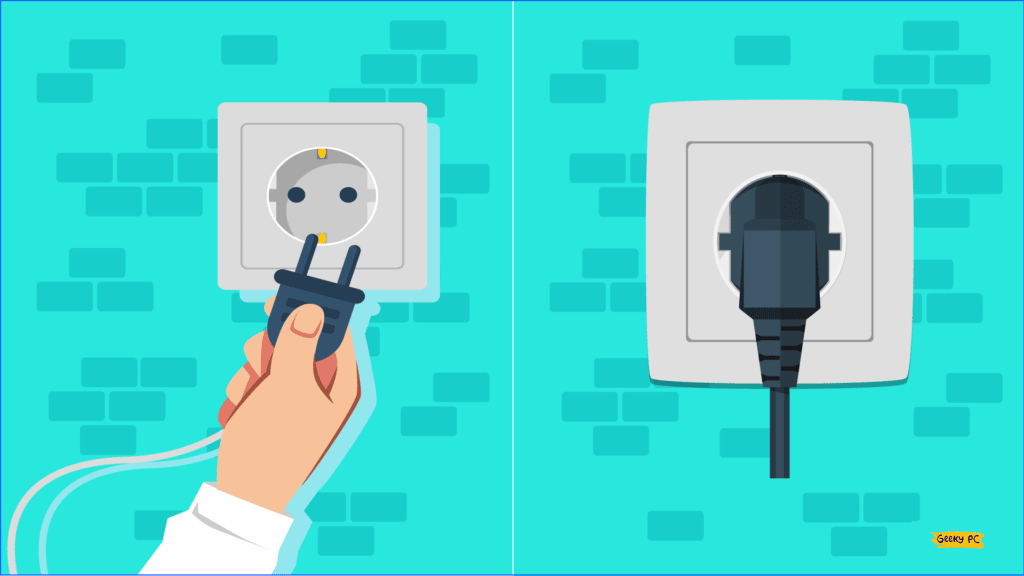
- Step 3: Now unplug the router/modem from the power source and keep it in idle mode for at least two to three minutes.
- Step 4: After the waiting time gets over, plug the socket into the power source.
- Step 5: Press the “Power” button again to switch it on and wait until all the indication lights get stabilized (stop flickering).
- Step 6: Now, try to connect to the LAN once again from your system.
A few of our users have started getting an unknown LAN error with a yellow triangle sign after they have power cycled their routers, especially while using a static IP connection provided by their ISPs.
If you are also encountering similar issues, follow our complete guide to fix the “Wi-Fi Keeps Disconnecting” error on Windows devices.
2. Re-Enable Network Adapter
If the “no operation can be performed on LAN” error frequently pops up on your system, there may be a bug in your network connection itself.
And you should disable and then reenable the network adapter to resolve this issue in no time. And you can do it in a few simple steps.
- Step 1: Locate the “Windows” icon located at the bottom-left corner of the taskbar and right-click on it.
- Step 2: Select the “Device Manager” option from the contextual menu.
- Step 3: After the new window appears, click on the “Network Adapter” option to expand it further.
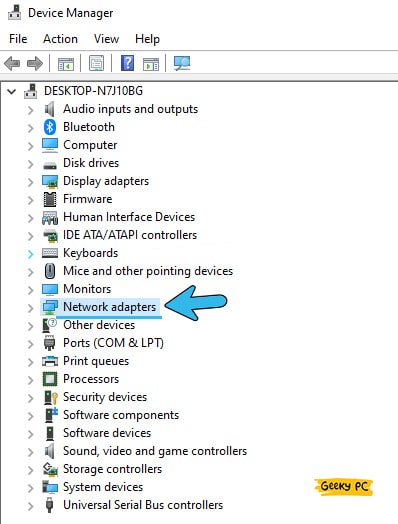
- Step 4: Now right-click on the network adapter option that you are using right now and click on the “Disable” button to switch it off.
- Step 5: Keep it in idle mode for at least 30 seconds and then again right-click on it to fetch the contextual menu.
- Step 6: Select the “Enable device” option from the contextual menu to reenable it.
- Step 7: Check if you are getting the proper network on your system once you have reenabled it.
It may sometimes happen that your network configuration, such as IP, gateway, and DNS, gets lost once you disable and reenable the network adapter. So, you should better note down the configuration and parameters provided by your ISP before trying this step.
If you are also getting the same kind of problem on your system, you can follow our comprehensive guide to fixing the “Failed To Enumerate Objects In The Container” error in Windows devices.
3. Reset Ethernet Adapter
The operation error in the network adapter, especially on your local area network, can be triggered if you have faulty adapter settings on your system.
So, before you try anything advanced to tweak the network settings completely, you should just reset your ethernet adapter first to check whether that can resolve this issue.
- Step 1: Press the “Windows Key + I” buttons together to launch the “Settings” app on your system.
- Step 2: Once the new window appears, click on the “Network & Internet” option.
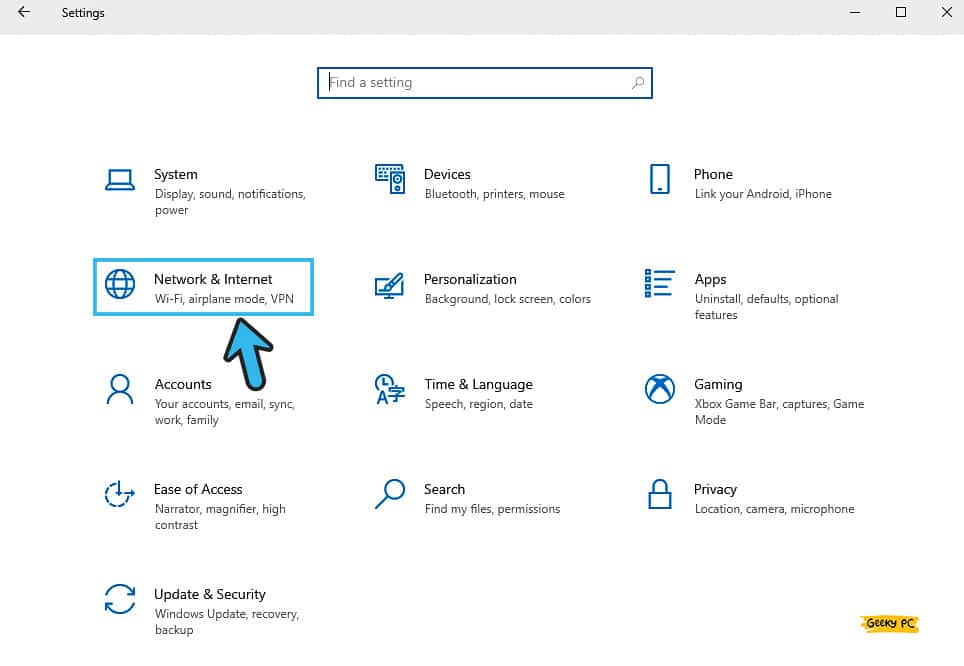
- Step 3: Navigate to the left panel and select the “Status” option to monitor the current network status.
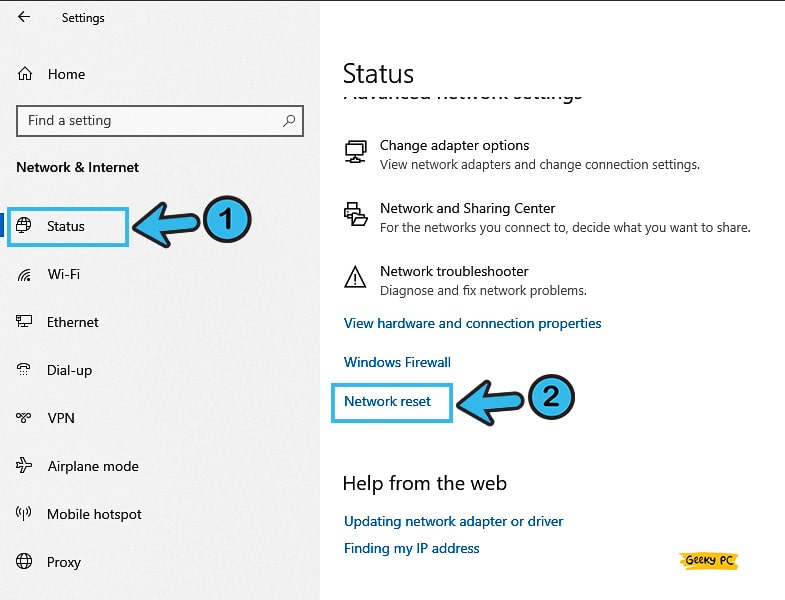
- Step 4: Navigate to the right panel and then click on the “Network reset” option.
- Step 5: Now select the “Reset Now” button from the new prompt menu.
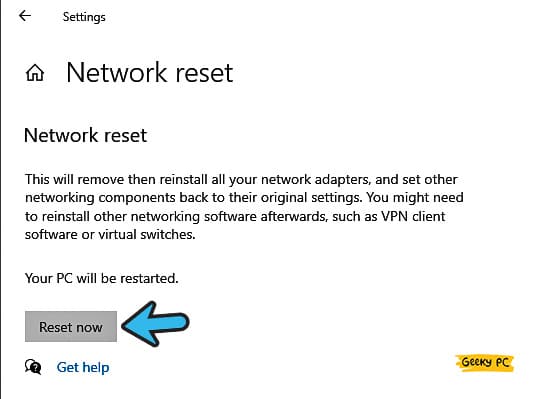
- Step 6: Wait until the resetting operation is done and the network is stabilized.
- Step 7: Reboot your system and check whether you are still getting the error on your local area network.
Most of our users have started getting an undefined network error once they have reset their ethernet adapter.
4. Reset TCP/IP Parameters
Besides hard retting your network adapter by restarting your modem or router, you can also soft reset the connection through your TCP/IP settings to resolve the “no operation can be performed on local area connection while it has its media disconnected” error on Windows devices.
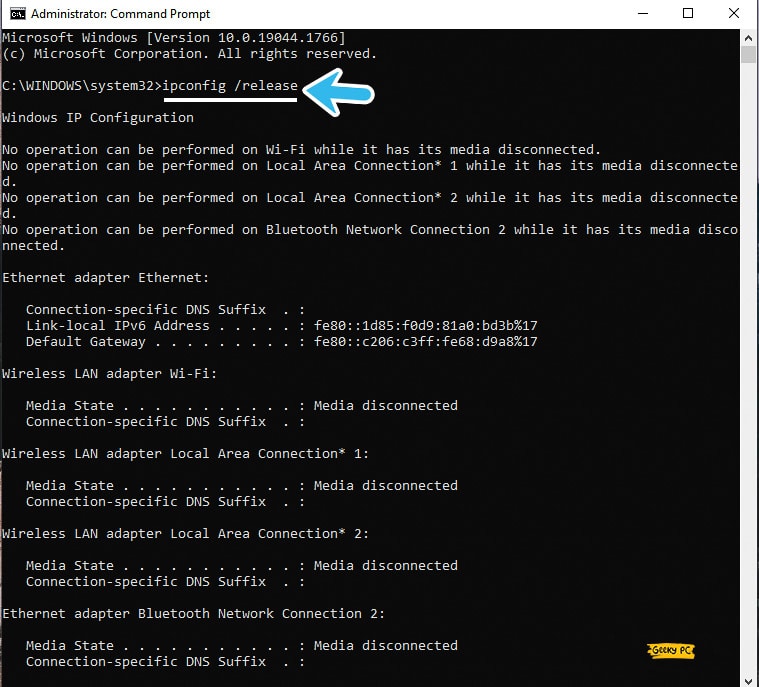
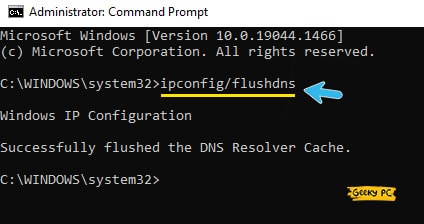
- Step 1: Press the “Windows Key + R” buttons together to launch the “Run” command on your system.
- Step 2: Type “CMD” in the designated field and hit the “Enter” button to launch the command prompt app.
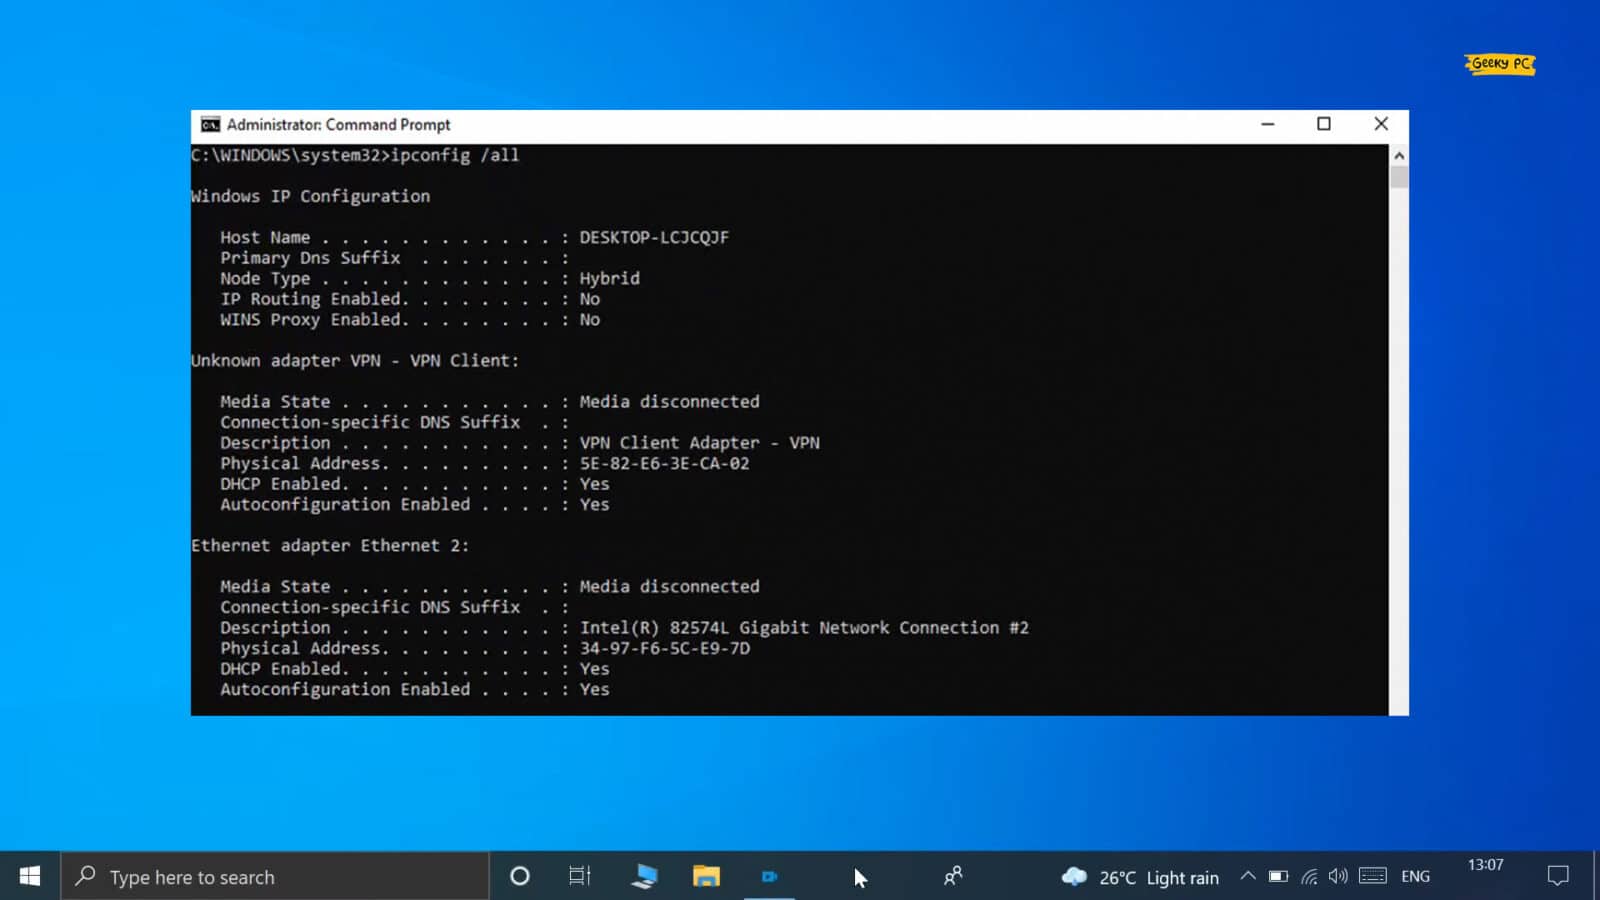
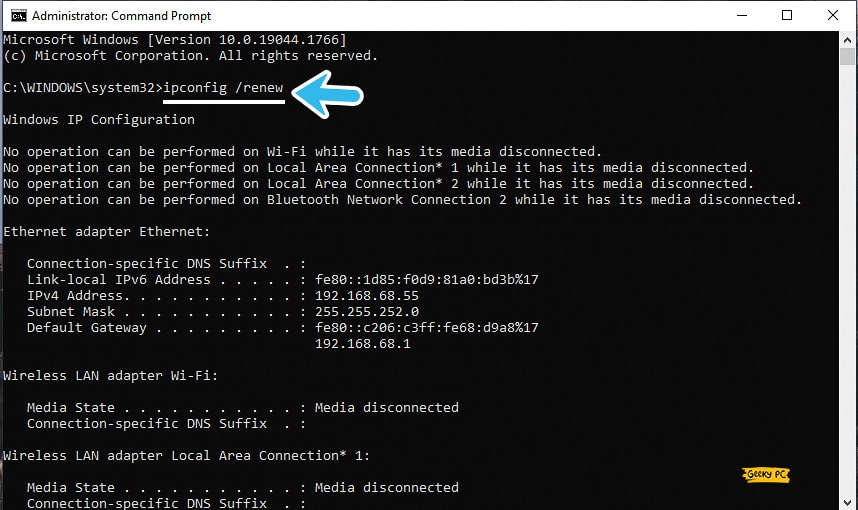
- Step 3: After the black CMD window appears on your system, type the following commands in exact order and hit the enter button: “
ipconfig /release,” “ipconfig /flushdns,” “ipconfig /renew,” and “ipconfig.”
- Step 4: Once these operations are done, execute the following commands in the same way and hit the “Enter” button:
nbtstat –r
netsh int ip reset
netsh winsock reset
netsh winsock reset catalog
netsh int ipv4 reset reset.log
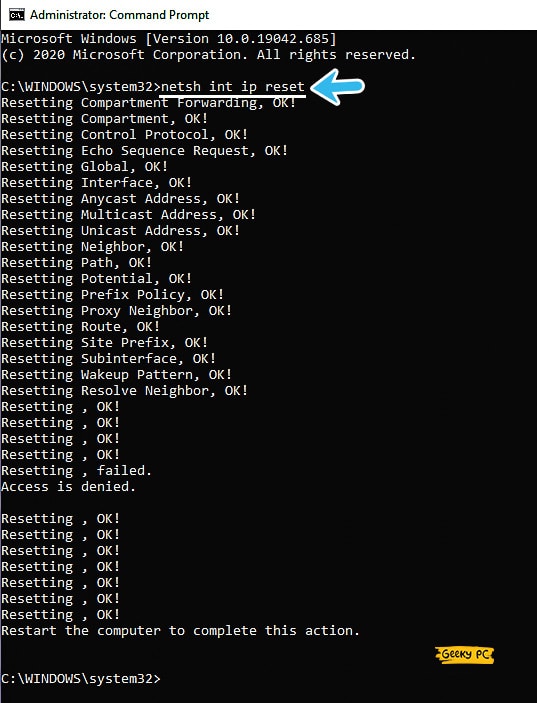
- Step 5: Once you have completely reset the “TCP/IP” connection, type the “Exit” command and hit the enter button to close the command prompt app.
5. Enable Automatic IP
If the ISP-provided connection is not directly inserted into your system, instead, if you are using an external modem or Wi-Fi router, you may get the “no operation can be performed on Wi-Fi” error for faulty parameters.
In that case, enabling the automatic IP option is the first thing you should try.
- Step 1: Click on the “Magnifying Glass” icon located at the bottom-left corner of your taskbar to initiate the search field.
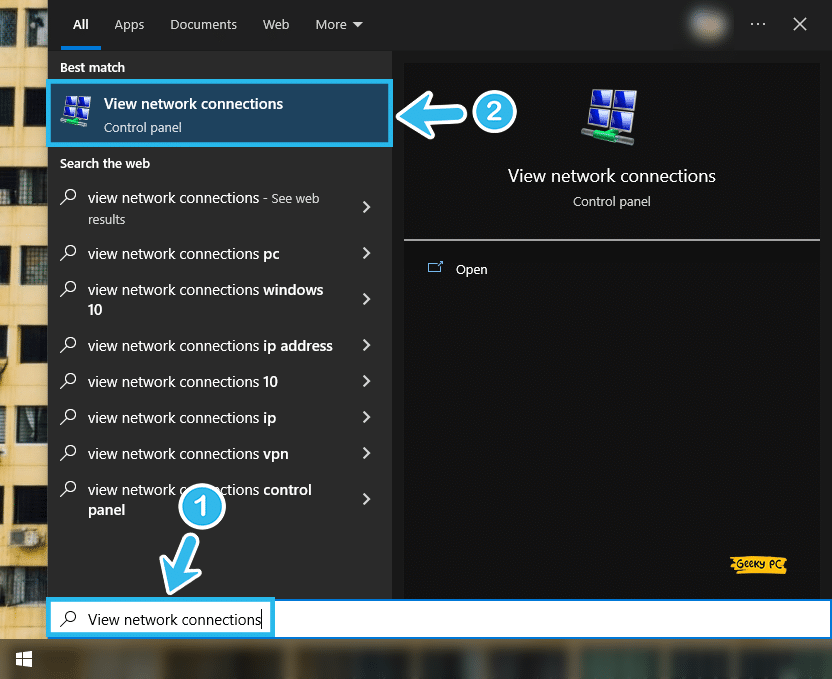
- Step 2: Type “View network connections” on the designated field and click on the very first result that appears.
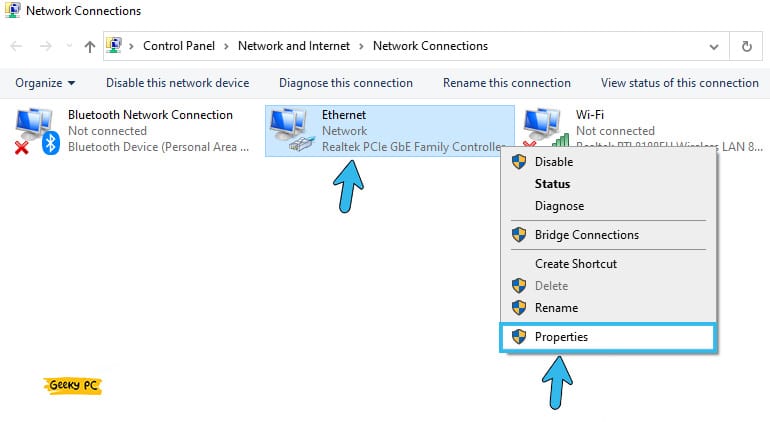
- Step 3: Once the network control panel launches, right-click on the “Ethernet” option and select the “Properties” menu from the list.
- Step 4: Now, navigate to the “This connection uses the following item” tab and locate the “Internet Protocol Version 4 (TCP/IPv4)” option under it.
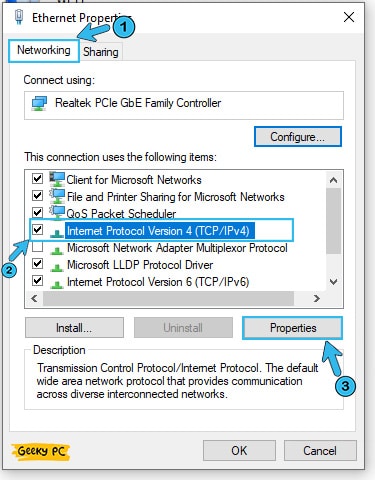
- Step 5: Now, to launch the IPV4 properties of your ethernet connection, click on the “Properties” button.
- Step 6: Put a tick mark on both the boxes beside the “Obtain an IP address automatically” and “Obtain DNS server address automatically” options.
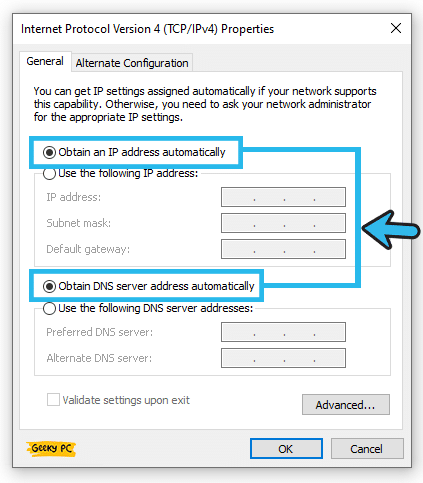
- Step 7: Click on the “OK” button to save the settings and exit the app.
If your ISP has provided a static IP connection with a particular subnet mask and gateway address, you shouldn’t execute this step on your system and enable the automatic IP connection.
Otherwise, several other network-related issues will start to trigger.
6. Use Google DNS For Ethernet
Most Windows users generally use automatic IP assignment and DNS settings to run their network. And even if they use a static IP connection, the ISP itself provides a separate set of IP and DNS to use.
However, it is better to use a public and open DNS connection to minimize the loading time.
- Step 1: Click on the “Magnifying Glass” icon located at the bottom-left corner of your Windows taskbar.
- Step 2: Type “Settings” in the designated field and click on the very first result that appears.
- Step 3: After the “Settings” window launches, click on the “Network and Internet” option.
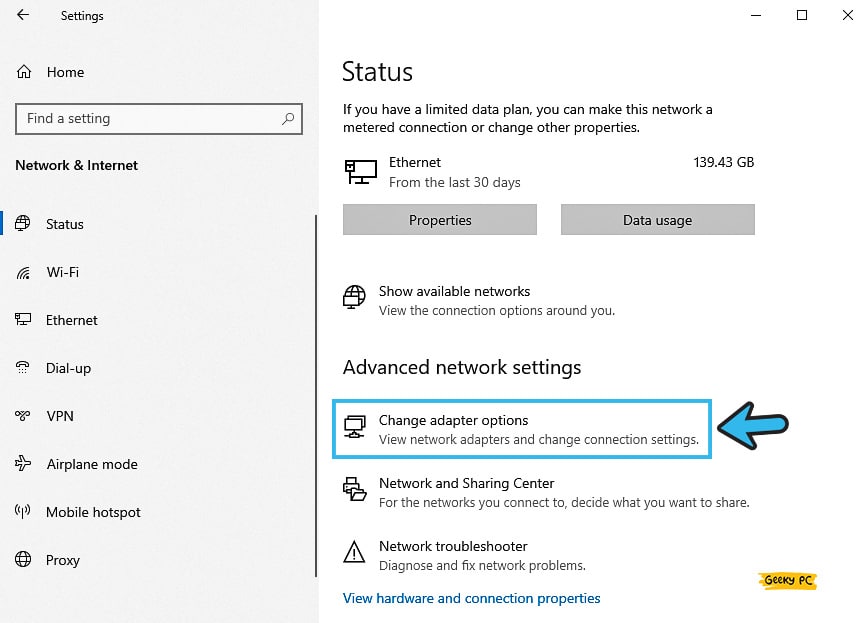
- Step 4: Navigate to the right panel, select the “Advanced network settings” option, and click on the “Change adapter options” link.
- Step 5: After the new window appears, right-click on the “Ethernet” icon and select the “Properties” option from the contextual menu.
- Step 6: Put a tick mark in the adjacent box to the “Internet Protocol Version 4 (TCP/IPv4)” option and further select the “Properties” option.
- Step 7: Once the new tab opens, put a tick mark on the adjacent box to the “Use the following DNS server addresses” option.
- Step 8: Type the following parameters in the respective field; “Preferred DNS server: 8.8.8.8” and “Alternate DNS server: 8.8.4.4.”
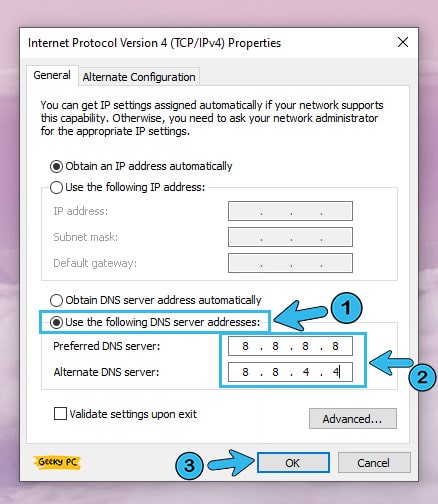
- Step 9: Now, click on the “Apply” button to save the settings and then the “OK” button to exit the app.
A few of our users have reported getting a group policy error once they have tweaked their network parameters, especially while using a device under a network administrator.
If you are also encountering similar issues on your device, follow our step-by-step guide to fix the “This program is blocked by group policy” error in Windows devices.
6+ Advanced Fixes For The LAN Media Disconnection Error In Windows
If none of the generic fixes can resolve the “no operation can be performed on local area connection while it has its media disconnected” error on your system, the problem may be way more profound than you think. And in that case, you must resort to advanced fixes.
7. Disable Network Sharing Option
Network sharing is an option in your network setting that is turned on by default in the latest generation Windows OS, such as Windows 10 and 11.
However, this sharing can create issues, especially if you have connected your device to an open network. So, you should manually disable it.
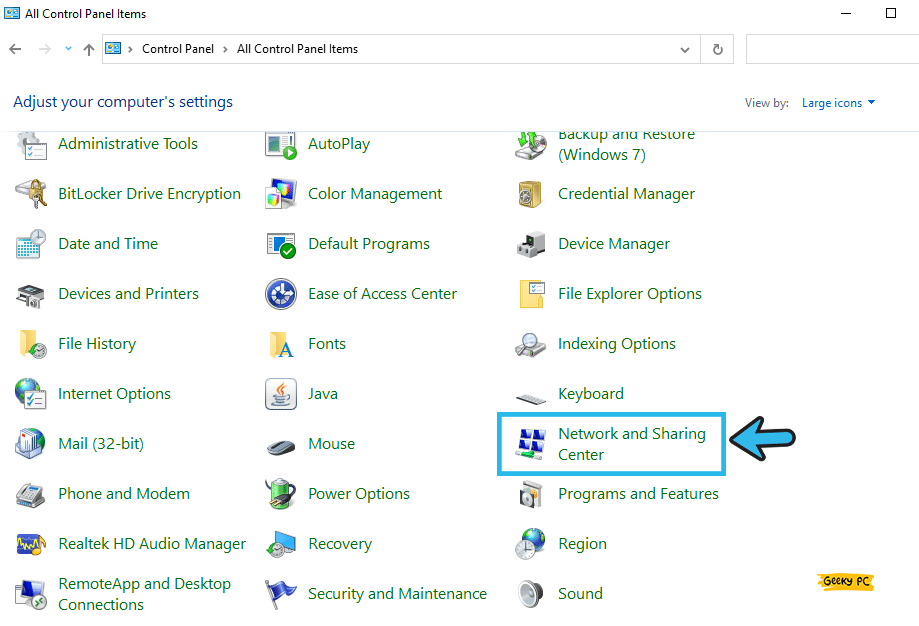
- Step 1: Click on the “Magnifying Glass” icon located at the bottom-left corner of your taskbar.
- Step 2: Type “Control Panel” in the designated search field and click on the very first result that appears.
- Step 3: Once the new window launches, navigate to the “View by:” option in the top-right corner and select the “Large Icons” option from the list.
- Step 4: Now, click on the “Network and Sharing Center” option from the menu.
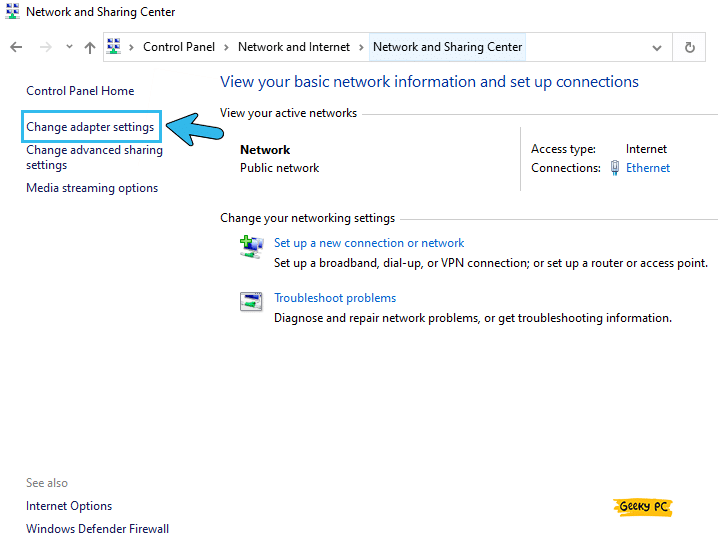
- Step 5: Navigate to the right panel and click on the “Change Adapter Settings” option.
- Step 6: Right-click on the problematic network icon and select the “Properties” option from the list.
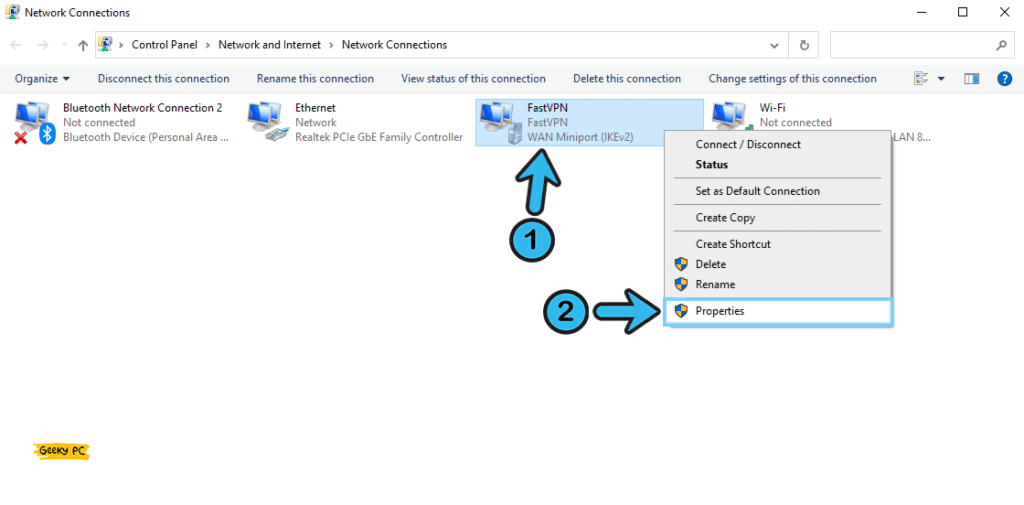
- Step 7: Click on the “Sharing” tab from the header selection menu.
- Step 8: Now, uncheck the box beside the “Allow other network users to connect through this computer’s Internet connection” option.
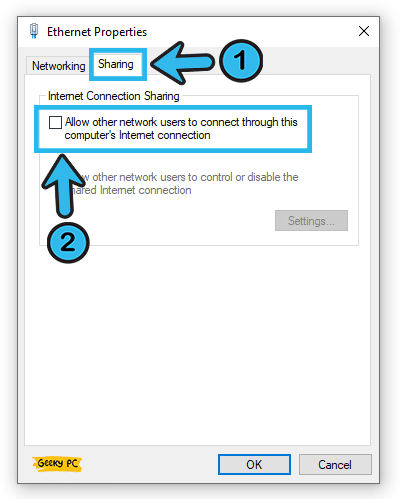
- Step 9: Click “OK” to save the settings and exit from the window.
- Step 10: Reboot your device, connect to your network again, and check whether you are still getting the same error.
Several of our users have started getting a service host delivery error once they have disabled the network sharing option on their devices.
If you are also facing the same issue on your device, follow our comprehensive guide to fixing the “Service host delivery optimization” error in Windows devices.
8. Update The Network Adapter Driver
The “ipconfig media disconnected” error can pop up in Windows 10 / 11 devices if you are using an outdated network adapter driver.
Besides, an obsolete driver can trigger other issues in a cycle and can also cause a security loophole. So, you should update your network driver in timely intervals.
- Step 1: Press the “Windows Key + R” buttons together to initiate the “Run” dialogue box.
- Step 2: Type “devmgmt.msc” in the designated field and hit the “Enter” button,
- Step 3: Once the “Device Manager” app launches, navigate to the left column and click on the “Network Adapters” menu to expand it.
- Step 4: Now, locate the network adapter you are using right now and right-click on it to fetch the contextual menu.
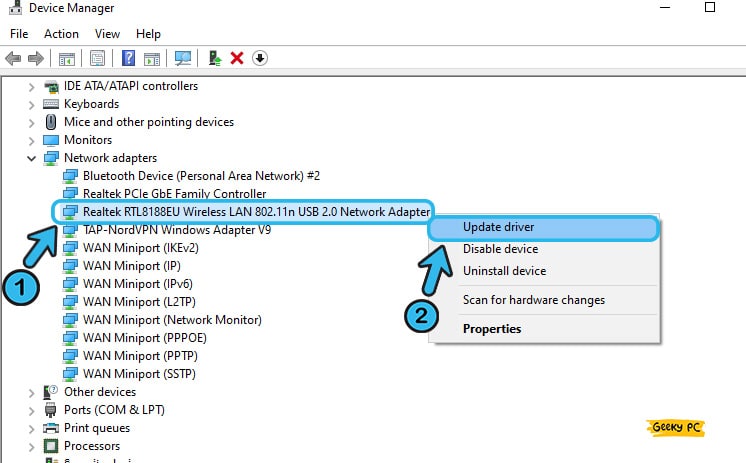
- Step 5: Select the “Update Driver” option from the menu and wait until you get the new prompt.
- Step 6: Click on the “Search Automatically for Updated Driver Software” option once you get the new prompt menu.
- Step 7: Follow the on-screen instruction and wait until Windows automatically download and install the latest network adapter driver on your system.
- Step 8: Once it is successfully updated, reboot your system and check for the issue again.
If updating a single network driver (“Realtek” driver is the default choice) can’t fix the media disconnection issue on your system, you may need to update all the available network adapters.
And to do that, you can update all the available networks under the “Network Adapters” option on the “Device Manager” app.
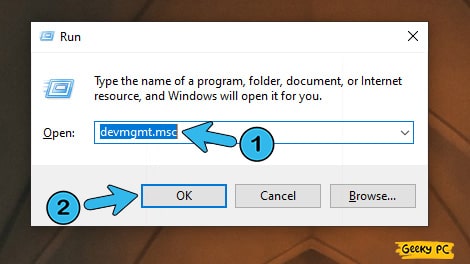
9. Uninstall The Network Adapter Driver
If the media disconnection or other LAN-related issues are not solved even after updating your network adapter driver, you have no other way than to uninstall the network adapter driver and then reinstall a fresh driver again.
But, if you do that, it will give it a clean setting to work with.
- Step 1: To launch the “Run” dialog box, click on the “Windows Key + R” buttons together.
- Step 2: Type “devmgmt.msc” in the run field and hit the “Enter” button.
- Step 3: After the new “Device Manager” window launches, navigate to the left panel and locate the network adapter you are currently using.
- Step 4: Right-click on the network adapter and select the “Uninstall” option from the contextual menu.

- Step 5: Once you get the warning message, click on the “OK” button to uninstall the device.
- Step 6: After it is successfully uninstalled from your system, reboot your system.
- Step 7: Windows will automatically search, download, and install the latest network adapter driver in the background.
- Step 8: Once you get the “Device successfully installed” message, reconnect to the LAN again.
If you are using any third-party adapter or a specialized external network adapter card on your device, Windows may sometime fail to find a suitable driver.
And in that case, you need to manually download and install the latest driver for your adapter from the manufacturer’s website.
10. Troubleshoot Your Network
Network troubleshooter is an effective tool that now comes preinstalled with the latest generation of Windows OS, especially with Windows 10 and 11.
If you are frequently getting network errors and LAN-related issues, you should run the network troubleshooter to resolve it in no time.
- Step 1: Press the “Windows Key + I” buttons together to launch the “Settings” app on your system.
- Step 2: Once the new window appears, scroll down, and click on the “Update & Security” button.
- Step 3: Now, navigate to the left panel and select the “Troubleshooter” option.
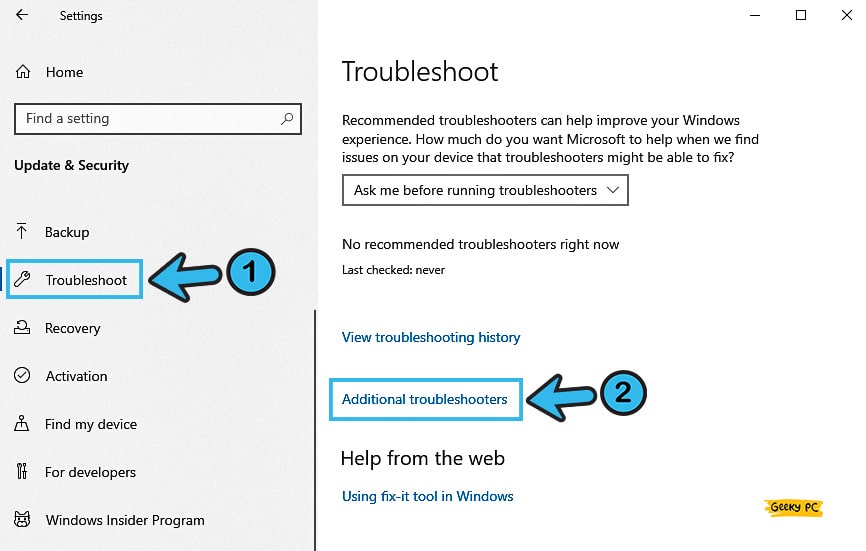
- Step 4: Navigate to the right panel and further click on the “Additional troubleshooters” option.
- Step 5: Once the new window appears, select the “Internet Connection” option.
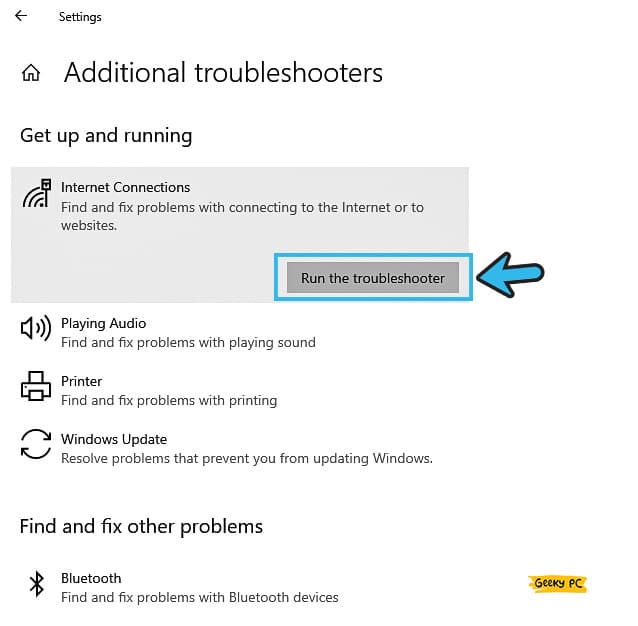
- Step 6: Now, click on the “Run the troubleshooter” option and follow the on-screen instruction.
- Step 7: Once the troubleshooting procedure is fully completed, reboot your system and check whether you are still getting the same issue.
Some of our users have reported to us that they have started getting an unresponsive taskbar once they have proceeded with the troubleshooter option.
11. Setup A New Connection
If you have wrongly configured your network connection, the “ipconfig/renew no operation can be performed” error message can trigger on your system. You can simply rest it from the “Settings” menu.
Otherwise, you can also set up a new connection all together to give it a fresh start.
- Step 1: Click on the “Magnifying Glass” icon located at the bottom-left corner of your taskbar.
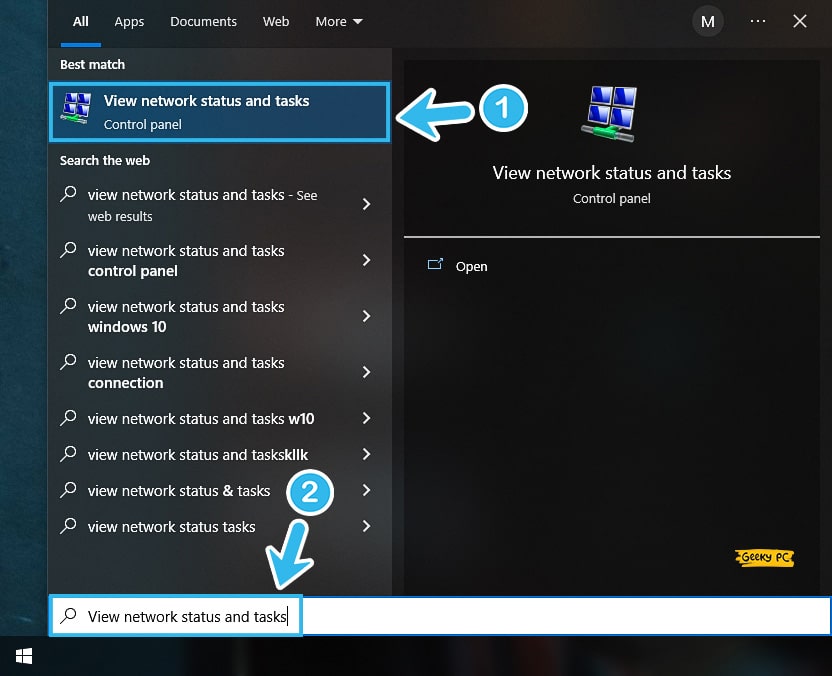
- Step 2: Type “View network status and tasks” in the designated search field and click on the very first result that appears.
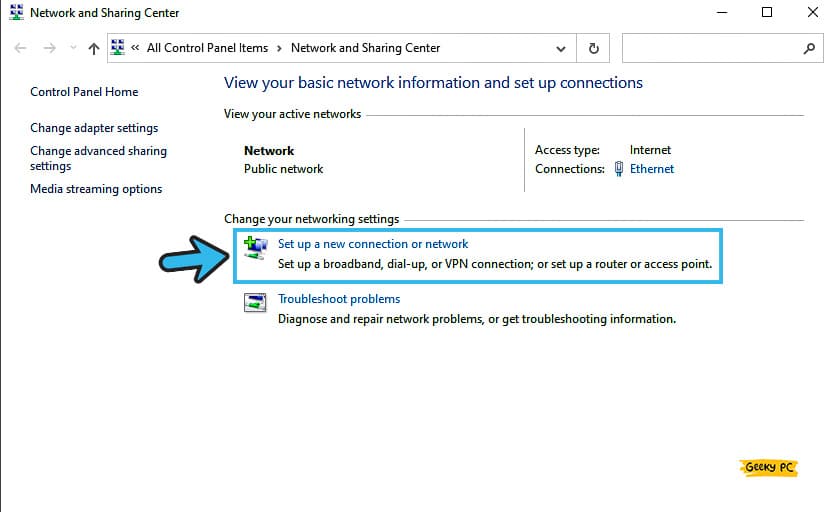
- Step 3: After the new window launches, click on the “Set up a new connection or network” option.
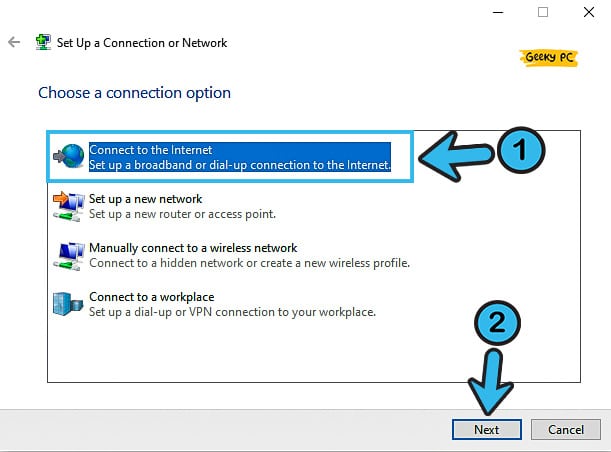
- Step 4: Once you get a new popup box, click on the “Connect to the Internet” option first and then click on the “Next” button to proceed further.
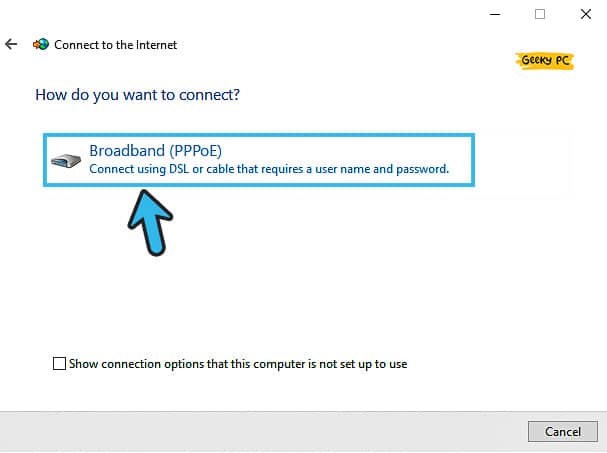
- Step 5: Once the new window appears, navigate to the “How do you want to connect?” tab and select the “Broadband (PPPoE)” option.
- Step 6: Put desired username and password in the designated field and click on the “Connect” option.
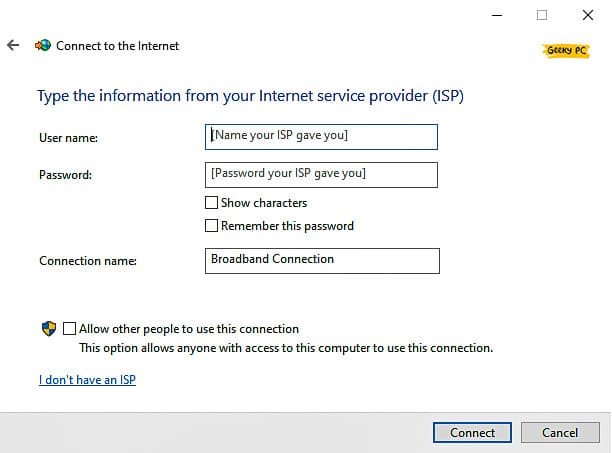
- Step 7: Let Your Windows OS finish the network setup process and connect it to the new network once it is done.
If you are using an unrestricted account, or if you want to create a new unrestricted account, you can leave the spaces of “Account Name” and “Password” blank. And in that way, you don’t need to enter any username or password while connecting to the LAN or Wi-Fi network.
12. Restore Windows OS To A Previous Point
If none of the methods we have mentioned above can resolve the media disconnection error in your Windows device, the problem may lie in the root installation folder.
It may even happen for any corrupted root directory as well. In that case, you need to restore your system to a previous point when everything was running smoothly.
- Step 1: Right-click on either the “This PC” or “My Computer” icon (depending on your OS variant) on your home screen.
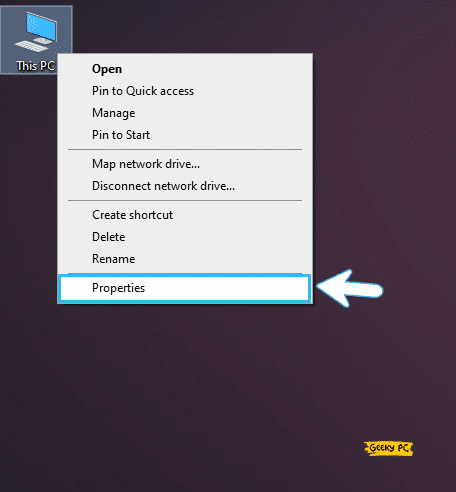
- Step 2: Select the “Properties” tab from the contextual menu.
- Step 3: Once the “System Settings” app launches, click on the “Advanced System Settings” option.
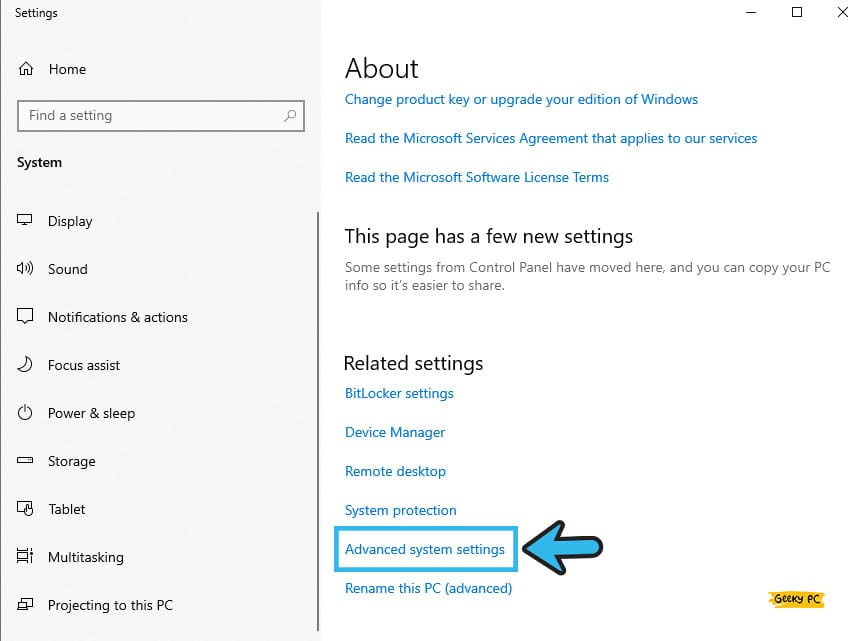
- Step 4: Now, navigate to the header menu and select the “System Properties” tab.
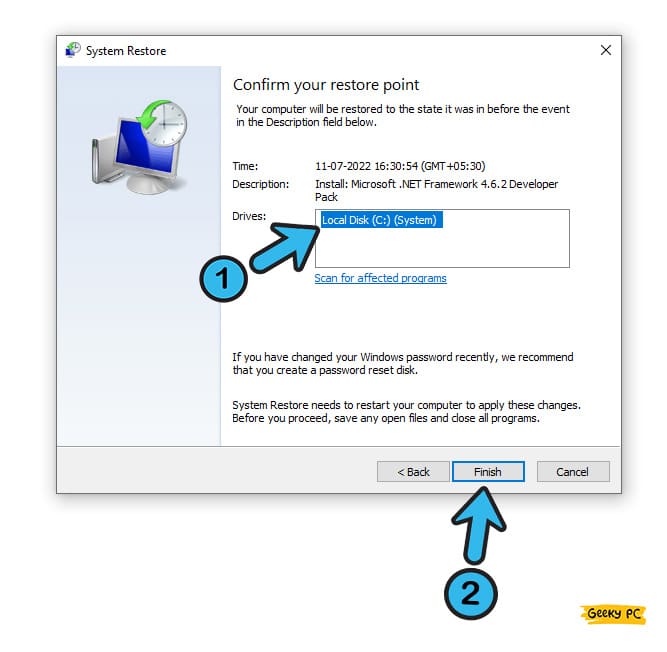
- Step 5: Click on the “System Restore” option and further click on the “Next” button to proceed.

- Step 6: Select the “Show more restore points” to check all the available restore points available on your device.
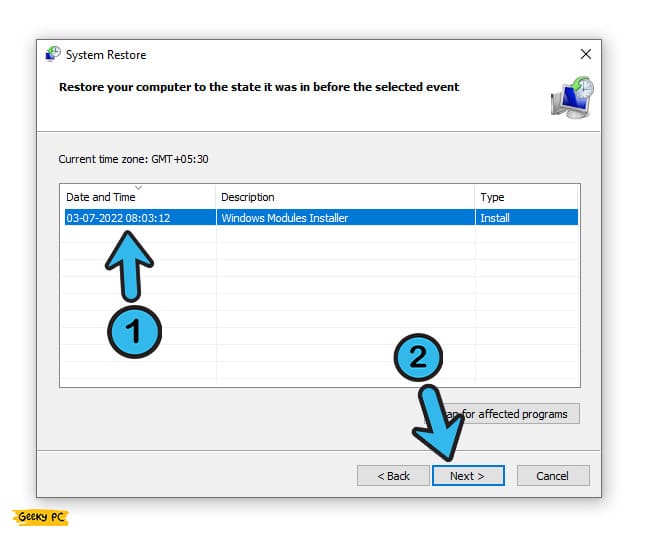
- Step 7: Now, select any of the previous restore points and follow the on-screen instruction.
- Step 8: Once the Windows OS is successfully restored to a previous point, connect to the network adapter again.
Many people have started getting a network gateway error on their systems once they have rolled back their OS to a previous restore point, especially while using a static IP connection.
If you are also facing the same, follow our step-by-step guide to fix the “Error Code 0x80070035” error in Windows devices.
Conclusion
In most cases, the six generic fixes we have mentioned above are sufficient to resolve the LAN media disconnection error on Windows devices.
But, if none of those methods works, you must resort to advanced fixes. However, creating a fresh “System restore point” is better before trying any pro methods.
So, that’s all the possible solutions we have for the “no operation can be performed on local area connection while it has its media disconnected” error in Windows devices.
If you think we have missed any of the practical solutions, feel free to drop your feedback and suggestions in the comment box.
FAQs
Q. How do I fix Media disconnected local area connection?
You should start by power cycling your modem or router that you are currently using. Besides, you should also rest the IP stack and Winsock option through the command prompt. If these two don’t work, you can disable the network adapter and then reenable it to give it a fresh start.
Q. What does it mean when your media is disconnected?
The media disconnection error is mainly triggered when your LAN or other network adapter fails to establish a connection with the WAN. It can even trigger if you are using an outdated network driver that is not supporting the latest internet options available with your ISP.
Q. How do I reconnect Wi-Fi media?
First, go to the “Settings” menu by pressing the “Windows Key + I” buttons together. You need to then select the “Network and Internet” option and then select the Wi-Fi connection you are using. And lastly, you should right-click on it to fetch the contextual menu and then select the “Enable” option.
Q. How do I reconnect to ipconfig?
Open the “Run” dialog box first and type “CMD” to launch the “Command Prompt” window on your system. Once the black screen appears, type the “ipconfig /release” command, and press the “Enter” button. After that, type the “ipconfig /renew” command and press the “Enter” button again.