
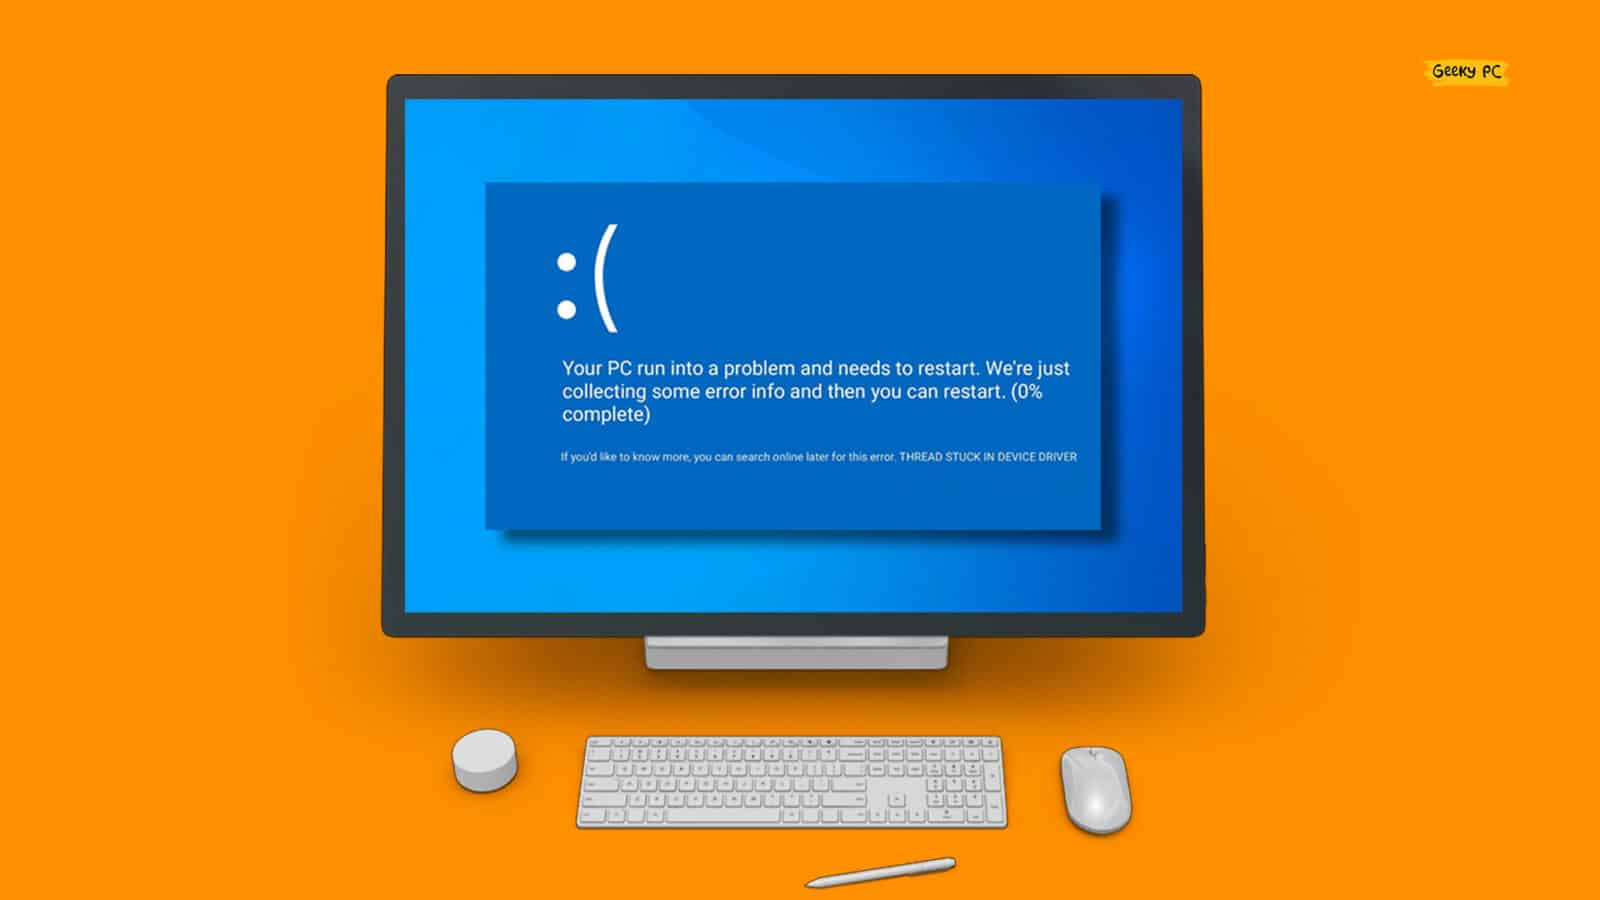
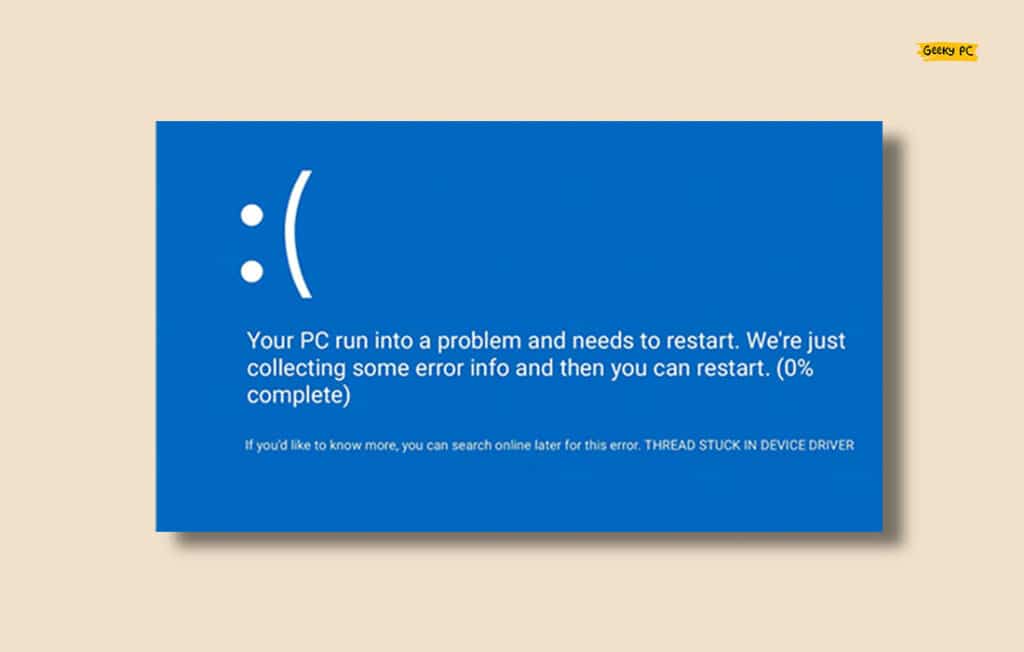
We feel annoyed when we start getting blue screen errors on our systems, isn’t it? And things get even more complicated if a thread is stuck in the device driver and your hardware foes into an idle state. However, you can easily resolve it.
The thread-stuck error can be typically resolved just by updating your Windows OS and the GPU driver. Besides, you should disable the antivirus and firewall temporarily, and also the fast startup option. Many people also fixed it by running the SFC and DISM scans on their systems.
However, these are not the only solutions to fix this error. But, before we go deep into the solution part, let’s understand what this error actually is and what are the reasons that can trigger it.
What Are The Primary Causes For The Thread Stuck In Driver In Windows?
Although the thread-stuck error is pretty common in Windows devices, this error mainly occurs for a few reasons. And if you consider a broader spectrum, this particular error is mainly triggered for six reasons.
- You are using an outdated version of Windows that needs an urgent update.
- Any startup application or process is interfering with the device driver files.
- You have a bad or completely damaged sector on your hard disk drives.
- Windows Defender or any other third-party antivirus is interfering with the drivers.
- You have enabled hardware or GPU acceleration that is overriding the drivers.
- There are errors in the system files on the root directories of your device.
Besides these six primary reasons, this error can also trigger if you are using an obsolete driver for your GPU.
Many users also started getting threads stuck in device driver error while using unsupported hardware as well.
6+ Easy Fixes For The “Thread Stuck in Device Drivers” Error
If the thread stuck in device driver error frequently happens on your Windows device, you should first proceed with the generic fixes that need lesser tweaks.
And in almost 80% of the cases, these generic fixes alone are enough to resolve this error in no time.
1. Restart Your System In Safe Mode
At times, any of the third-party startup applications you have installed on your system may interfere with the device drivers. And that can easily make the thread stuck in Windows 10.
So, to resolve it, you need to give your system a fresh reboot in safe mode to minimize interference.
- Step 1: Press the “Windows Key + I” buttons together to initiate the “Settings” app.
- Step 2: Once the new window launches, scroll down and navigate to the “Update & Security” option.

- Step 3: After a new menu appears, navigate to the left panel and click on the “Recovery” option.
- Step 4: Now, come back to the right panel and click on the “Restart” button located under the “Advanced Startup” header.
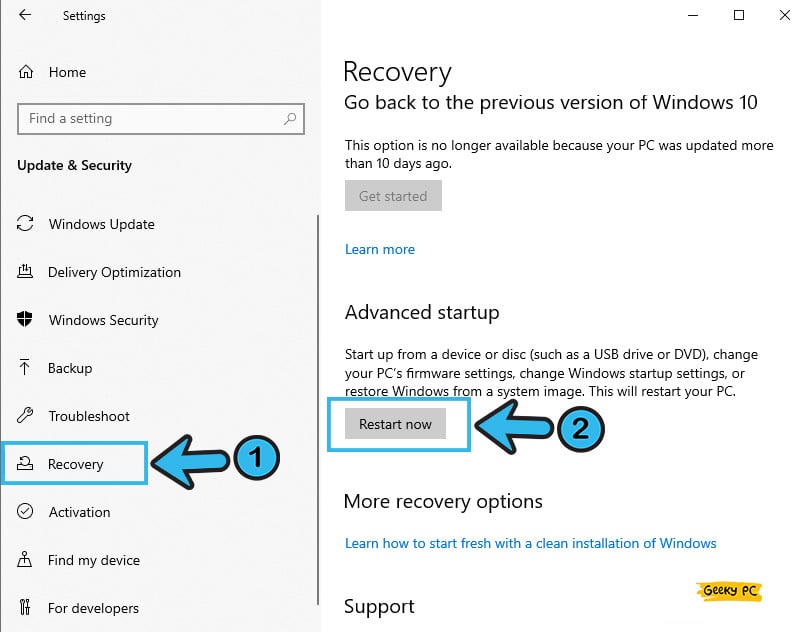
- Step 5: Let windows restart and select the “Safe Mode” option from the boot-up menu.
- Step 6: Once your OS is successfully loaded in safe mode, recheck your device driver.
2. Disable Fast startup In Windows
Fast startup is a unique feature that comes preinstalled with the latest versions of Windows, such as Windows 10 and 11.
However, this fast startup can interfere with several device drivers installed on your system. So, to rectify it, you need to disable it manually.
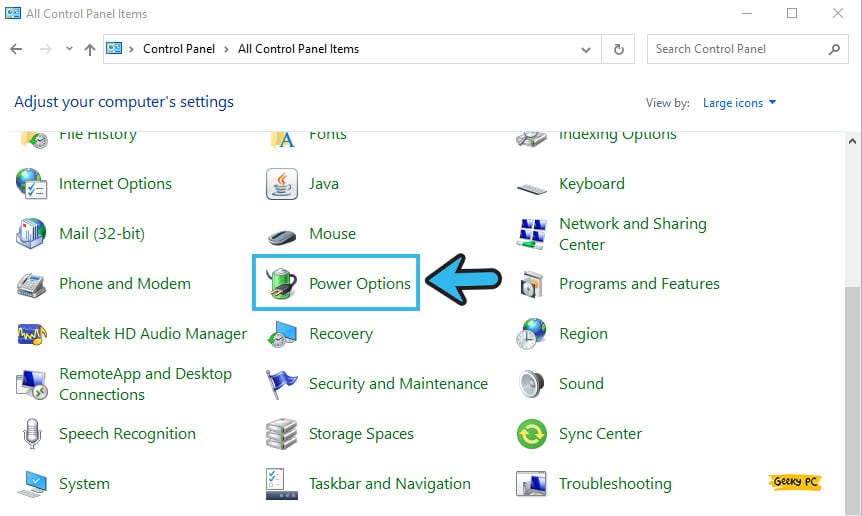
- Step 1: Click on the “Magnifying Glass” icon located at the bottom-left corner of your taskbar.
- Step 2: Once the search field appears, type “Control Panel” and click on the first result that appears.
- Step 3: Select the “Large Icon” option from the drop-down list located at the top-right corner under the “View by” header.
- Step 4: Now, click on the “Power Option” button.
- Step 5: Once the new window appears, navigate to the left panel, and select the “Choose what the power buttons do” option.
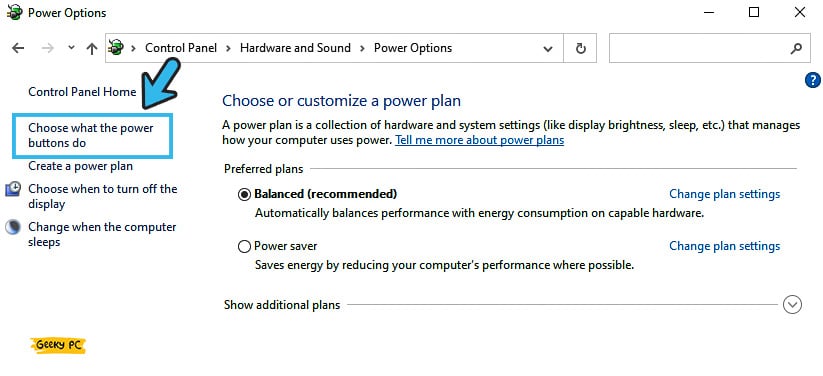
- Step 6: Uncheck the box beside the “Turn on fast startup (Recommended)” option to disable it.
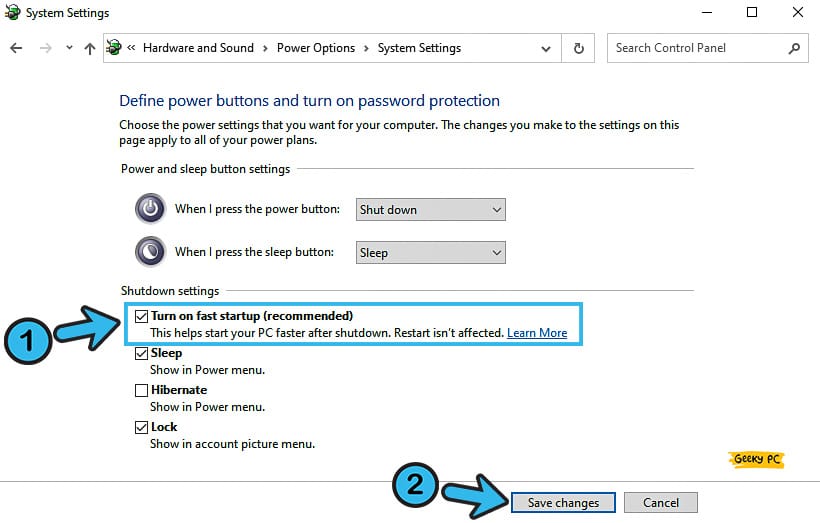
- Step 7: Click on the “Save Changes” button to save the settings and restart your device.
You shouldn’t disable the “Fast Startup” option for a long time, as it can tweak your startup operation in many ways. And for that, you may frequently get BSOD errors that are even more difficult to fix. So, once the device driver error is rectified, you should reenable it.
If you are also facing the same, you can follow our step-by-step guide to resolve the Windows Update Error 80073701 on Windows devices.
3. Check Your HDD
A mismanaged or buggy hard disk can cause a threading error in the device driver. It may also sometime happen that a particular sector on HDD is not functioning properly or is fully damaged.
And that can also cause this particular issue. So, before trying anything, check your HDD first.
- Step 1: Press the “Windows Key + R” buttons together to initiate the “Run” command.
- Step 2: Once the run field appears, type “CMD” and click on the “OK” button.
- Step 3: After the black “Command Prompt” window launches, type “chkdsk /r c:” and hit the “Enter” button. (If the “C” drive is your default system drive)
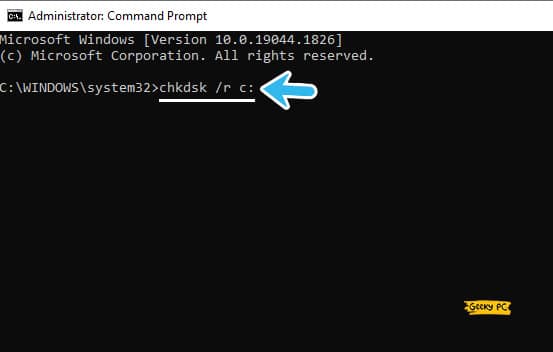
- Step 4: Let the scanning process end and exit from CMD by typing the “exit” command.
- Step 5: Reboot your system and try to update your device driver again.
If Windows finds too many bad sectors or bugs on your HDD, it is better to replace your hard drive altogether.
You will get faster speed and secured connection by using the latest-generation SSD or NVME HDDs. Although these are costlier than SATA drives, these HDDs will last long.
4. Run The BSOD Troubleshooter
If a thread is stuck in your device driver, and that causes a blue screen of death, there may be a faulty line on your system files.
And do fix it effectively; you can run the BSOD troubleshooter that now comes preinstalled on the latest version of Windows OS.
- Step 1: Click on the “Windows” icon or “Start” button (depending on your OS variant) located at the bottom-left corner of your taskbar.
- Step 2: Now, click on the “Settings” (the “gear” icon) option to launch the app.
- Step 3: Once a new window appears, scroll down, and click on the “Update & Security” option.
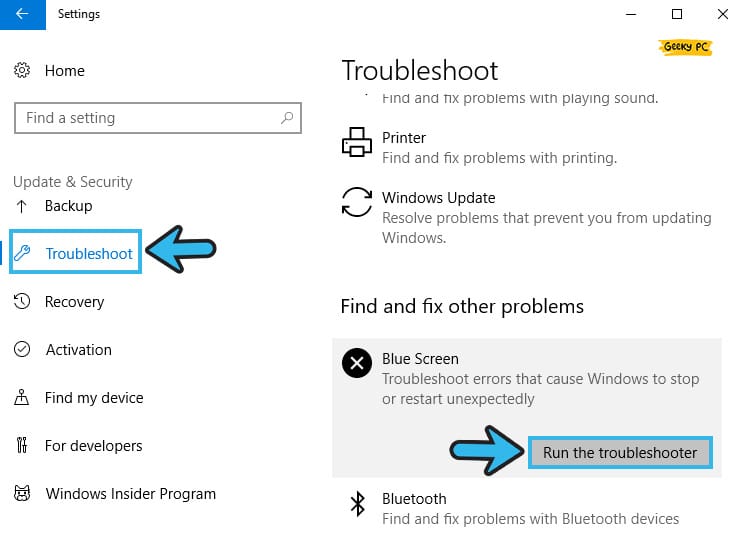
- Step 4: Navigate to the left panel and click on the “Troubleshoot” button.
- Step 5: Now, navigate to the right panel and click on the “Run the Troubleshooter” button under the “Blue Screen” error. (You will only get this option after encountering BSOD)
- Step 6: Follow the on-screen instruction to finish the troubleshooting option.
- Step 7: Reboot your system and check whether any thread is still stuck on the device driver.
You should close all the applications opened on your devices before proceeding with the BSOD troubleshooter.
Otherwise, troubleshooting operations may interfere with the running apps and can trigger additional errors.
5. Temporarily Windows Defender Temporarily
We all know that the Windows Defender antivirus program that now comes preinstalled with the latest Windows OS is undoubtedly robust security software.
But, at times, this antivirus program can interfere with the device drivers. So, you need to temporarily disable it to eliminate the interferences.
- Step 1: Press the “Windows Key + I” buttons together to initiate the “Settings” app on your system
- Step 2: Now, navigate to the bottom of the page and click on the “Update & Security” option.
- Step 3: Once the new page opens, navigate to the left panel, and click on the “Windows Security” option.
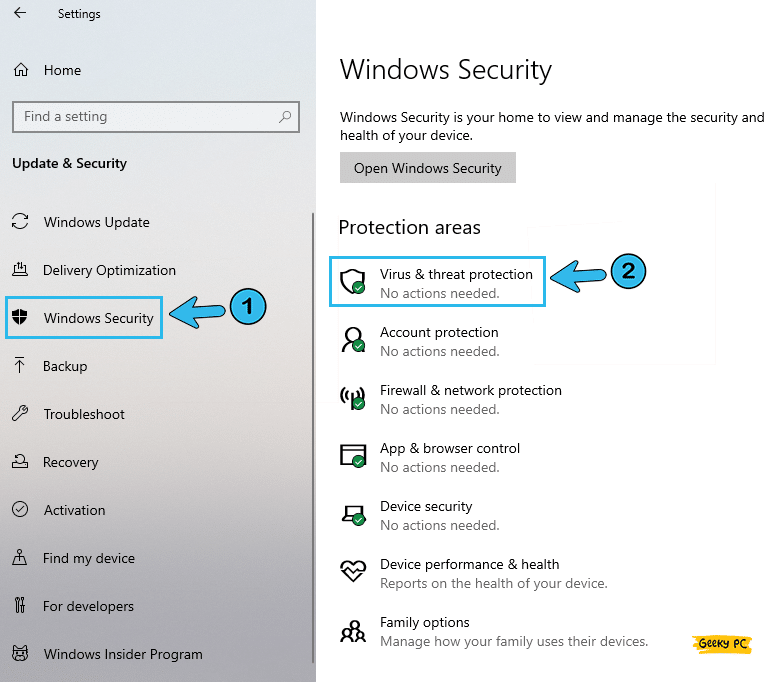
- Step 4: Now, navigate to the right panel and click on the “Virus & threat protection” option.
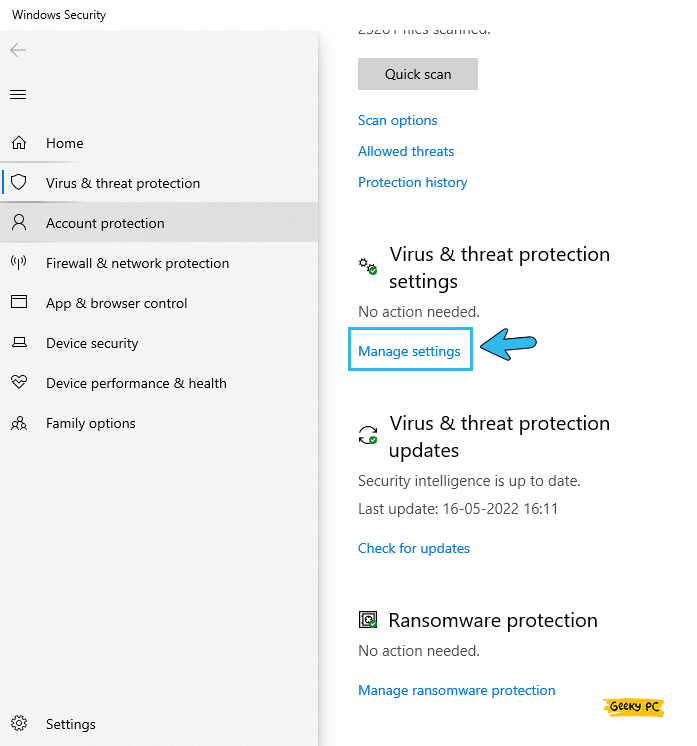
- Step 5: After the new window launches, click on the “Virus & threat protection settings” option.

- Step 6: Locate and toggle the switch beside the “Real-time protection” option.
- Step 7: Now, click “OK” to save the settings and exit from the “Settings” app.
A few people have reported getting an unexpected group policy error once they have disabled the Windows Defender on their system, especially while using the device under a network admin.
If you face a similar situation, you can follow our comprehensive guide to fixing the “This program is blocked by group policy” error in Windows devices.
6. Update Your Windows OS
If you are frequently encountering device driver errors in Windows, you may have been using an outdated version of the Windows OS. And you need to update it ASAP.
Updating Windows on a regular basis will not only solve minor glitches but also fixes various errors.
- Step 1: Click on the “Magnifying Glass” icon located at the bottom-left corner of your taskbar.
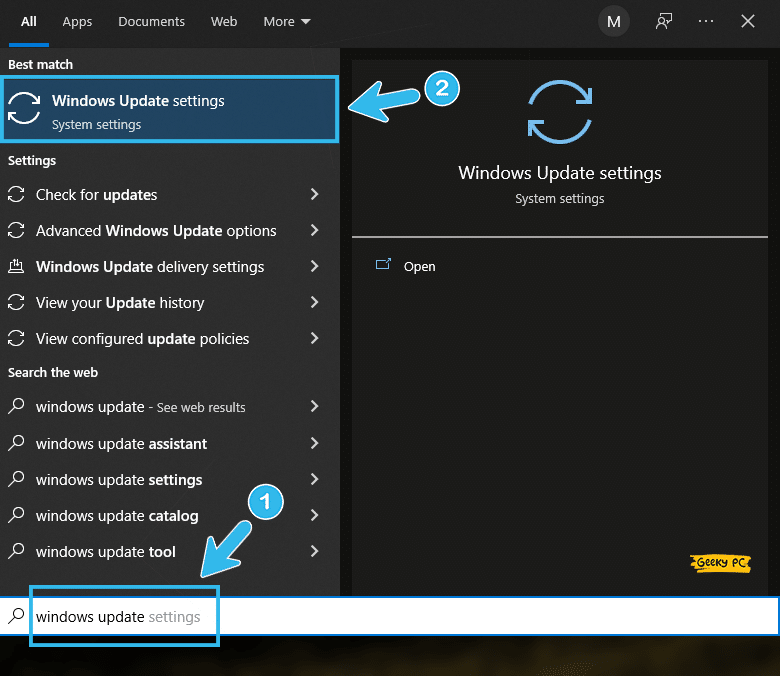
- Step 2: Once the “Search” field appears, type “Windows Update” and click on the very first result that appears.
- Step 3: Once the “Update Manager” app launches, navigate to the left panel and click on the “Windows Update” option.
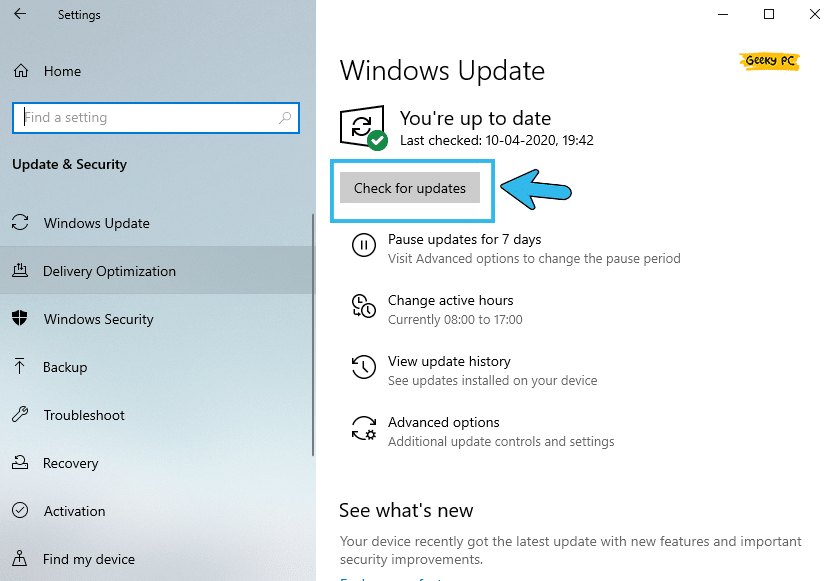
- Step 4: Now, navigate to the right panel and click on the “Check for updates” option.
- Step 5: Let Windows search and install the latest update from the Microsoft server.
- Step 6: Once your OS is fully updated, reboot your device and check whether the problem still arises.
Many Windows users have reported getting an unresponsive taskbar once they have rolled out the newest Windows update.
6+ Advanced Fixes If The Thread Is Stuck In The Device Driver
If none of the generic methods we have listed above can resolve the thread stuck in device driver error in your device, the problem may be way more deep-rooted than you can possibly assume.
And in such cases, proceeding with the advanced fixes is the only option left to resolve the error.
7. Update Your Display Adapter Driver
If a thread stuck error frequently pops up on your Windows device, you may have been using an outdated version of the GPU driver.
To resolve it, you need to update your GPU driver not only to get rid of these bugs but also to experience a smoother display.
- Step 1: Depending on your Windows variant, Right-click on either the “Start” button or the “Windows” icon.
- Step 2: Select the “Device Manager” option from the menu to launch the app.
- Step 3: Once the new window pops up, click on the “Display Adapter” option.
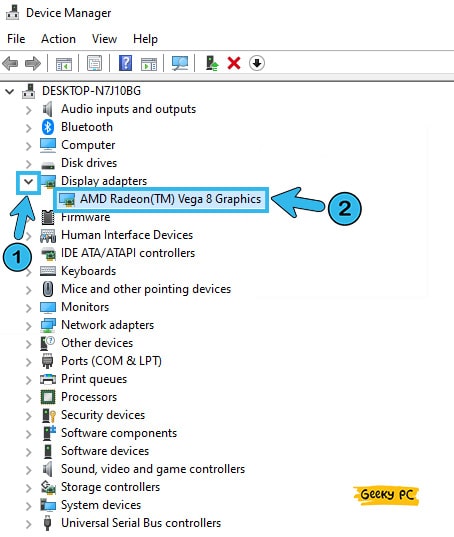
- Step 4: Once the header is expanded, navigate to your GPU driver from the list, and right-click to fetch the additional menu.
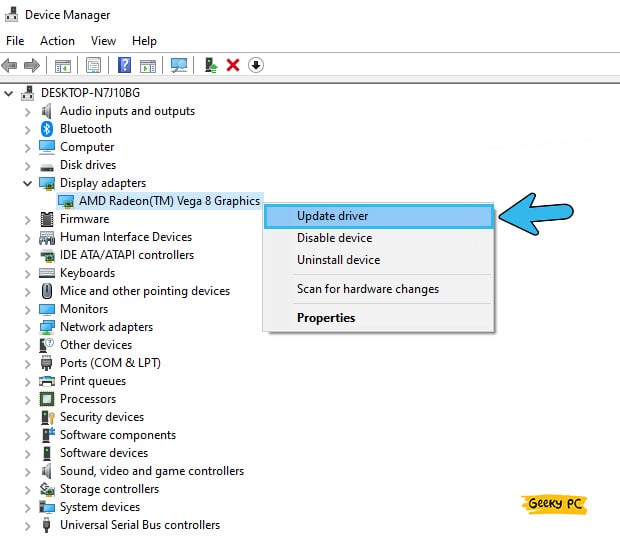
- Step 5: Now, click on the “Update Driver” option from the menu.
- Step 6: Once you get a new prompt, click on the “Search automatically for drivers” option.
- Step 7: Let Windows search and install the latest driver for your GPU and reboot your system once it is done.
8. Disable Hardware Acceleration
Hardware acceleration is a preinstalled system on your Windows device that forces hardware to override the graphics from GPU instead of the typical CPU-bound output.
But if any thread is stuck on the driver, you have to disable it manually.
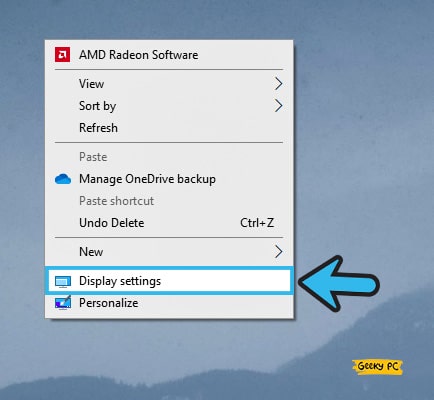
- Step 1: Right-click on the empty space on your desktop home screen and select the “Display Settings” option from the menu.
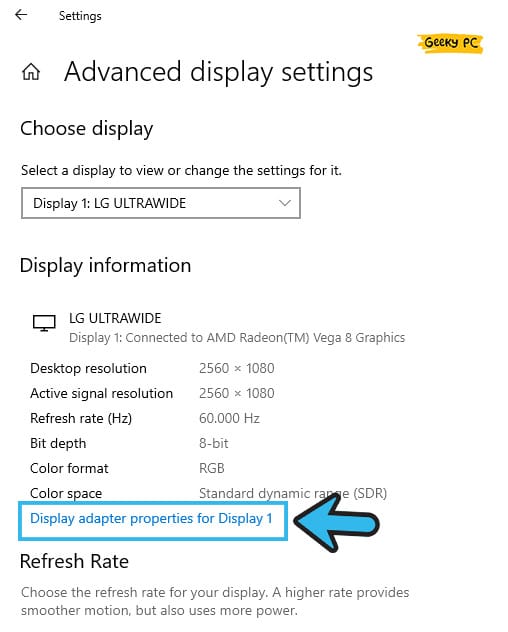
- Step 2: Once the “Settings” app launches, navigate to the right panel, and click on the “Advanced Display Settings” option.

- Step 3: After the new menu launches, click on the “Display adapter properties for Display 1” tab.
- Step 4: Navigate to the header menu and click on the “Troubleshoot” option.
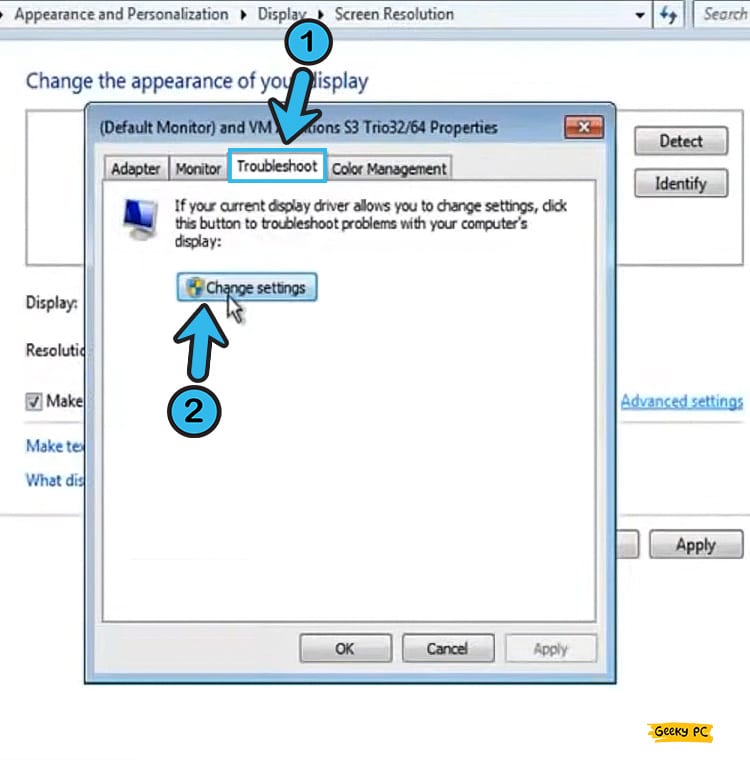
- Step 5: Once a new window opens, click on the “Change Settings” option.
- Step 6: Navigate to the “Hardware Acceleration” option and drag the slider toward the “None” option.
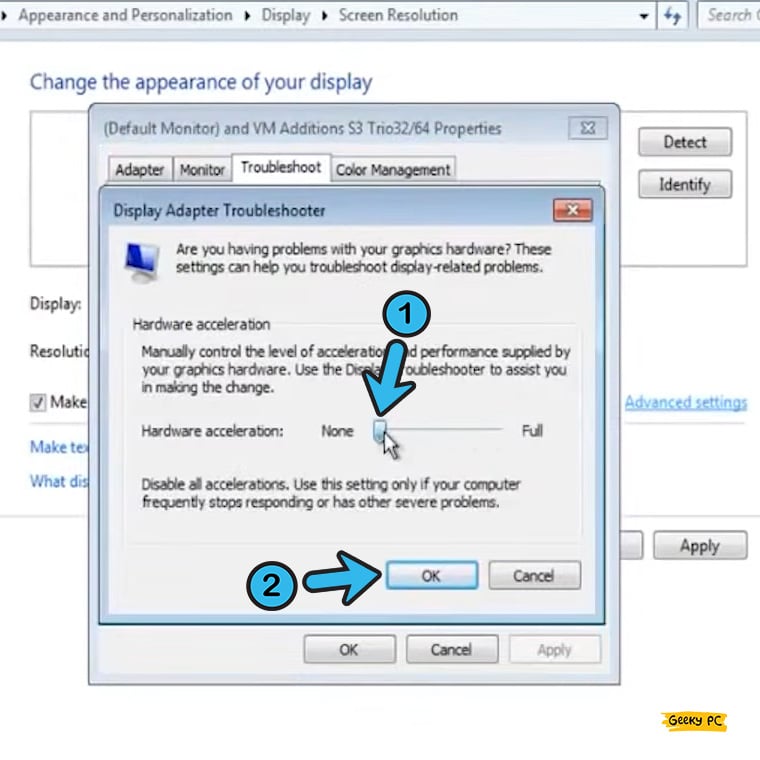
- Step 7: Now, click “OK” to save the settings and exit the app.
You may get an unidentified network error if you disable the hardware suddenly, as many people have already reported it.
9. Disable GPU Acceleration (Nvidia)
Not just hardware acceleration, you may also disable the GPU acceleration altogether to resolve the thread-stuck error, especially while using an Nvidia graphics card.
However, you can easily do it from the Nvidia control panel itself in a few simple steps.
- Step 1: Right-click on an empty space on your Windows home screen to fetch the menu.
- Step 2: Select “Nvidia Control Panel” from the menu to launch the app.
- Step 3: Once the new window appears, navigate to the left panel, and click on the “Set PhysX configuration” option.
- Step 4: Now, navigate to the right panel and select “CPU” from the drop-down list under the “Select a PhysX processor” header.
- Step 5: Click the “Apply” button to save the settings and exit the app.
- Step 6: Now, reboot your device and check whether the problem still arises.
Many people have reported getting a generic PnP monitor error once they have disabled the GPU acceleration from the Nvidia control panel. If you face a similar situation, you can follow our detailed guide to fix the generic PnP monitor error in Windows devices.
10. Run SFC Scan On Your Device
SFC or System File Checker is an inbuilt tool in the latest version of Windows OS that can effectively find and fix errors in the root directories and system files.
However, if your thread is stuck in Windows while the device driver updates, you should run the SFC scan to fix the error automatically.
- Step 1: To launch the “Run” command, press the “Windows Key + R” buttons together.
- Step 2: Once the “Run” field appears, type “CMD” and click on the “OK” button.
- Step 3: After the black window of the “Command Prompt” app launches, type the “sfc /scannow” command.
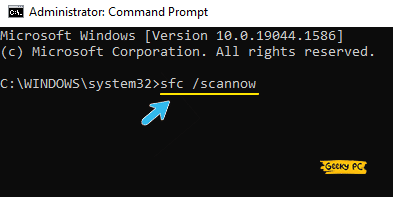
- Step 4: Hit the “Enter” button and let SFC do its job to find the error codes in system directories.
- Step 5: Once the operation is finished, type “Exit” to close the “Command Prompt” window.
- Step 6: Now, reboot your system and check whether you are still getting the thread-stuck error.
11. Run The DISM Tool
Besides SFC, DISM is another tool that comes preinstalled with the latest Windows OS that can effectively check and resolve errors in the system files.
So, if you have any buggy system files and the thread is frequently getting stuck due to that, you should also execute the DISM scan to fix it.
- Step 1: Press the “Windows Key + R” buttons together to launch the “Run” command.
- Step 2: After the run field appears, type “CMD” and click on the “OK” button.
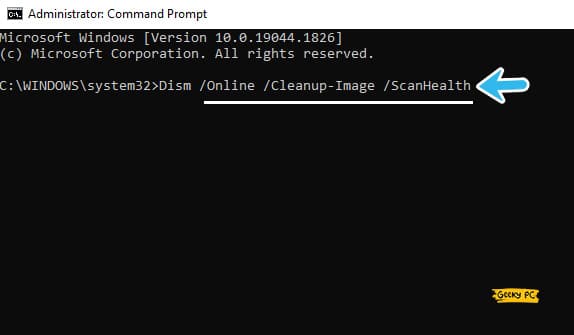
- Step 3: Once the new black window of “Command Prompt” launches, type the “Dism /Online /Cleanup-Image /CheckHealth” command and hit enter.

- Step 4: Now, type the “Dism /Online /Cleanup-Image /ScanHealth” command and hit the “Enter” button again.
- Step 5: Finally, type the “DISM.exe /Online /Cleanup-image /Restorehealth” command and hit the “Enter” button.
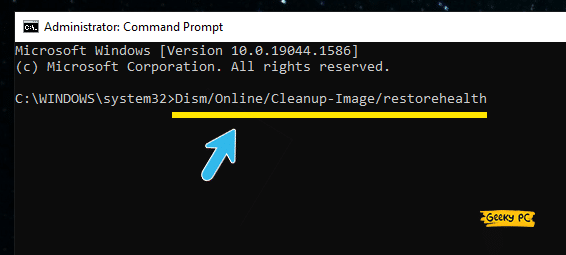
- Step 6: Once the “Restore Health” operation is done, type “Exit” to close the “Command Prompt” window.
- Step 7: Now, reboot your system and try to update your device driver again.
It is better to disable your Windows Defender or any other third-party antivirus before performing this DISM scan.
Otherwise, the security software may restrict the tool from digging deep into the system files. So, it is better to disable the antivirus and the firewall beforehand and then perform this task.
12. Restore Your Operating System To A Previous Point
If a malicious software or app has already modified the system files or the root directories on your device, you may frequently get the thread-stuck error.
And in such cases, you need to entirely restore your Windows OS to a previous point when everything was running smoothly on your device.
- Step 1: Right-click on either the “This PC” or “My Computer” icon (depending on your Windows OS variant).
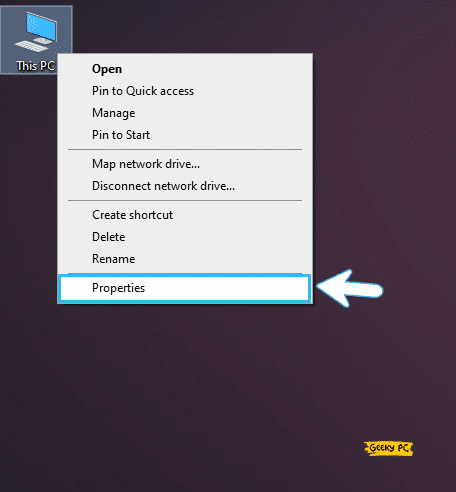
- Step 2: Select the “Properties” option from the menu to launch the “System Settings” app.
- Step 3: Once the new window appears, click on the “Advanced System Settings” option.
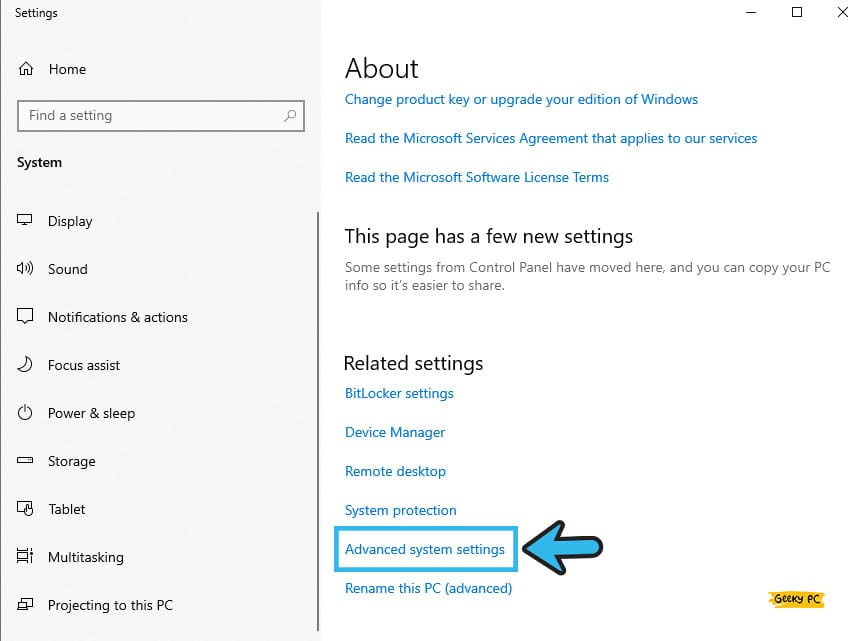
- Step 4: Now, navigate to the header menu and click on the “System Properties” tab.

- Step 5: Click on the “System Restore” button and then click the “Next” button to proceed.
- Step 6: Now, click on the “Show more restore points” option.
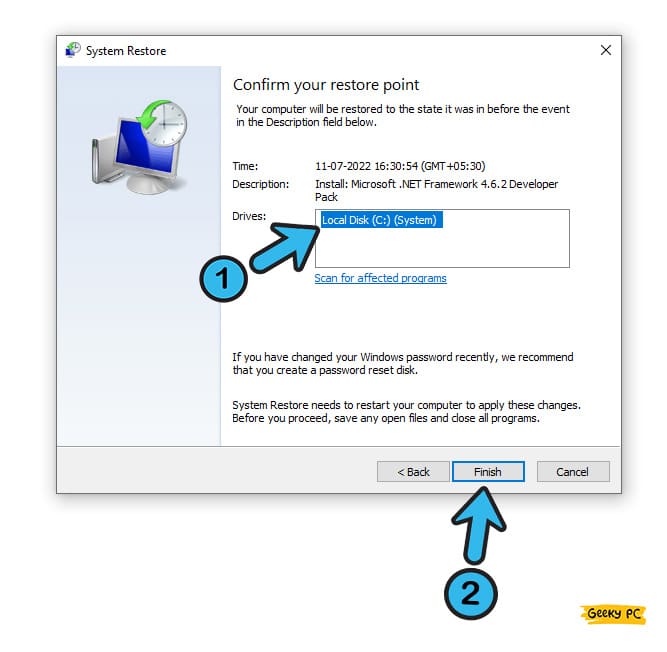
- Step 7: Select any of the previous restore points from the list where everything was running seamlessly.
- Step 8: Click on the “Finish” button to complete the restoration operation.
- Step 9: Once your Windows is fully restored, reboot your system again.
Many people have reported getting an error in their internet settings once they have restored their OS to a previous point, especially if they are using a static IP connection provided by the ISP.
In such cases, follow our detailed guide to the “ERR_NETWORK_CHANGED” error on Windows devices.
What “Thread Stuck in Device Drivers” Error Actually Is?
The “Thread Stuck” error typically occurs when an installed driver on your system falls into an endless coding loop that forces the hardware into a completely idle state. And if that happens, you’ll start getting BSOD with this particular error message.
This error mainly happens if any of the drivers themselves are corrupted or infected by viruses. Besides, it may also occur if you have downloaded any driver from a suspicious third-party site.
Moreover, it can also occur if any crucial driver is completely missing from your system.
Conclusion
Before restoring to any of the advanced methods, try all the generic methods first that need lesser tweaks on your system. However, if you truly need to execute the advanced commands, it is better to create a “Restore Point” first to roll back if anything goes wrong.
So, that’s all the possible solutions we have for the thread stuck in device driver error. If you think we have missed any solution, or if you have any other effective solution, feel free to drop your suggestion and feedback in the comment box below!
FAQs
Q. What causes device driver issues?
Various device driver issues can trigger if you are using an outdated version of the driver. Besides, these issues can also trigger if you have installed corrupted or infected drivers on your system. Moreover, t can also happen if you have any crucial driver completely missing from your device.
Q. How do I fix the thread stuck in the device driver?
You should start by updating your device driver first, as most issues can be resolved with the update. You can also execute the SFC and DISM scans to resolve this issue. Many people have also fixed it after running the BSOD troubleshooter.
Q. Is the thread stuck in the device driver bad?
You’ll typically get a BSOD with the “Thread stuck in device driver” error message if any specific driver falls into an endless loop that causes the hardware to go into an idle state. However, it is a pretty common error that can be effectively resolved with a few simple steps.
Q. How do I check if my driver is failing?
The problem may be within the driver itself if it keeps on failing. However, you can manually check the status and disable it by entering the “devmgmt.msc” command in the Run field. And once the device manager window appears, you can right-click to check the status of the particular driver.