
Isn’t it annoying when you start getting frequent green pixels on your monitor? Yes, it is even more annoying if it starts to appear when we binge-watch! However, there are many ways to fix green pixels on a monitor.
Replacing the power and the display cable of your monitor will likely resolve the green-pixel problem. Besides, you should also update your OS and the GPU driver. Many people also solved it by disabling the hardware acceleration. You can also just reboot your system into safe mode.
However, these are not all the solutions we have to fix the green pixels. But, before we dive deep into the solutions, let’s understand what this error actually is and what are the real reasons behind this error.
Why Am I Keep Getting Green Pixels On My Monitor?
Not just once, but many people keep getting green pixels on various regions on their monitors. And that seems problematic if they don’t know how to fix green pixels on a monitor. However, there are particular reasons why it keeps coming back.
First, your monitor is not in a good state, and it needs urgent repair. And second, you also need to update your outdated GPU driver.
Combining a faulty monitor with an obsolete graphics driver is the perfect concoction to trigger this issue. However, you also need to check your connecting cables to check for any signs of wear and tear.
What Are The Primary Causes Of Green Pixels on LCD Monitors?
Although it is not an uncommon problem these days, there are several reasons why you keep getting green pixels flickering on the monitor.
However, if you consider a broader spectrum, this issue can typically trigger for six primary reasons.
- The graphics and the power cable of your monitor are faulty and need replacement.
- You have a broken monitor with dead pixels on it that need urgent repair.
- You are using an outdated version of the Windows OS or the graphics card driver.
- Any third-party software or app is interfering with the GPU driver.
- You are using an unsupported refresh rate or screen resolution on your monitor.
- You have enabled hardware acceleration on your system.
Besides these six, you may also get this error if any of your pixels are overused and burnt. However, these pixels can be fixed manually, which we will soon reveal.
5+ Easy Fixes For Green Pixels On Monitor
Before trying anything exotic that needs serious tweaks on your system, you should try the generic methods to fix green pixels on a monitor.
And in almost 90% of the cases, these generic fixes alone are sufficient to resolve the bug on your monitor.
1. Replace Your Display Cable
If all of a sudden, the green pixels have started appearing on your screen; it may be due to a faulty connecting cable. Besides, this error can also typically trigger if you are using any peripherals or cables that your monitor does not support.
It can even happen if you have a loose cable attached to it.
- Step 1: Remove the power and the connecting cable from both your cabinet and monitor (You may also need to unscrew it first if you are using a VGA cable).
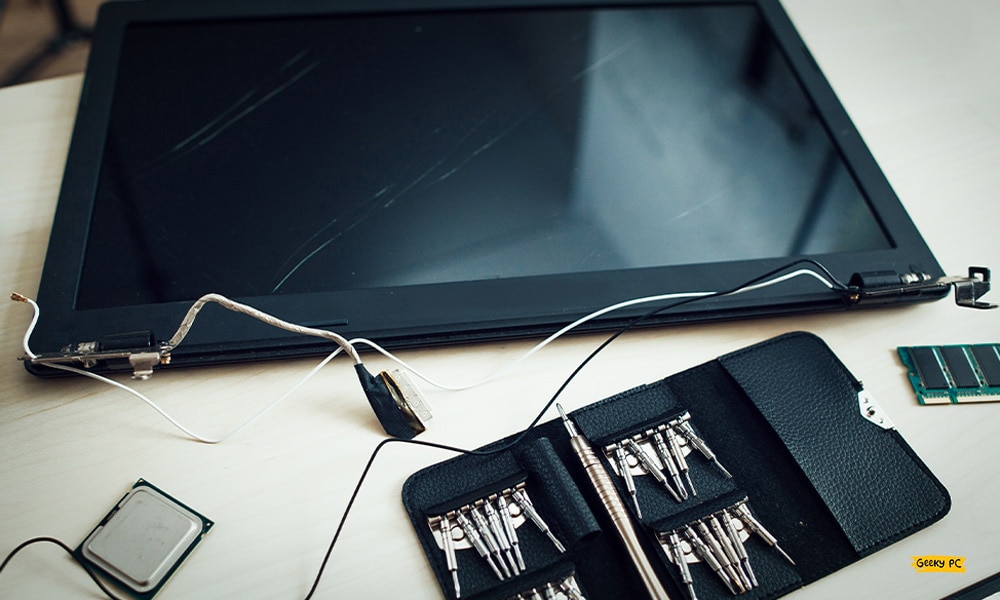
- Step 2: Manually inspect if the cable has any signs of wear and tear.
- Step 3: Buy and replace the old connecting cable on your monitor.
- Step 4: Tightly secure the cable to both the cabinet and monitor to establish the right connection.
- Step 5: Boot up your device and check the monitor if the green pixels still appear.
It is better to use an HDMI cable if you still use the old-school VGA cables that usually come with CRT monitors.
Not just a better and more secure connection between the cabinet and the monitor, but you’ll also ensure a sharper and cleared display output by using an HDMI cable (if your GPU supports it).
2. Keep The Monitor Shut For A Day
If you overuse your monitor for a longer period, some of the pixels may burn out. And to remove all the flickering pixels on the monitor, you may need to stop using it for at least for a day to let all the pixels settle down. It will ensure the long life of your monitor as well!
- Step 1: Shut down your device and let it cool down for at least 15 seconds.
- Step 2: Remove your main power cable from both your CPU and your monitor, and let it cool down for some time.
- Step 3: Now, remove all the peripherals from your system and keep those unplugged for a day.
- Step 4: Replug all the connecting cables securely to your monitor and CPU.
- Step 5: Connect and secure the power source to the CPU and monitor and check whether the small lights have appeared.
- Step 6: Boot up your system and check whether the same green pixels are again appearing or not!
Several people have reported getting various issues after they have re-plugged their monitors, especially after replacing the connecting cables. Also, you can follow our comprehensive guide to Fix Green Computer Screen in a few simple steps.
3. Manually Remove Green Pixels
If keeping your monitor switched off for an entire day or replacing the connecting cables can’t solve the green pixel issues, the problem may lie with the monitor. And you can manually remove the green pixels by applying gentle pressure on the screen.
- Step 1: Turn off the monitor (But don’t remove it from the power source or don’t shut down your system).
- Step 2: Take a damp cloth that will not scratch your screen (Cotton cloths will be the right choice).
- Step 3: Gently apply pressure with the damp cloth on that particular part where the pixels are stuck. (Don’t apply pressure anywhere else. Otherwise, you may damage more pixels on the screen)
- Step 4: Keep applying pressure and turn on your monitor.
- Step 5: Slowly release the pressure when the monitor is fully turned on.
You need to make sure that you are not applying too much pressure on your LCD or LED screen. Otherwise, you may permanently damage your monitor while doing it.
So, always keep a soft hand while applying pressure. Besides you can also use a blunt object with a cotton cover to apply pressure.
4. Reboot Your System In Safe Mode
At times, I keep getting green flickering pixels on my monitor, not due to any faulty cable or dead regions on the screen but mainly due to external interference of a third-party app.
Rebooting your system in a safe mode can effectively eliminate interference issues.
- Step 1: Click on the “Windows” icon located at the bottom-left corner of your taskbar and click on the “Gear” icon to launch the “Settings” app.
- Step 2: Once the new window launches, scroll down and click on the “Update & Security” option.

- Step 3: Navigate to the left panel and click on the “Recovery” option.
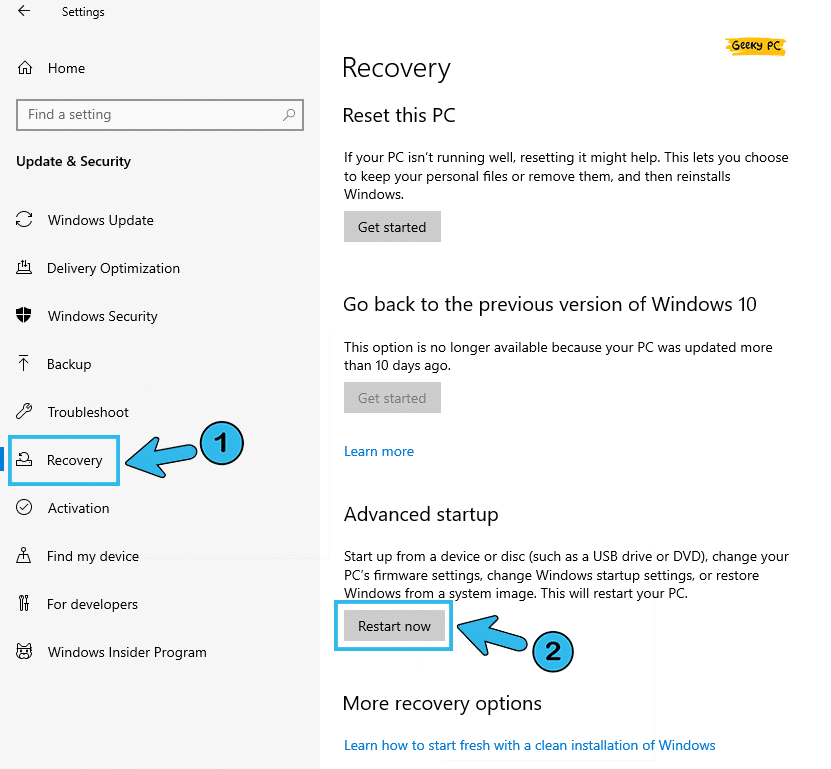
- Step 4: Now navigate to the right panel and click on the “Restart Now” button under the “Advanced Startup” header.
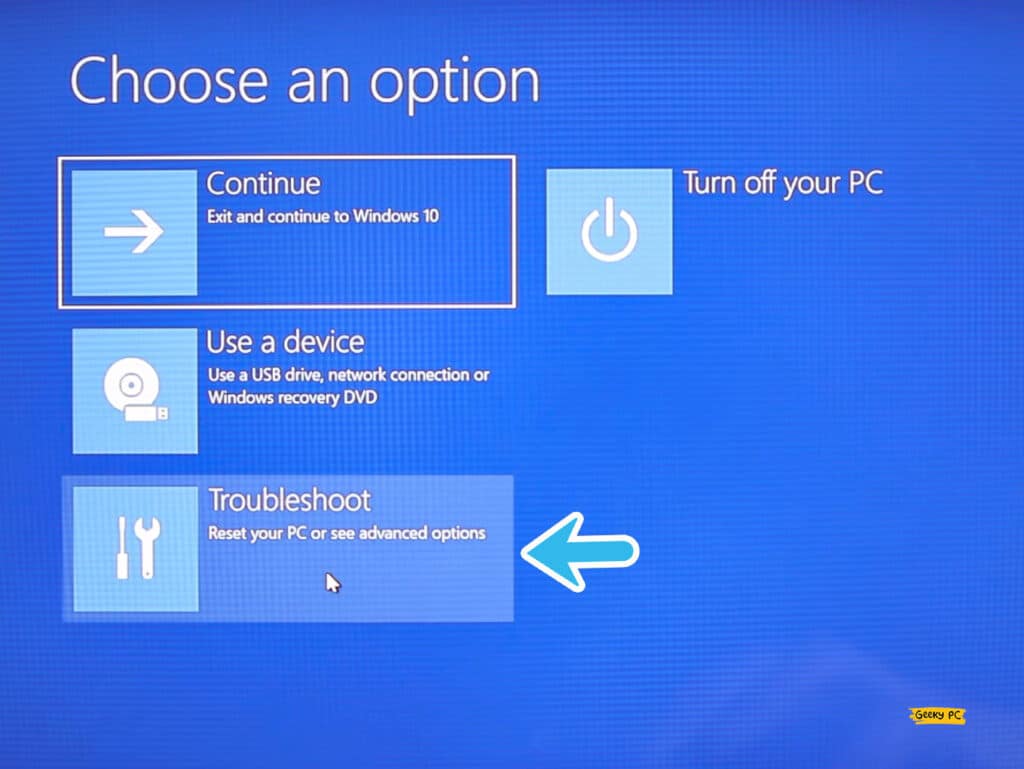
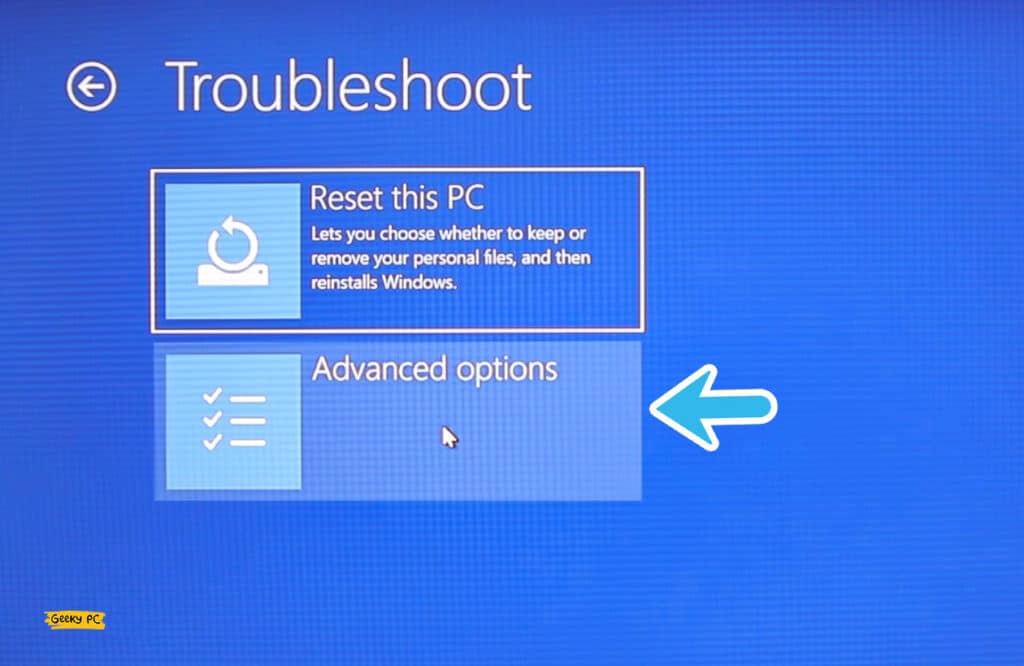
- Step 5: While the new prompt appears after the restart, click on the “Troubleshoot” option.
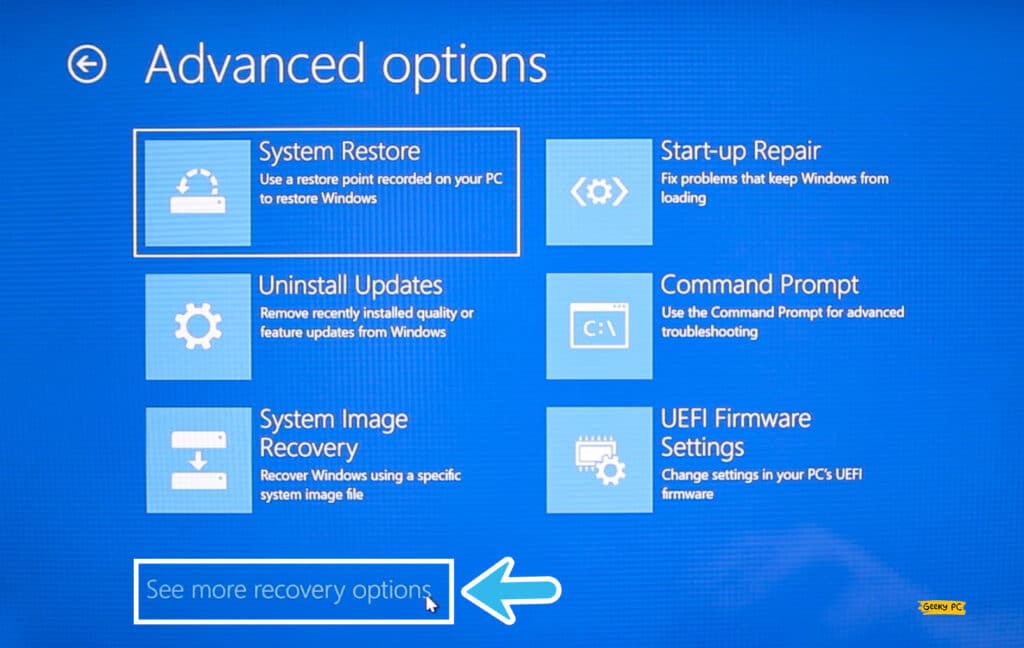
- Step 6: Now, navigate to the “Advanced” option. Under that, click on “See More recovery options.”
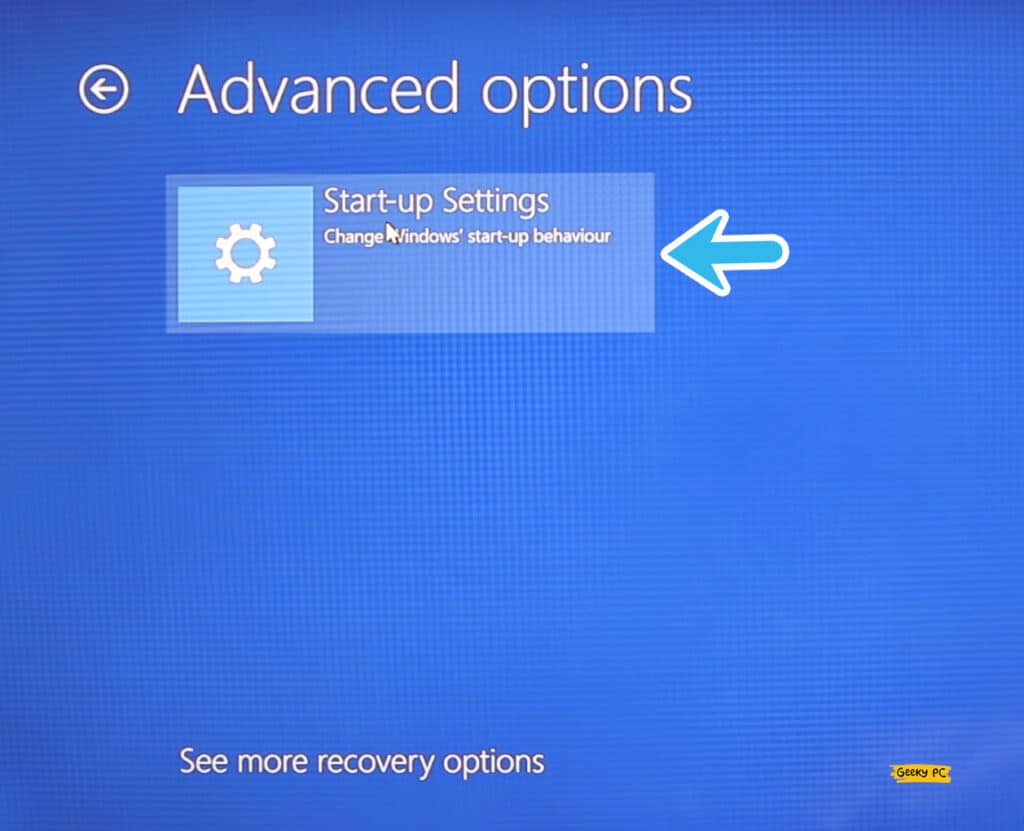
- Step 7: Further click on the “Startup Settings” option.
- Step 7: Click on the “Restart” button and select the “Safe Mode” option from the reboot menu.
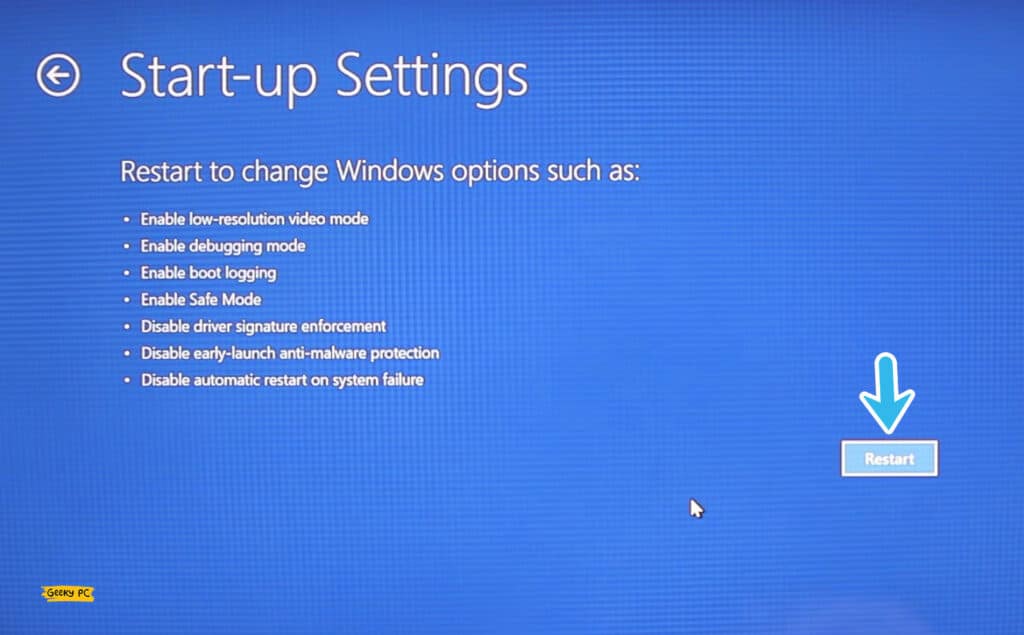
- Step 8: Check whether the green pixels are still there once your device fully restarts.
If you are not getting the green pixels on your monitor all the time, but usually, those start to arrive whenever you open Twitch, the problem may lie on the website.
In that case, follow our step-by-step guide to fix Twitch’s black screen errors effectively.
5. Update Your GPU Driver
The green pixel error can keep coming on your display if you are using an outdated version of the GPU driver.
And besides the OS itself, you need to keep the drivers updated to ensure a smoother display and also to fix minor errors and glitches related to graphics.
- Step 1: Right-click on either the “Windows” icon or the “Start” button (Depending on your OS variant).
- Step 2: Click on the “Device Manager” app to launch it.
- Step 3: Once the new window appears, click on the “Display Adapter” option to expand it further.
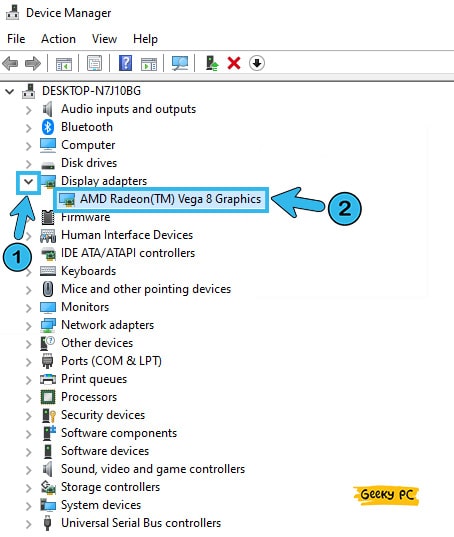
- Step 4: Locate your GPU driver from that list and right-click on it to launch the additional menu.
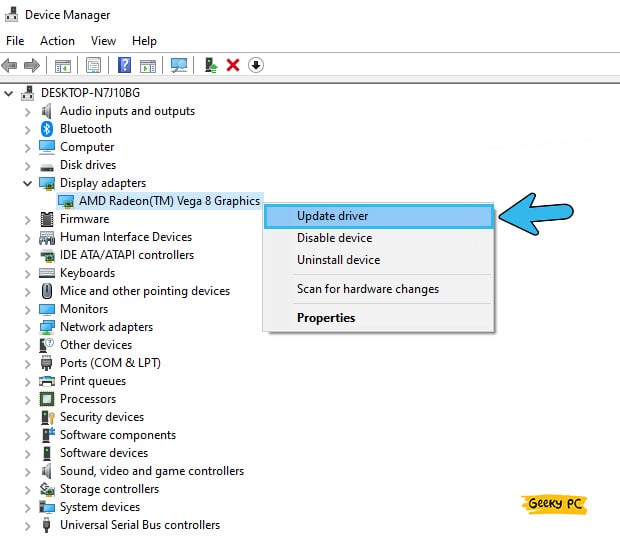
- Step 5: Select the “Update Driver” option and click on the “Search automatically for drivers” when you get a new prompt.
- Step 6: Let windows automatically find the right driver for your GPU and install it.
- Step 7: Follow the same procedure and update all your graphics-related drivers on the “Display Adapter” header.
5+ Advanced Fixes For Green Pixel Error On Your Monitor
If none of the above methods are working to fix green pixels on the monitor, your problem probably lies way deeper than you think.
And in such cases, resorting to the advanced methods that need some serious tweaks to your system is the only option left.
6. Change The Refresh Rate
If you are not using the correct refresh rate that is supported by your GPU, you may get a green pixel error on your monitor.
So, it is absolutely necessary to use the correct refresh rate on the GPU settings and the monitor itself. And you can do it manually with the monitor settings.
- Step 1: Locate the control switches on your monitor (It can either be on the front, at the bottom, or even at the backside of your monitor, depending upon the model you are using).
- Step 2: Press the “Menu” switch and let the monitor toggle into settings mode.
- Step 3: Use the navigation switches and go to the “Refresh Rate” option.
- Step 4: Select the right refresh rate between 60Hz, 100Hz, 120Hz, or 144Hz (depending on the supported refresh rate of your GPU).
- Step 5: Once you are done with the monitor settings, right-click on your Windows home screen and select the “Display Settings” option.
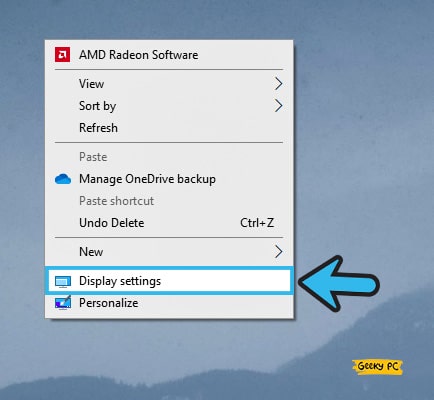
- Step 6: Once the new window appears, navigate to the right panel, scroll down, and click on the “Advanced Display Settings” option.

- Step 7: After the new menu appears, scroll down, and change the refresh rate from the drop-down menu.
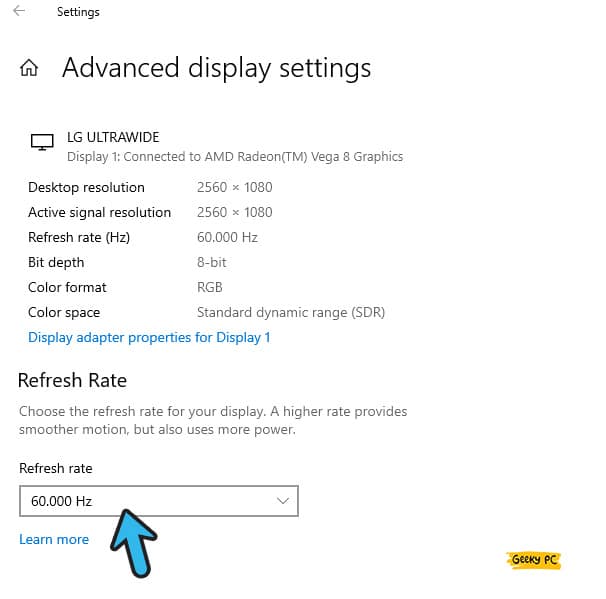
- Step 8: Now, navigate to your GPU software and set up the same refresh rate that you have chosen for your monitor.
- Step 9: Reboot your system and check whether the green pixels have gone or not!
You may need to check the instruction manual of your monitor to know about the supported refresh rate. If you haven’t selected a single refresh rate on both your monitor and windows settings, further graphics-related problems may also trigger.
If you are also facing the same, follow our comprehensive guide to fixing generic PnP monitor errors in a few simple steps.
7. Adjust The Screen Resolution
Not just the refresh rate, but you also need to select the right screen resolution to fix all the flickering green lines on a monitor.
If you choose the wrong screen solution, you’ll not just get various graphics-related bugs but will also never enjoy a smoother and more vivid viewing option.
- Step 1: Click on the “Windows” icon on the “Start” button located at the bottom-left corner of your taskbar.
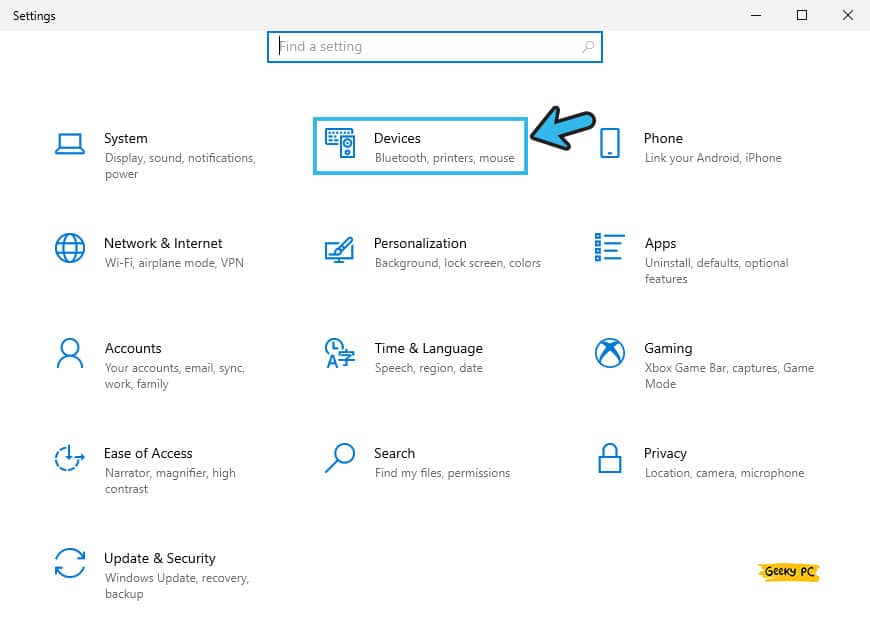
- Step 2: Click on the “Settings” option (The “Gear” icon in Windows 10/11).
- Step 3: Once the “Settings” app launches, click on the “Devices” option.
- Step 4: Navigate to the right panel, scroll down, and click on the “Display Settings” option.
- Step 5: Once the new window launches, select the right (Recommended) resolution from the drop-down menu under the “Display Resolution” option.
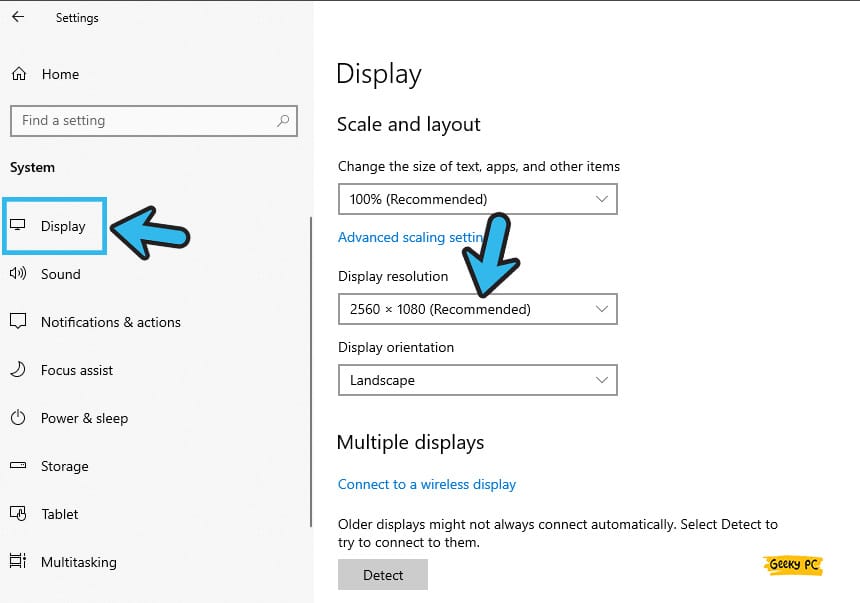
- Step 6: Reboot your system and relaunch windows with the new screen resolution.
Refer to the instruction manual that comes with your monitor to know about the maximum supported screen solution for your monitor. You should select the maximum supported resolution on your Windows settings to ensure a smoother display.
8. Disable Hardware Acceleration
If you have already enabled hardware acceleration on your Windows settings, it will force your graphics to override through your GPU instead of your CPU.
However, if you keep getting green-pixel errors, you may need to disable it manually to fix the issue.
- Step 1: Right-click on the empty space on your Windows home screen and select the “Display Settings” option.
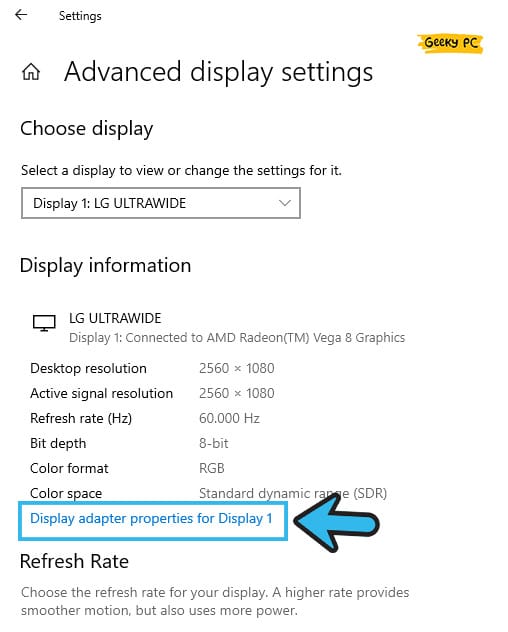
- Step 2: After the “Settings” app appears, navigate to the right panel and select the “Advanced Display Settings” option.
- Step 3: Once the new menu appears, click on the “Display adapter properties for Display 1” tab.
- Step 4: Now, select the “Troubleshoot” option from the header menu.
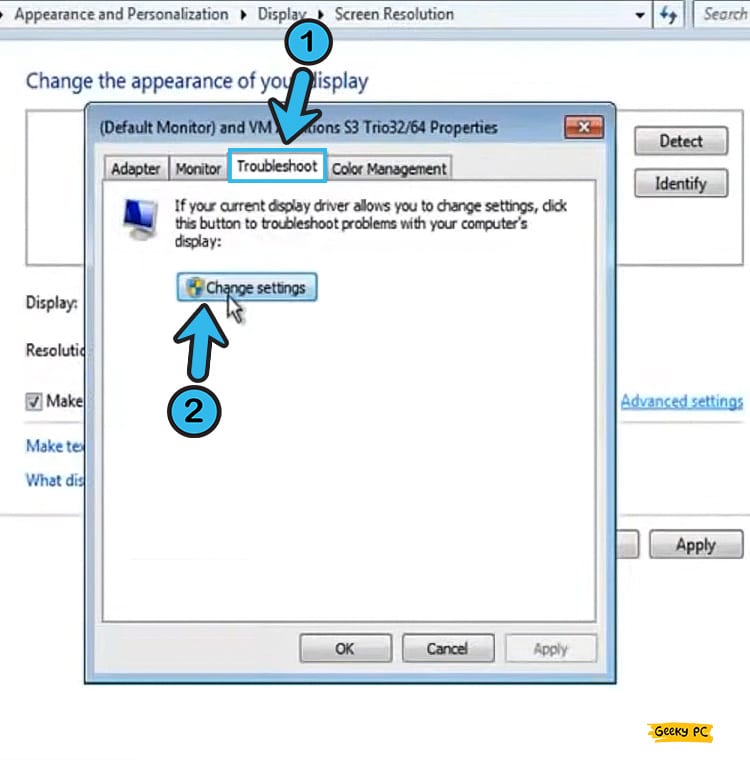
- Step 5: Once the new window appears, click on the “Change Settings” option.
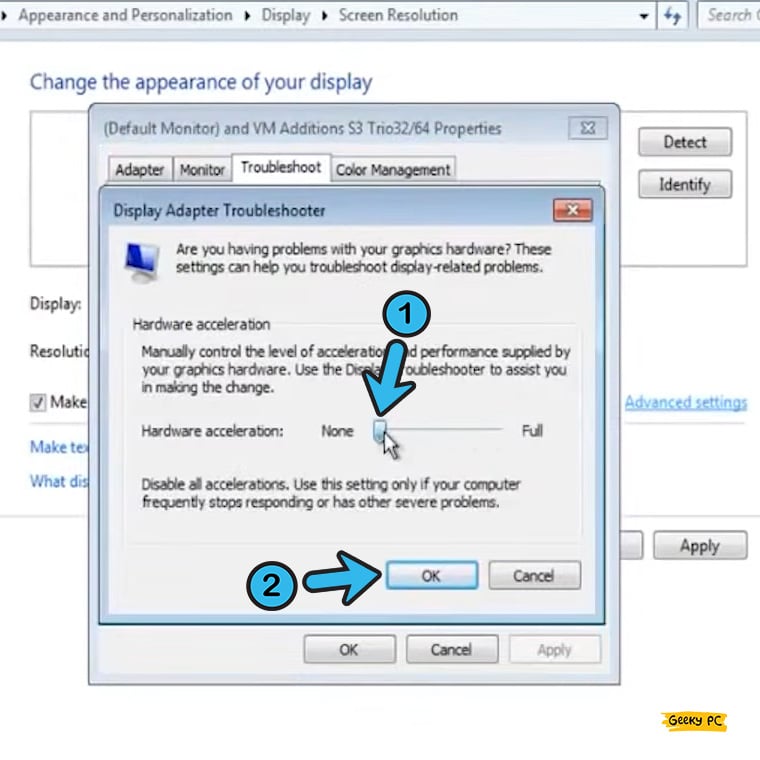
- Step 6: Locate the “Hardware Acceleration” option and move the slider towards the “None” parameter.
- Step 7: Click “OK” to save the settings and reboot your Windows device.
If you disable all the hardware acceleration on your Windows settings all of a sudden, you may get various issues, especially undefined network errors.
Note: If you are not getting the “Troubleshoot” option on the menu, you can just navigate to the “Adapter Type” header and then click on the “Properties” button.
Once the new window launches, click on the “Resources” tab and navigate to the “Hardware Acceleration” properties.
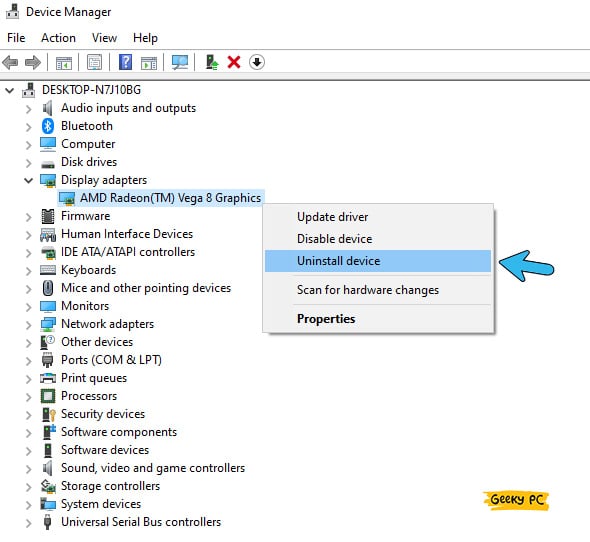
9. Uninstall GPU Driver And Move Into Default Graphics Output
If you keep getting the green pixel error on Windows devices even after updating your GPU driver, the high chances are that the GPU driver itself is not supported.
In such cases, you need to manually uninstall the driver and roll back to the default graphics driver to fix it.
- Step 1: Press the “Windows Key + X” buttons together to initiate the additional menu.
- Step 2: Click on the “Device Manager” option to initiate the settings.
- Step 3: Once the new window appears, click on the “Display Adapters” tab to expand it.
- Step 4: Navigate to the GPU driver you are using and right-click on that to fetch additional options.
- Step 5: Now, select the “Uninstall Device” option to initiate the procedure.
- Step 6: Once you get the new prompt, tick the box beside the “Delete the driver software for this device” option.
- Step 7: Now, click on the “Uninstall” option to remove the GPU driver completely from your system.
You can also manually remove your graphics card from your motherboard to reroute your graphics output to the default mode. However, you also need to unplug your monitor cable from the GPU and re-plug it into the default video output of your motherboard.
10. Use Third-party Pixel Fix Tools
If none of the above methods are sufficient to fix the green pixel error on your monitor, you may have a bug or error in the root directory. In such cases, using a third-party tool is likely to solve your issue. And there are two most trusted tools available which you can completely rely on.
- JScreenFix: One of the most downloaded and trusted tools to repair dead and burnt pixels, JScreenFix can solve the issue in less than 10 minutes. It is a completely free-to-use tool and takes just a minute to access.
- Undead Pixel: It is also a trusted tool that can effectively locate dead or burnt pixels on your screen and can repair it within minutes. Undead Pixel is also a free tool to download.
Alternatively, you can just contact the manufacturer of your monitor to claim your warranty (if it is still under the warranty period) or contact their customer care to get the additional support needed.
What Is The Different Between A “Stuck” and A “Dead” Pixel?
If a particular pixel on your screen shows a different color, the pixel is probably stuck. And a dead pixel always appears either black or white on the screen. However, the fundamental difference between a stuck and a dead pixel is that you can repair and fix stuck pixels, while dead pixels are absolutely unrepairable.
There is another type of pixel problem called a hot or white pixel. If any pixel on your screen is permanently colored white, it is called the hot or the white pixel. Although it is a bit different in color, white pixels are also a type of dead pixels.
Conclusion
Before trying any pro methods, you should start by applying gentle pressure on the pixel to fix the green-pixel error on Windows devices.
However, it is also absolutely safe to try the generic methods we have listed above to fix green pixels on a monitor. But, if you have to try any advanced fixes, you should make a restore point on your system first.
So, these are all the methods that we have to solve this monitor error. If you think we have missed any or if you have a better working method to resolve this issue, feel free to connect with us in the comment box below.
FAQs
Q. Why do I see green spots on my monitor?
It is highly possible that the connecting cable or the monitor itself is broken and needs urgent repair. However, these green spots can even appear if you are using an outdated version of the Windows OS or an obsolete version of the GPU driver.
Q. Can you fix dead pixels on a monitor?
There are no direct ways to fix a dead pixel on your own. If you have a stuck pixel, you can fix it by gently applying pressure. However, if the pixel is completely dead or burnt, there is no way to repair it other than resorting to a display technician. You may also need to change your monitor altogether to get rid of this issue.
Q. Do dead pixels go away?
No, dead pixels will never go away on their own. Besides, it won’t even go away if you try any home remedies like applying pressure or keeping it shut for a day. A dead pixel needs a technician to repair it. Otherwise, you may have to change your monitor and upgrade to a new one.
Q. What causes dead pixels on monitors?
If your monitor suffered any physical damage, such as a pinch by a sharp object, it could definitely cause dead pixels. However, a dead pixel can even appear for manufacturing defects too. Besides, dead pixels can even appear if there is a problem with the connecting cable.