
There is no doubt that both Windows 10/11 and macOS Sierra ensure a smooth installation procedure. However, you had to bang your head when the error code 0x0 triggers during an installation process on these OS, isn’t it?
Error 0x0 code can be typically fixed by replacing the faulty RAM. Besides you can also fix it by disabling the antivirus and ending the conflicting programs. This issue can also be solved by deleting junk files and cleaning up the disk. Moreover, you can also update your OS to fix it.
However, several other methods are also available that can effectively resolve this issue. But, before we dive deep into the solutions, let’s understand what this error actually is and what are the primary reasons behind this error.
What Are The Primary Causes Of Error Code 0x0?
Although error code 0x0 is pretty common in Windows and Mac-based systems, there are several reasons this error can typically trigger. But, in a broader spectrum, this error code mainly occurs for six primary reasons.
- Hardware, peripherals, or accessories installed on your system is faulty.
- Your system has encountered an incomplete installation or buggy installation.
- A software or app has left an invalid entry on your registry or other root files.
- Your device is infected with malicious programs or viruses.
- You might have accidentally deleted important system files or have an issue in the root directory.
- The system might have encountered an improper shutdown (mainly due to power failure).
Besides these six, this error code can also trigger if you are running conflicting programs at the same time. It can even trigger if your antivirus is interfering with the installation process.
2+ Hardware Fixes To Resolve Error Code 0x0
The error code 0x0 can trigger on your Windows-based systems if you have any minor hardware issues, such as faulty RAM or any loose connection in the peripherals. So, before trying any system tweaks, you should check your hardware to fix it.
1. Replace your RAM
A faulty RAM or “Random Access Memory” inserted on your motherboard can typically cause several errors. Besides, these issues can still trigger if you have a broken pin or a loose pin on the RAM hardware itself. So, before trying any software tweaks, just replace your RAM.

- Step 1: Unplug all the peripherals and the power cable from your CPU.
- Step 2: Slide the side panel from your cabinet to open it (you may also need to unscrew the panel first).
- Step 3: Now, trace your RAM slots and check if the RAM is sitting loose on those.
- Step 4: If not, push the small clips at both ends of your RAM slot to eject the RAM hardware.
- Step 5: Take out the RAM and insert a new RAM into the same slot with firm hands.
- Step 6: Push the RAM to the slot until the clips on both ends lock the hardware.
- Step 7: Close your cabinet, attach all the peripherals and power cables, and reboot your system.
If replacing the RAM is not an option, you can alternatively just shift the slot of your RAM (as almost all the motherboards have multiple RAM slots). All you need is to take out the RAM from its slot and push it down to the next slot until the clips fully secure it.
2. Disconnect All Accessories And Reconnect Them
Besides RAM, loose or faulty peripherals attached to your system can also trigger various issues. It may even happen if you have any defective or loose wires on your system. So, it is better to manually check and reconnect all the accessories and peripherals to your system.
- Step 1: Shut down your computer and leave it idle for at least 15 to 30 seconds.
- Step 2: Unplug all the power cables from both the monitor and the cabinet and let those cool down.
- Step 3: Now, detach all the cables, peripherals, and accessories from your cabinet (Don’t forget to eject USB drives and printer cables beforehand).
- Step 4: Keep your cabinet without any attachment for at least 2 minutes.
- Step 5: Now, securely reattach all the connecting cables and peripherals while using firm hands.
- Step 6: Insert the power cables on your monitor and cabinet, then power up the system.
You may also need to unscrew and re-screw the monitor cables if you are using a VGA connection. Besides, it is also better to de-dust all your peripherals and accessories before you insert those again into your cabinet.
6+ Easy Fixes For Windows Error Code 0x0
Before trying any advanced fixes that can make some severe alterations to your system, you should first resort to generic fixes that are easy to do and relatively safe. And in almost 80% of the cases, these generic fixes alone can solve the error code 0x0 on your device.
3. Restart Your Device In Safe Mode
If any third-party startup application interferes with Windows or any other software installation, the error code 0x0 in startup repair can still trigger.
So, you need to block that interference in such cases. And to do that, booting up your system to a safe mode is the best option.
- Step 1: To launch the “Settings” app, press the “Windows Key + I” buttons together.
- Step 2: Once the app opens, scroll down, and click on the “Update & Security” option.

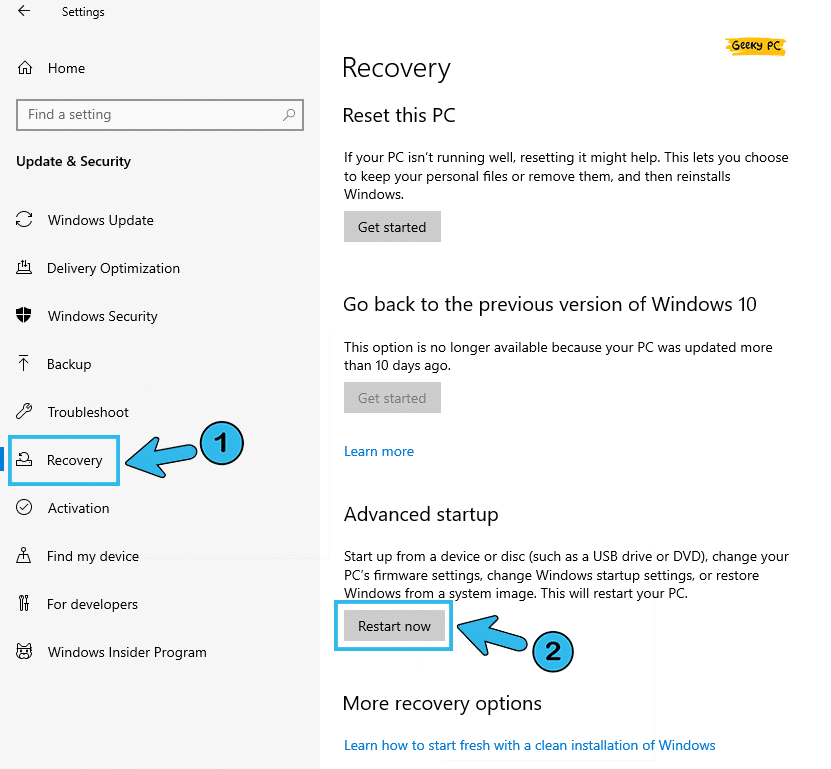
- Step 3: Now, once the new page appears, navigate to the left panel, and select the “Recovery” option.
- Step 4: Navigate to the right panel and click on the “Restart” button under the “Advanced Startup” option.
- Step 5: Let Windows automatically reboot itself and select the “Safe Mode” option from the boot screen.
- Step 6: Let your OS fully starts and check whether you are still getting this error.
Many people have encountered an unresponsive start button, especially on Windows 10 devices after they have restarted their systems to a safe mode.
If you are also witnessing the same on your system, follow our detailed guide to fix the start button on Windows devices.
4. Update Your Operating System
If you have installed an obsolete version of Windows OS on your system or if you are using an outdated version of Windows 10, the windows insider error 0x0 can frequently trigger.
And to resolve it, you need to update your Windows OS first before trying other tweaks.
- Step 1: Click on the “Magnifying Glass” icon on your taskbar to launch the “Search” field.
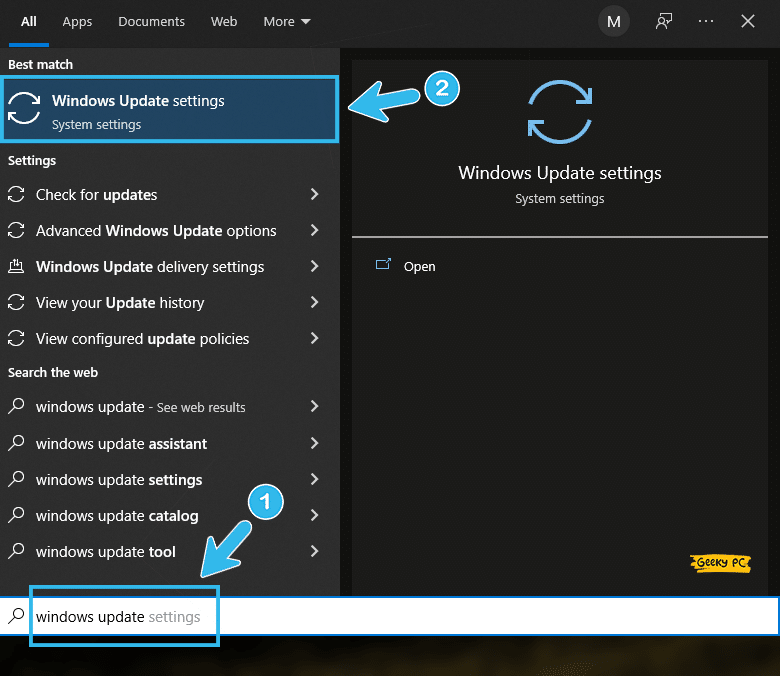
- Step 2: Type “Windows Update” on the search field and click on the very first result.
- Step 3: After the “Update Manager” app launches, navigate to the left panel, and select the “Windows Update” option.
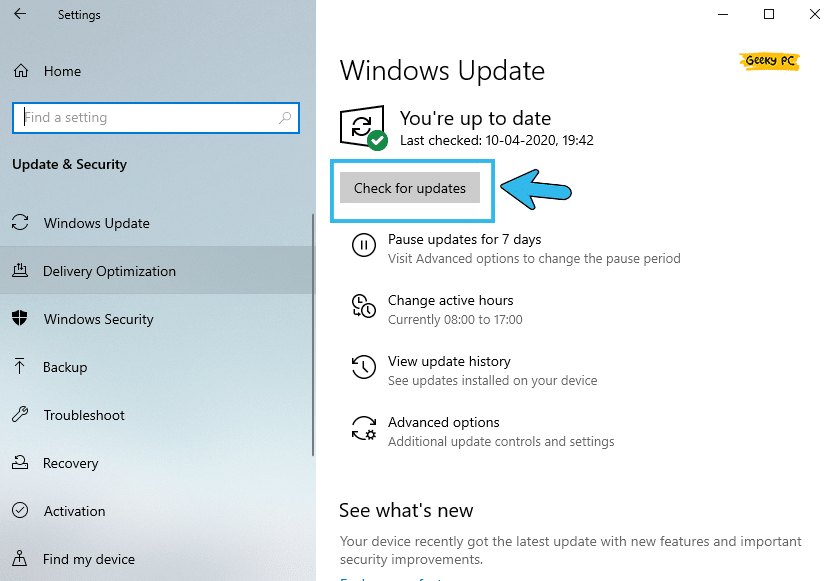
- Step 4: Come back to the right panel and click on the “Check for updates” option.
- Step 5: Let your OS automatically search for the latest update on the internet.
- Step 6: Once the new updates are successfully installed, restart your device and check if the problem still triggers.
A few Windows users have reported having a completely unresponsive taskbar after they rolled out the latest Windows 10 update.
5. Delete Junk Files On Windows
If you have too many junk files accumulated on your system, the 0x0 code can trigger. However, you can easily clean up those junk files from your system to eliminate that issue. Besides, cleaning up junk files can also save some disk space on your system.
- Step 1: Click on the “Magnifying Glass” icon on the bottom-left corner of your taskbar.
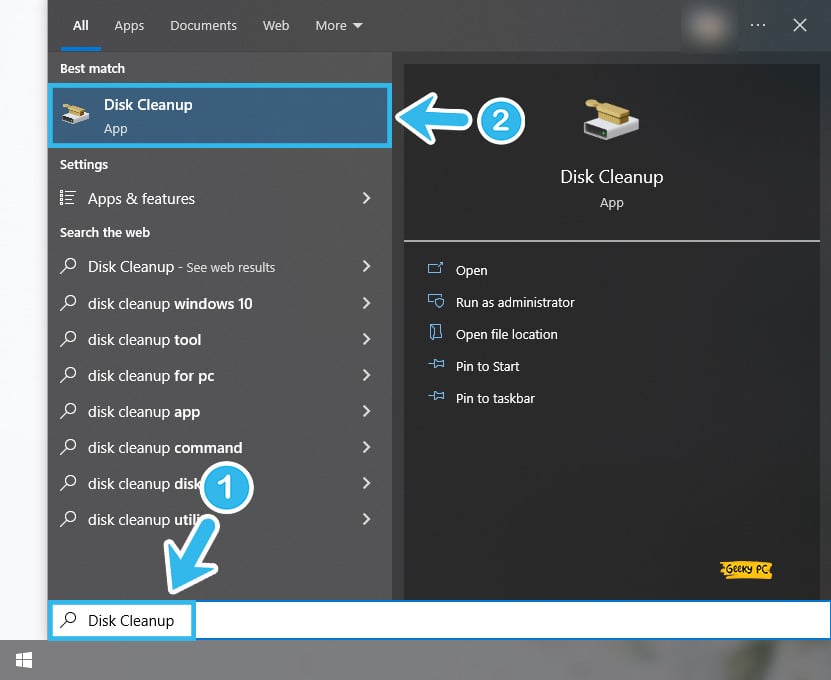
- Step 2: Type “Disk Cleanup” and click on the first result once the search field appears.
- Step 3: After the small popup window appears, select your “C:” drive from the drop-down list.
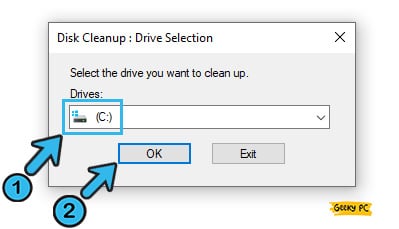
- Step 4: Once the new window appears, tick all the boxes beside the items under the “Files to delete” header.
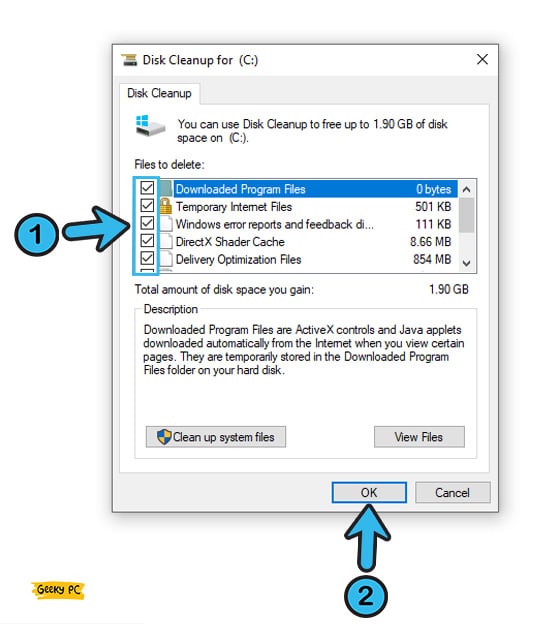
- Step 5: Click on the “OK” button and then the “Delete Files” option to initiate the junk removal process.
- Step 6: Restart your system once the junk files are completely deleted.
It is perfectly safe to select all the items from the list and then delete the junk files from those categories.
However, if you want to keep your internet profile intact with all the browser history, you can uncheck the “Temporary Internet Files” option and then proceed.
6. Go For A Thorough Disk Cleanup
Besides the normal junk files, the system disk test error code 0x0 can also trigger if you have junk files on the system or in the root directories. And to resolve it, you need to manually remove the junk files from your system directories.
- Step 1: Navigate to the bottom-left corner of your taskbar and click on the “Magnifying Glass” icon.
- Step 2: Once the search field appears, type “Disk Cleanup” and click on the very first result that appears.
- Step 3: Select your “C:” drive from the drop-down menu on the newly launched popup.
- Step 4: After the new window launches, click on the “Clean up system files” option located at the bottom.
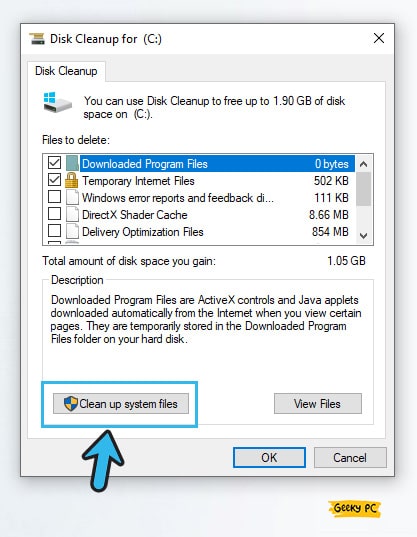
- Step 5: Select “C:” drive again and then select all the items available under the “Files to delete” header on the new window.
- Step 6: Click “OK” and then click on the “Delete Files” option once you get a new prompt.
- Step 7: Reboot your system when the junk files are entirely removed from your system’s root directories.
7. Stop Conflicting Programs From Task Manager
At times, conflicting programs running on the same platform can interfere with each other. And that interference can instantly trigger various errors on Windows devices.
So, it is better to end all the conflicting programs from your system and give your windows a fresh start.
- Step 1: Press the “Ctrl + Alt + Del” buttons altogether to launch the “Task Manager” app.
- Step 2: Navigate to the “Processes” tab from the header menu.
- Step 3: Now, select each option from the list and right-click on that item to fetch the additional options.
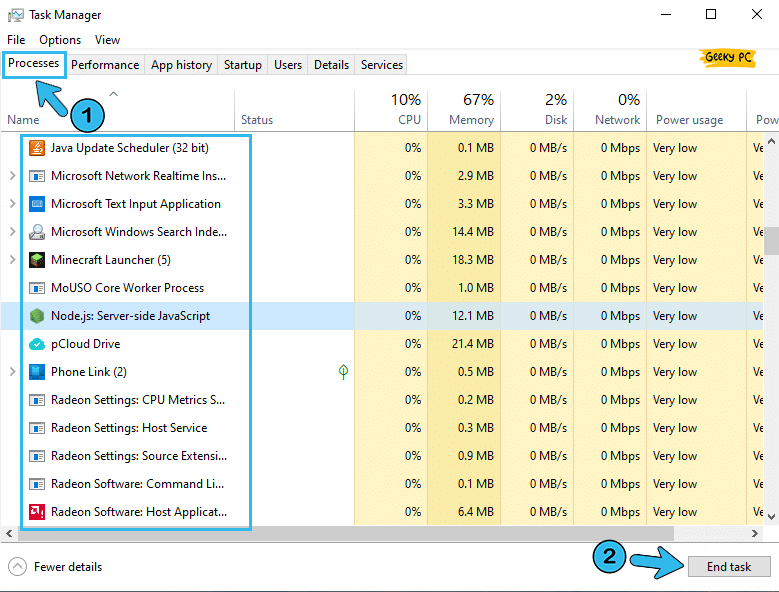
- Step 4: Select the “End Task” button to stop that particular app.
- Step 5: Once you have ended all the available tasks, reboot your system.
Some people started getting an unidentified ethernet error with a yellow triangle sign after they had stopped some programs from their task managers
8. Reinstall Operating System On Your Device
It may happen that you have certain bugs on your system file that no other third-party tool can repair. Besides, you can get several errors if you have any malware on your root directory.
In that case, proceeding with a rollback process can be the only option left.
- Step 1: To launch the “Settings” app, press the “Windows Key + I” buttons together.
- Step 2: Once the new window appears, navigate to the bottom of the page, and click on the “Update & Security” option.
- Step 3: Once the new page opens, locate the “Recovery” option on the left panel.
- Step 4: Come to the right panel and click on the “Get Started” button under the “Go back to the previous version of Windows 10” header.
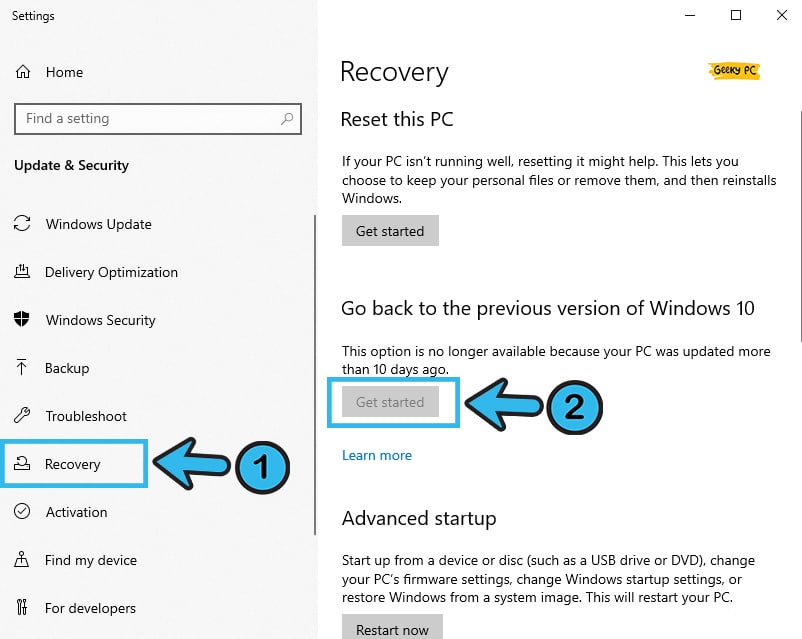
- Step 5: Follow the prompt instructions and select the “Choose an Operating System” option.
- Step 6: Click on the “Windows Rollback” option from the new menu.
- Step 7: Let windows roll out to the previous version and reboot your system once the process is over.
It is better to keep all your important files and data on an external drive before rolling it out to an older OS version. Otherwise, you’ll lose all those valuable data from your system.
On the other hand, you can also use free tools like Google Password Manager to save your passwords securely.
6+ Advanced Fixes For Error Code 0x0
If the generic fixes mentioned above can’t fix the error code 0x0 on your system, there are no other options left than resorting to the advanced methods that need some serious changes on your system. However, you should execute these fixes with utmost care.
9. Temporarily Disable Antivirus
There is no doubt that the Windows Defender antivirus that comes preinstalled with the latest Windows 10 and Windows 11 systems is robust security software.
However, it can interfere with any other third-party apps on your system to trigger various errors. And disabling it temporarily can effectively solve those issues.
- Step 1: Launch the “Settings” app by pressing the “Windows Key + I” buttons together.
- Step 2: Navigate to the bottom of the newly opened windows and click on the “Update & Security” option.
- Step 3: Click on the “Windows Security” option located on the left panel.
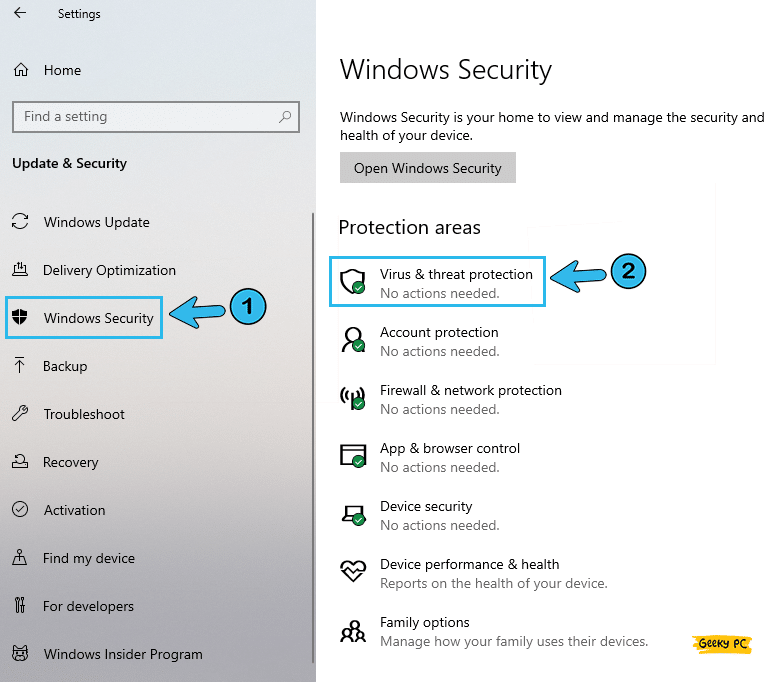
- Step 4: Now, click on the “Virus & threat protection” option on the right panel.
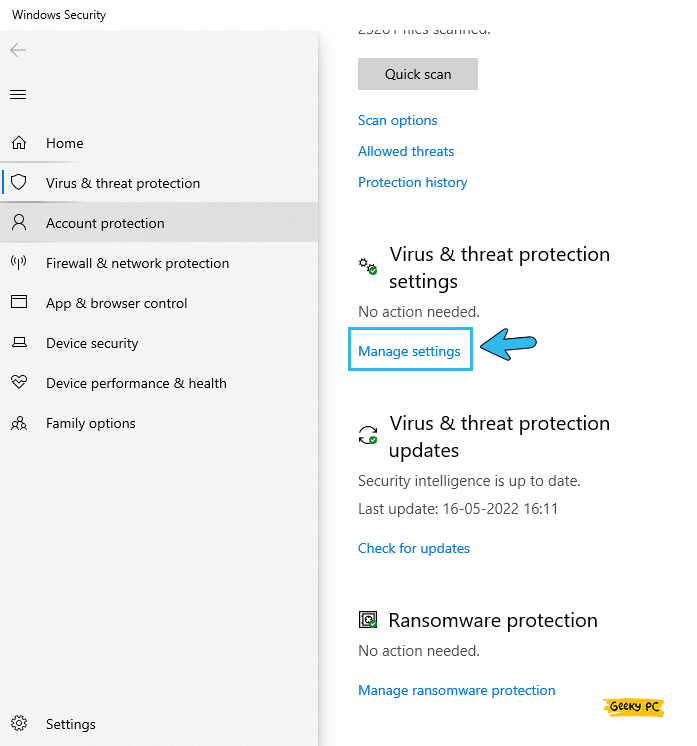
- Step 5: Once the new window appears, click again on the “Virus & threat protection settings” option.

- Step 6: Toggle the switch beside the “Real-time protection” option to pause the antivirus.
- Step 7: Click “OK” to save the settings and check whether you are still getting the issue.
Many people have reported getting a strange group policy error after they have disabled their Windows Defender, especially if they are using their systems under a network administrator.
If you are also facing the same, follow our detailed guide to fix the “This program is blocked by group policy” error in Windows systems.
10. Uninstall All Your GPU Drivers
The 0x0 code can typically trigger if you have a faulty GPU driver installed on your system. Besides, it can also trigger if you are using a malicious driver that comes from a third-party site.
In such cases, you should uninstall all the available GPU drivers from your system to rectify the error.
- Step 1: To launch the additional options, press the “Windows Key + X” buttons together.
- Step 2: Select the “Device Manager” option from the list to initiate the app.
- Step 3: Once the new page appears, click on the “Display Adapters” option on the left panel to expand it.
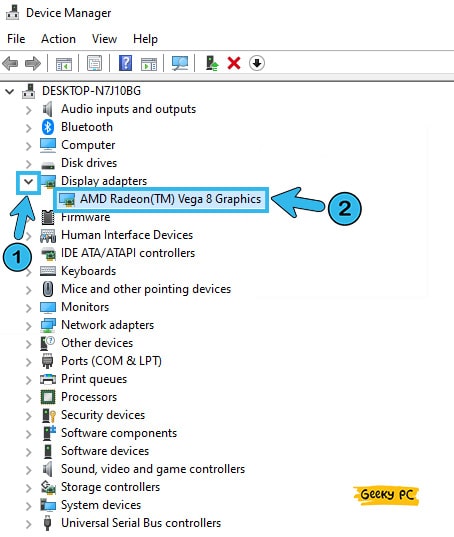
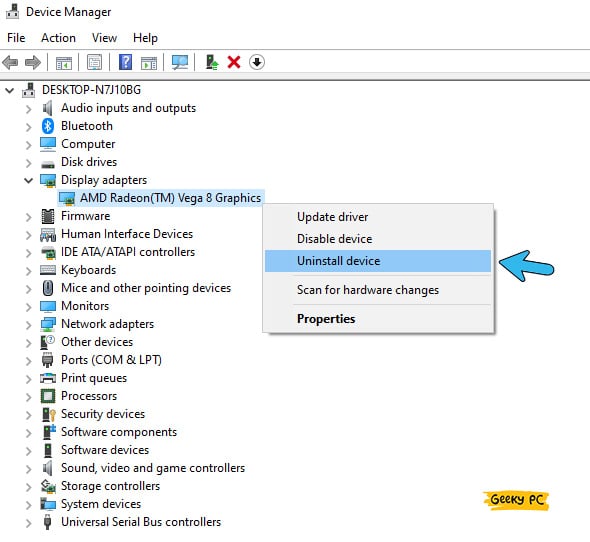
- Step 4: Now, locate your GPU driver from the list and right-click on it to fetch the options.
- Step 5: Click on the “Uninstall device” option from the list.
- Step 6: Once you get a new prompt, click on the “Delete the driver software for this device” option.
- Step 7: Click on the “Uninstall” option to remove the driver completely.
If you have multiple GPU drivers installed on your system, you need to delete all those drivers one by one. And you should restart your system after that.
If you get any generic monitor error after uninstalling the GPU drivers, follow our comprehensive guide to fixing the generic PnP monitor error on your system.
11. Completely Restore Your Windows OS
If rolling back to your old OS is not an option for your system. You can just restore your entire OS to older restore points. In that way, you can safeguard all your data and apps installed on your system. And you can do this in a few simple steps.
- Step 1: Right-click on either the “This PC” or “My Computer” icon (depending on your OS variant).
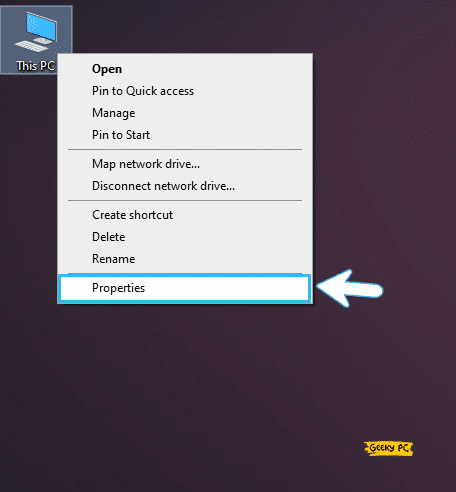
- Step 2:Click on the “Properties” tab to initiate the system settings.
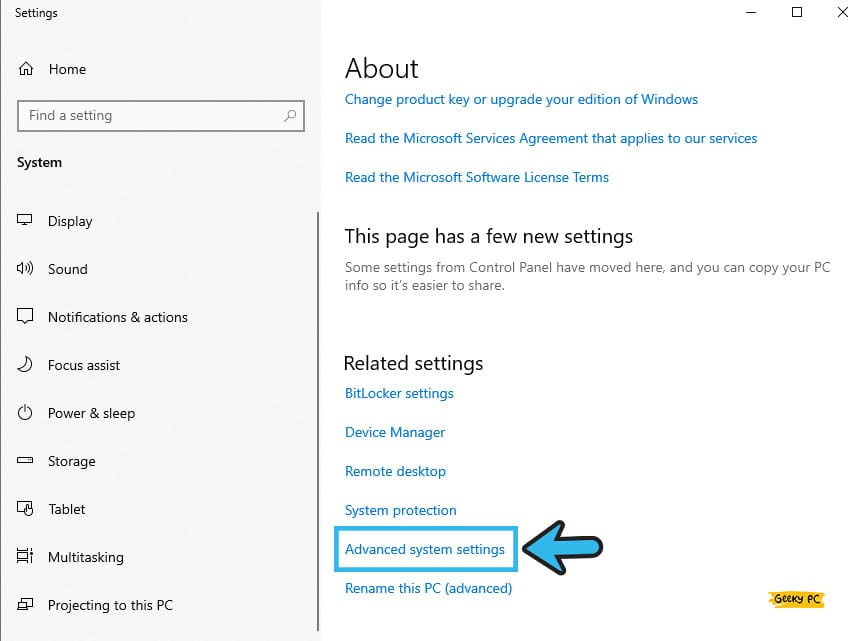
- Step 3: Once the new window appears, click on the “Advanced System Settings” option.
- Step 4: Navigate to the header menu and select the “System Properties” tab.
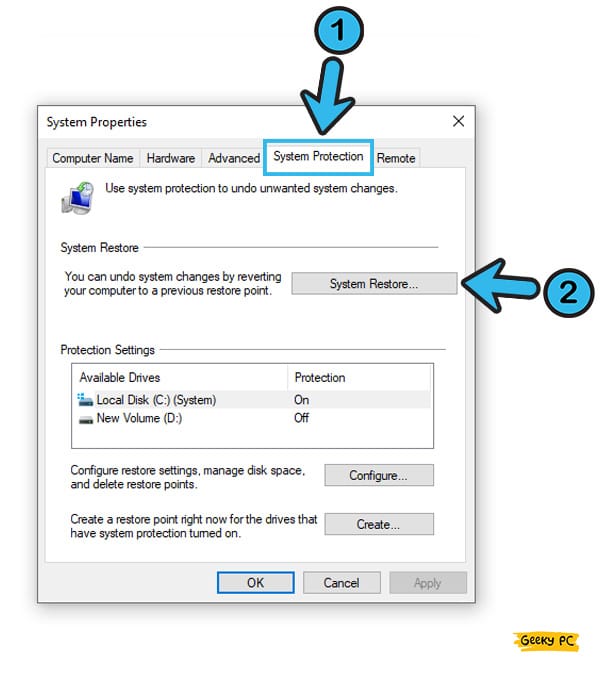
- Step 5: Now, click on the “System Restore” option and navigate to the “Next” button.
- Step 6: Navigate to the “Show more restore points” option and select any of the previous points.
- Step 7: Once the new popup box appears, click on the “Finish” button.
If you are using a static IP provided by your ISP and have restored your OS, your default gateway may stop responding after the tweak.
If your system is also facing the same issues, you can follow our step-by-step guide to the “Wi-Fi Keeps Disconnecting” error on Windows devices.
12. Perform SFC Scan
System File Checker or SFC is a unique tool that comes preinstalled with the latest versions of Windows OS. And with this tool, you can manually check and debug the root directories and system files.
So, if you are frequently getting windows error code 0x0 on your system, using the SFC scan can be the best solution.
- Step 1: Press the “Windows Key + R” buttons together to launch the “Run” command.
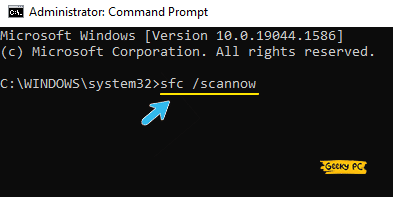
- Step 2: Type “CMD” in the dialog box and press the “OK” button to launch the “Command Prompt” app.
- Step 3: After the black window launches, type the “sfc /scannow” command and hit the enter button.
- Step 4: Let Windows identify and fix the corrupted system files on your root directories.
- Step 5: Restart your system when the operation is done.
It is better to restart your system into a safe mode and then proceed with the SFC scan to minimize interference from other third-party apps.
Besides, there are several free third-party root scanning tools also available that can effectively fix this issue.
13. Use A License Removal Tool (Windows Users)
If you are using a cracked version of the Microsoft Office pack or have spoofed the license of any Microsoft products, this 0x0 code can trigger when the OS detects it.
In such cases, using a third-party tool to wipe all the licenses from your system is the only option.
- Step 1: If you are using a cracked version of MS Office or any other Microsoft application, quit those apps and uninstall them completely.
- Step 2: Now, install any third-party license removal tool from the internet.
- Step 3: Once the setup file is downloaded, navigate to the “Downloads” folder on your system and locate the “.exe” file.
- Step 4: Double-click on that “.exe” file to start the installation process.
- Step 5: Once the removal tool is correctly installed, open the tool and remove all the cracked licenses from your system.
You first need to disable your antivirus before installing any third-party license removal tool on your system. Otherwise, the antivirus will count the removal tool as a virus and will instantly delete it. However, it is absolutely safe to get any virus prompt while installing these tools.
14. Use License Removal Tools (Mac Users)
Like Windows OS, Mac can also detect the anomaly if you have spoofed any license of the Microsoft products or have installed any cracked version of the package. However, there are several license removal tools that exist for Mac that can effectively solve this issue.
- Step 1: Uninstall MS Office and other Microsoft products from your Mac device.
- Step 2: Now, download any third-party license removal tool for the Mac OS (that should support your OS version).
- Step 3: Navigate to the “Downloads” folder on your system and click on the “.pkg” file.
- Step 4: Once you get a new prompt, click on the “Continue” button to start the process.
- Step 5: Now, click on the “Install” button and let Mac calculate the size, and install the tool.
- Step 6: Launch the tool once the installation is done (You may need to enter your local admin account’s ID and password to authenticate the tool).
- Step 7: Now, locate all the malicious licenses on your system and delete them.
If you are using any third-party antivirus tool on your Mac-based systems, you need to disable it first before downloading any license removal tool on your system. Otherwise, the antivirus will count it as a malicious application and will remove it in no time.
What Error Code 0x0 Actually Is?
The error code 0x0, especially in Windows 10 systems, typically triggers while installing software or apps on your device. If your system has encountered an issue while installing the software or if any bug triggers during the installation process, you’ll get this error message.
However, there are several other reasons why this error code can typically trigger on your system, such as various hardware issues or even conflicting programs on your system. This issue can also occur if you have any errors in the root directories.
Conclusion
Before trying the hardware tweaks, make your hands dry, as wet hands can create a short circuit in the motherboard. And before trying any of the advanced methods, always create a “restore point” on your system. However, it is perfectly safe to try the generic fixes we have mentioned above, as those are relatively safe.
So, these are all the possible solutions for error code 0x0. If you think we have missed any solution or if you have any effective solution to share with the geek community, feel free to connect with us or drop your suggestion and feedback in the comment box below.
FAQs
Q. What is the meaning of Error code 0x0?
Error code 0x0 mainly triggers when software or app fails to install on your system correctly. This issue can also trigger if your installation is corrupted or if you have any bugs in the installation directory. And it can happen in both Windows and Mac systems.
Q. What does status 0x0 mean?
You will receive a 0x0 error message on your system if any installation process stops all of a sudden due to internal errors. This error message can even trigger due to failed or buggy installations on both Windows and Mac-based devices.
Q. Can you repair Error 0x0 in Windows Devices?
Yes, you can definitely fix error 0x0 on Windows devices, as various methods of resolving this problem are available nowadays. You can start with hardware tweaks like changing your RAM or can also proceed with software fixes to resolve the installation bugs.
Q. Can error 0x0 only happen in Windows 10?
Not just Windows 10, error 0x0 can trigger in any system, irrespective of its operating system variant. However, Windows 10 and 11 are more prone to this error than mac or older versions of Windows OS.