
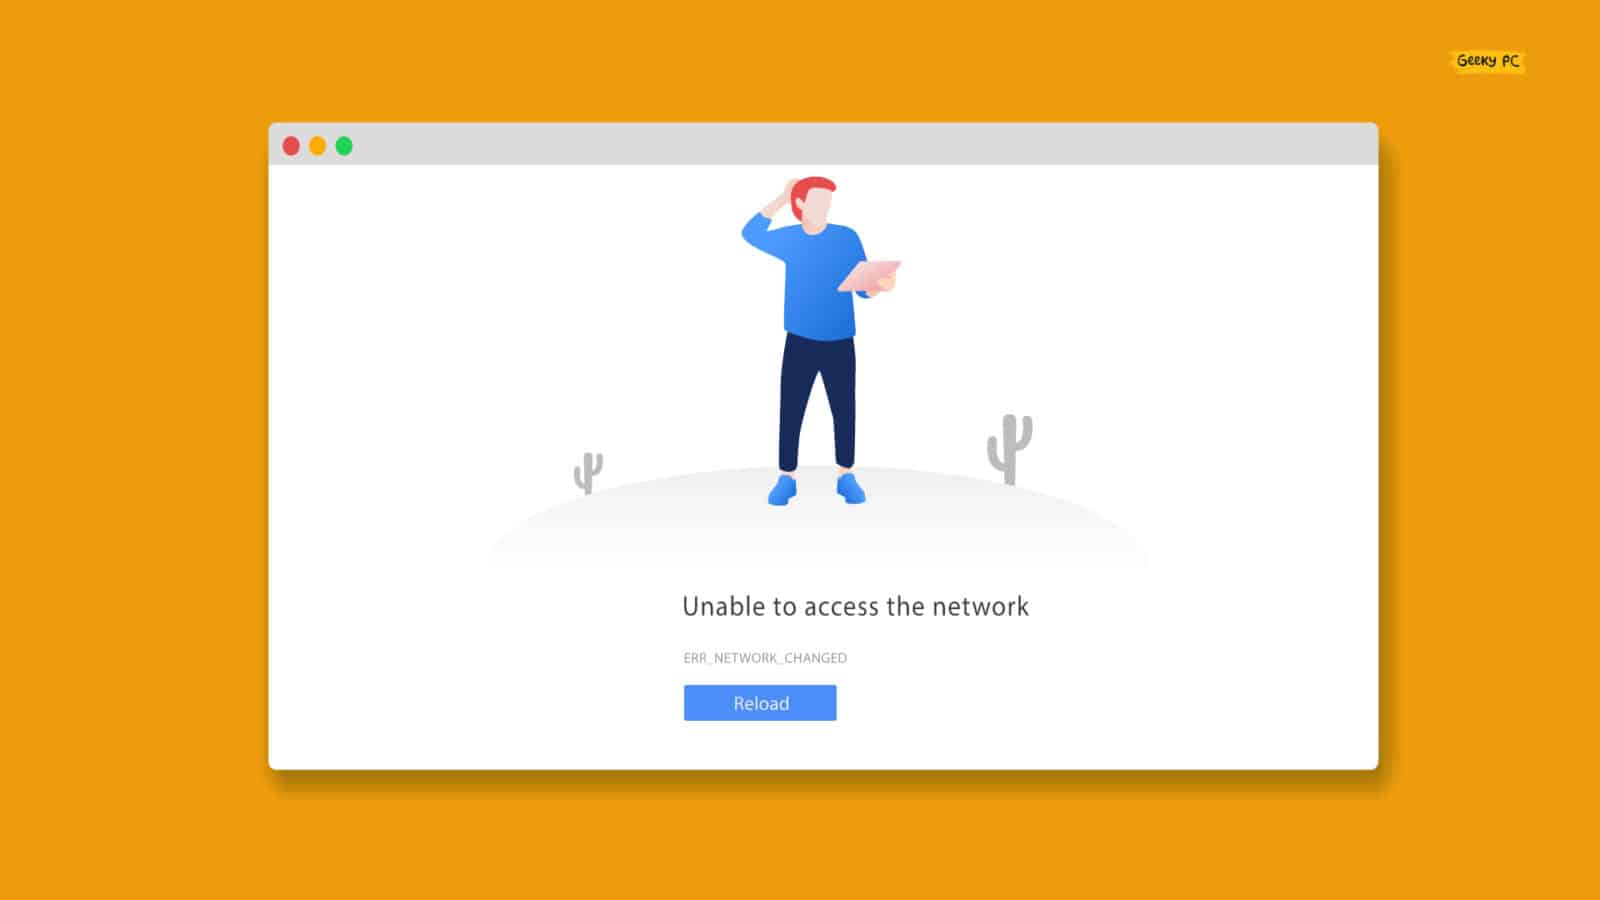
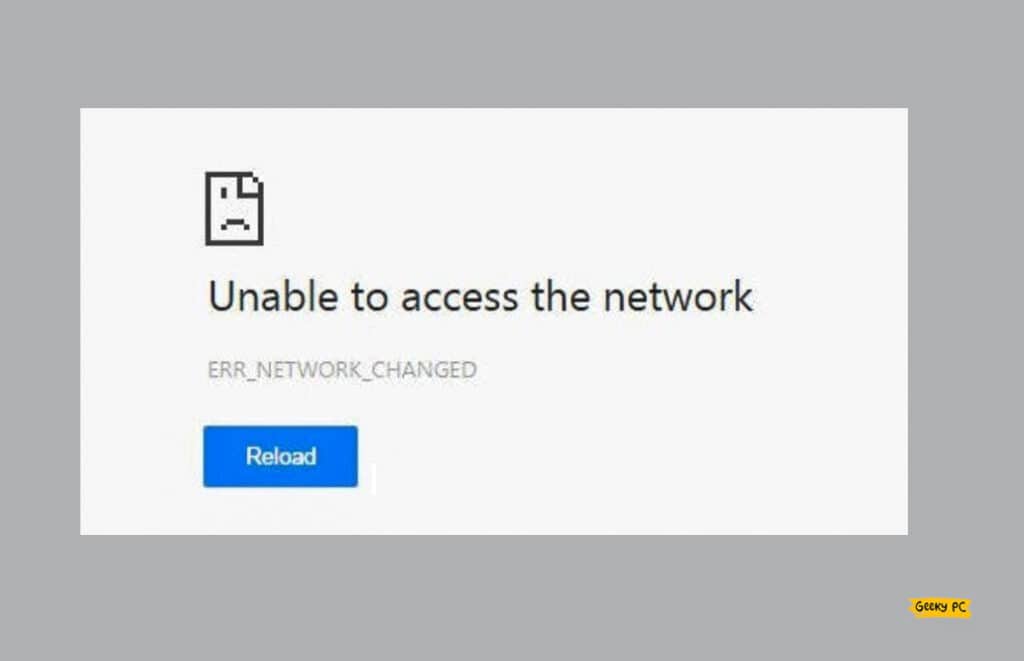
Weren’t you on the verge of banging your head on the wall when you got the ERR_NETWORK_CHANGED error all of a sudden, that too, while you were in the middle of doing something important? Yes, this particular issue is pretty common, and it has several solutions to fix it.
You can resolve this network change error by restarting your router. You should also update your OS and the network-adapter driver. It is also better to switch off the power saver mode and temporarily disable the antivirus. Besides, you can reset your entire network parameter as well.
However, several other solutions are available if these methods can’t solve the error effectively. But before we dive deep into finding the right solution, let’s understand what this error actually means and why it triggers in Windows devices.
What Are The Primary Causes For The ERR_NETWORK_CHANGED Error?
When launching any app on the new Windows devices, we sometimes get a popup message that reads, “your connection was interrupted ERR_NETWORK_CHANGED,” isn’t it? But, if you want to rectify this bug from the root, you need to understand the primary causes that can trigger this error message. And there are seven reasons that can attract this error.
- You are using an obsolete version of the Windows OS or an outdated version of the network adapter driver.
- The network parameters of your windows system are wrongly configured.
- There may be a bug in your ethernet adapter setting that is conflicting with the connection.
- Any or all of your WLAN profiles conflict with the existing network connection.
- The power-saving mode on your system is forcefully disabling the network adapter.
- Windows Defender or any other third-party antivirus software conflicts with the network connection.
- You have configured the wrong DNS address, or the DNS itself is not responding.
Besides these seven main reasons, there can be a couple of others that can trigger similar situations. It is also possible to get the same error in Google Chrome if you haven’t cleared your cookies, browsing data, and cache files for a long time.
5+ Easy Fixes For The ERR_NETWORK_CHANGED error
Before you try anything exotic, you need to try a couple of general methods. And trust me, almost 90% of the cases regarding this network error can be resolved through these general methods.
And the best part, you don’t need any supervision to execute these steps.
1. Restart Modem or Router
Not the actual connection or ISP; most of the network error primarily occurs due to a misconfigured router or modem installed on your own system. So, before you resort to anything exotic, follow a quick troubleshooting of restarting your modem or router.
- Step 1: Locate the “Power” switch, usually placed either on the back or the front panel of your router.
- Step 2: Press the button to switch off your router and check whether all the indication lights are off.
- Step 3: Unplug the router or modem from the power source and keep it idle for at least two minutes.
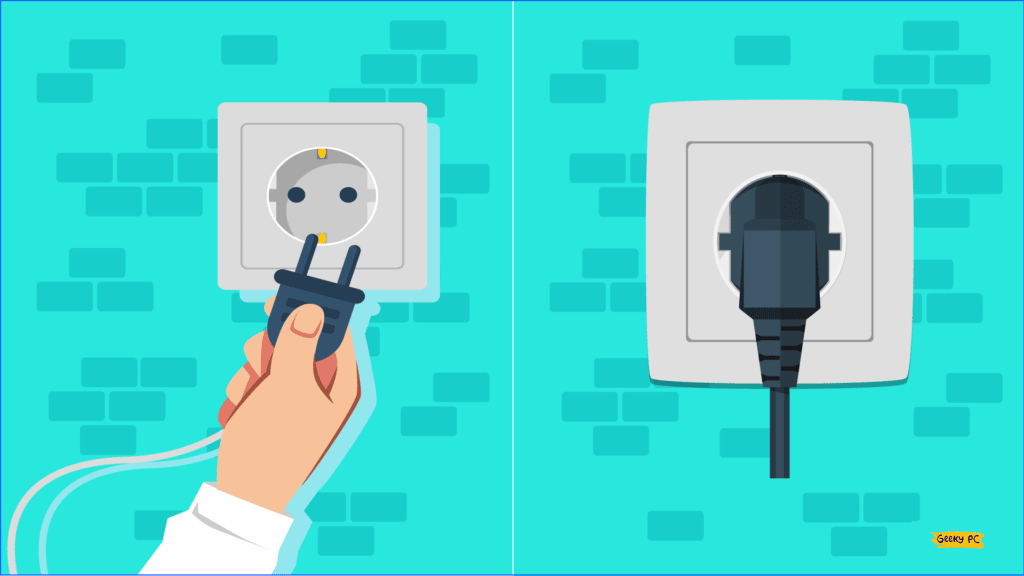
- Step 4: Now plug it back into the socket and let it remain idle for another minute.
- Step 5: Press the “Power” switch again and wait until all the indication lights stop flickering.
- Step 6: Try reconnecting to the internet once all the lights become stable.
2. Re-Enable Network Adapter
Restarting the router will not solve the issue if the bug is in the connection itself. So, disabling and then reenabling the network adapter from the system setting will be the savior if you get an error message that reads ERR_NETWORK_CHANGED in Windows 10.
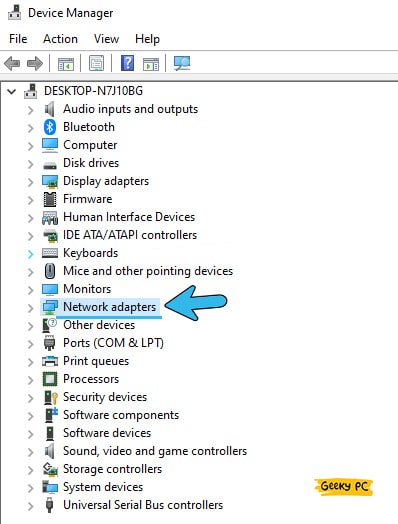
- Step 1: Right-click on the “Windows” icon located at the bottom-left corner of your taskbar.
- Step 2: Click on the “Device Manager” option from the newly opened options.
- Step 3: Once the new window appears, click on the “Network adapters” option to expand it.
- Step 4: Right-click on the adapter option that you are currently using and select the “Disable” button to turn it off.
- Step 5: Wait for at least 30 seconds and then right-click on the same adapter.
- Step 6: Select the “Enable device” option from the menu.
- Step 7: Once it is enabled, check whether you are still getting network issues.
It is even better if you follow this step and then restart your modem to give your system a complete network power cycle.
However, you do need to note down your network parameters and use those after resetting your network, especially if you are using a static IP connection.
3. Troubleshoot Your Network
Troubleshooting your PC is no rocket science anymore, as all the latest Windows OS are preinstalled with troubleshooting tools. And with the help of those, you can scan and fix any network issues without being a geek yourself.
- Step 1: Launch the “Settings” app by pressing the “Windows key + I” buttons together.
- Step 2: Once the app launches, scroll down and click on the “Update & Security” option.

- Step 3: Navigate to the left panel and click on the “Troubleshoot” option.
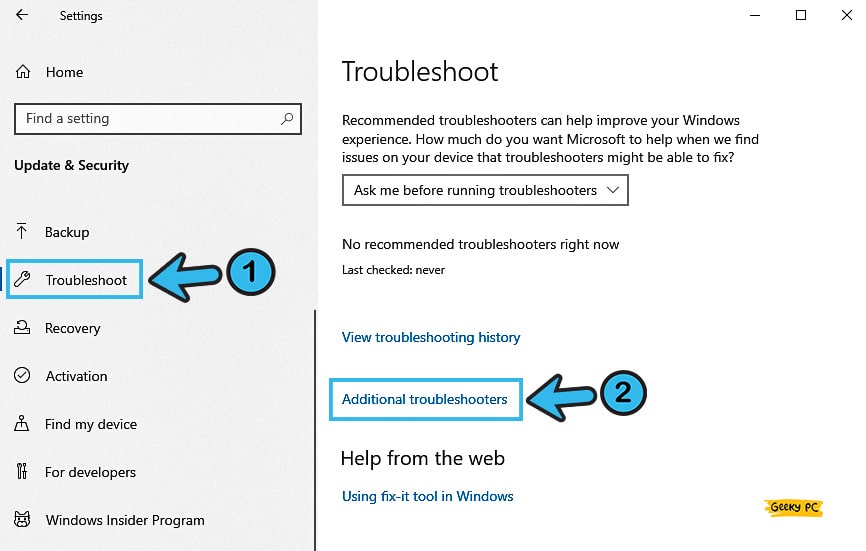
- Step 4: Now, come to the right panel and click on the “Additional troubleshooters” option.
- Step 5: After a new window opens up, click on the “Internet Connections” button.
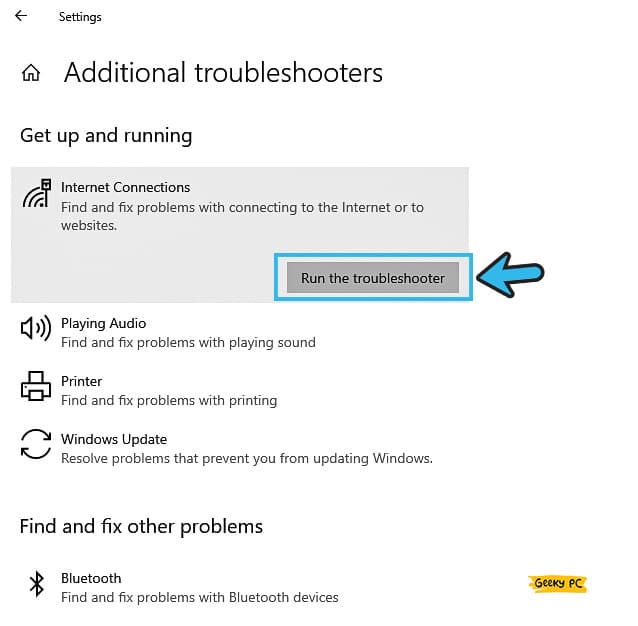
- Step 6: Further click on the “Run the troubleshooter” option and follow the on-screen instructions to initiate troubleshooting.
- Step 7: Once the troubleshooting is completed, restart your device and connect to the internet again.
If you have any OS bugs, you may witness an unresponsive taskbar once you troubleshoot your Windows device.
4. Reset Ethernet Adapter
If you cannot access the network even after troubleshooting your adapter setting, the problem may lie in the adapter. But before you try anything advanced, just reset the ethernet adapter option from the windows settings to rectify this error.
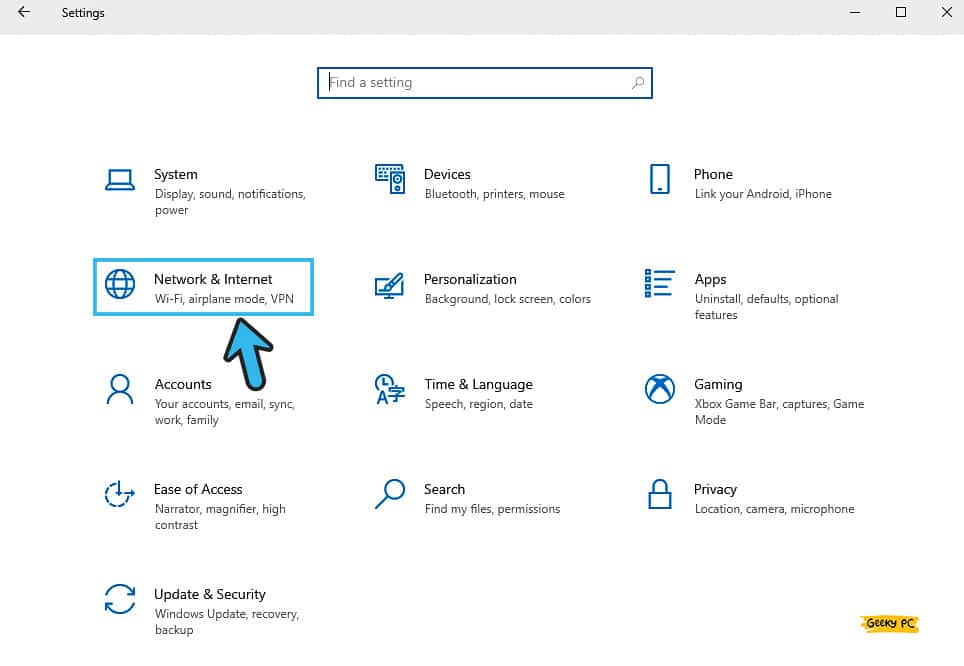
- Step 1: Press the “Windows Key + I” buttons to initiate the “Settings” app.
- Step 2: Once it launches, click on the “Network & Internet” option.
- Step 3: Navigate to the left panel and click on the “Status” option to check the current status.
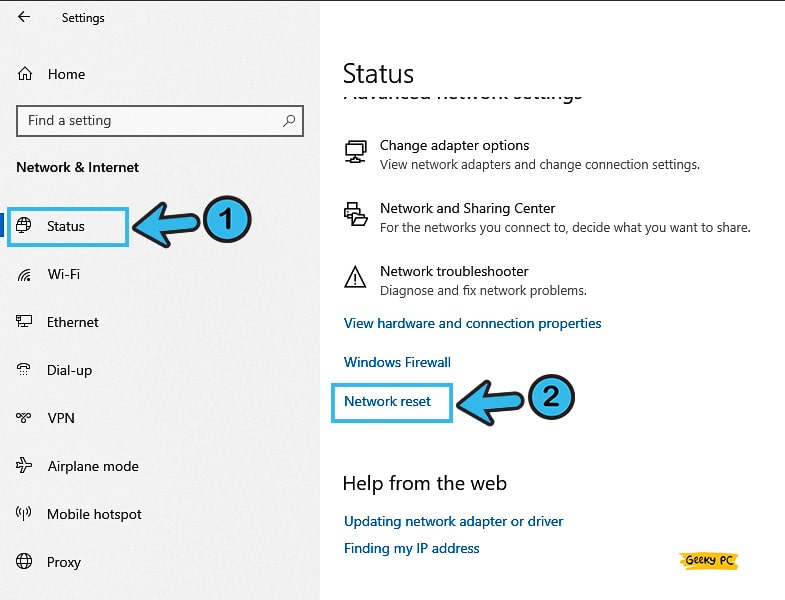
- Step 4: Now, come to the right panel and click on the “Network reset” option.
- Step 5: Once you get the new prompt menu, click on the “Reset Now” button.
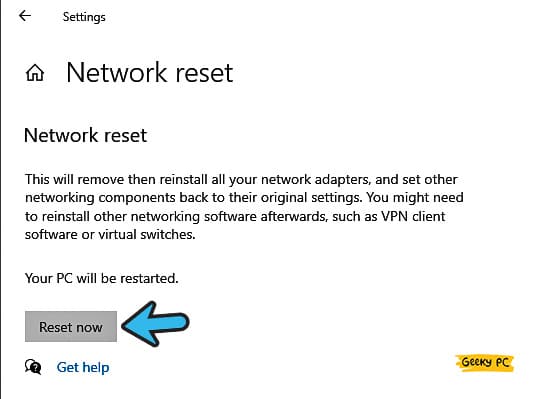
- Step 6: Wait for the resetting operation to finish, and reboot your system once it is done.
Many people have already reported to us that they are getting an undefined network error after resetting their ethernet adapter.
5. Update The Network Adapter Driver
Not just the network, but you can get several errors in almost all the components and peripherals of your computer if you are using obsolete versions of those drivers. So, it is better to check if any update is available for your network adapter.
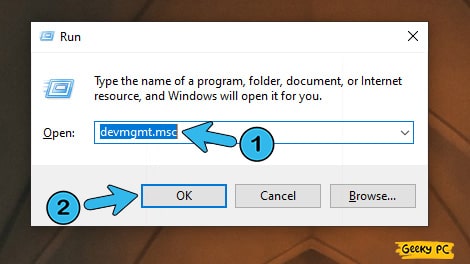
- Step 1: Press the “Windows Key + R” buttons together to launch the “Run” command.
- Step 2: Type “devmgmt.msc” in the designated field and hit “Enter” to initiate the “Device Manager” app.
- Step 3: Click on the “Network Adapters” menu from the left-hand column to expand the header.
- Step 4: Navigate to the network adapter you are currently using and right-click on it to fetch the menu.
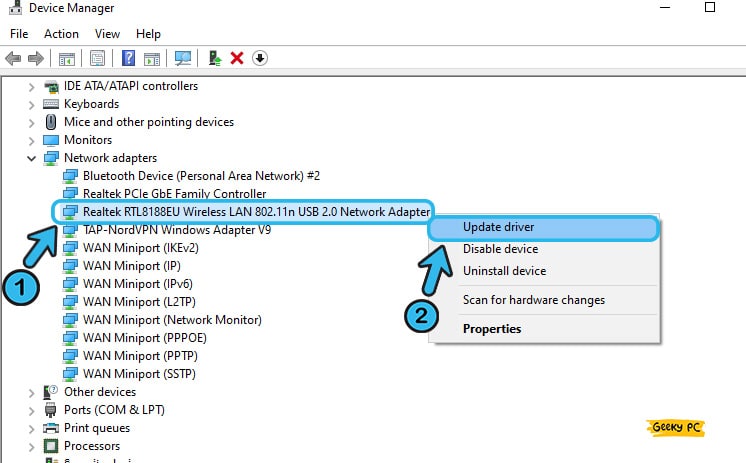
- Step 5: Click on the “Update Driver” option from that additional menu.
- Step 6: Once you get a new prompt, click on the “Search Automatically for Updated Driver Software” option.
- Step 7: Follow the on-screen instructions to complete the updating process and reboot your system when it is done.
Suppose you still get the network changing error even after updating the “Realtek” driver. In that case, you should update all the available drivers displayed under the “Network Adapters” option on the “Device Manager” app, either offline or online.
7+ Advanced Fixed For The Network Change Error
If you can’t solve the network issues after trying all the generic methods we have mentioned above, your problem may be way more deep-rooted than you have assumed. In that case, resorting to advanced methods will be the only option left to fix this issue in no time!
6. Reset TCP/IP Parameters
There are two ways to reset your network parameters; soft reset and hard reset. For a hard reset, you need to manually press the reset key located generally on the back panel of your external router or modem.
But you can easily do the soft reset of your TCP/IP parameters by using the command prompt.
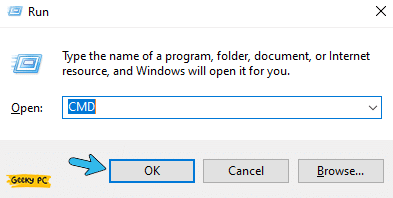
- Step 1: Initiate the “Run” command by pressing the “Windows Key + R” buttons together.
- Step 2: Type “CMD” in the desired field and hit enter to launch the command prompt app.
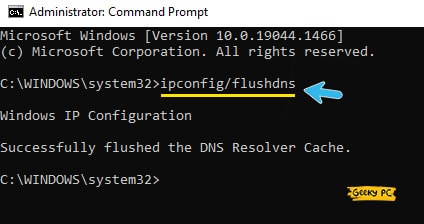
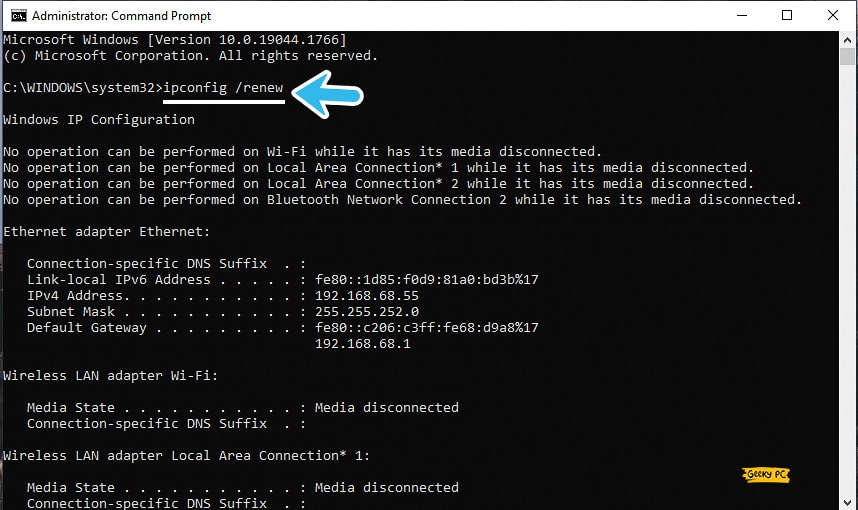
- Step 3: Once the black screen appears, type the following commands one after another and hit the enter button: “ipconfig /release,” “ipconfig /flushdns,” “ipconfig /renew,” and “ipconfig settings.”
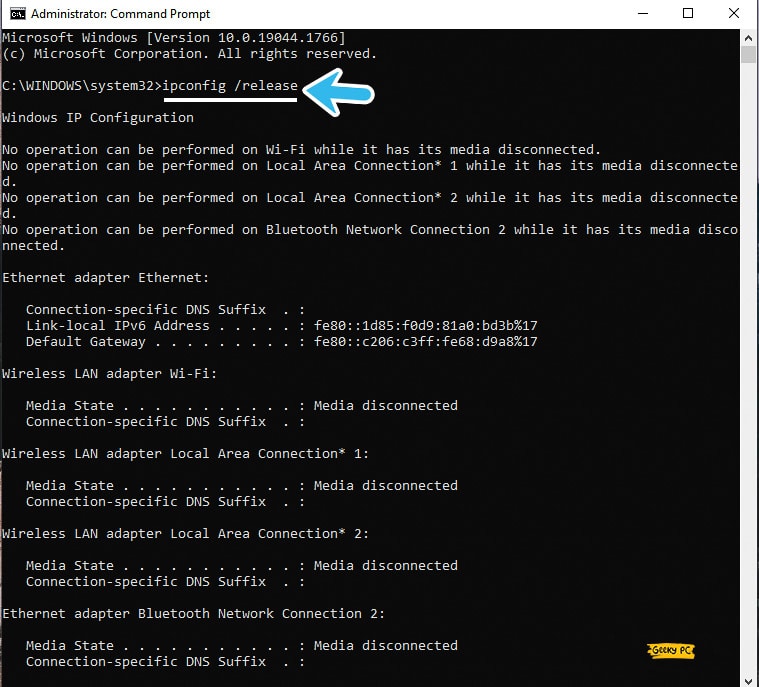
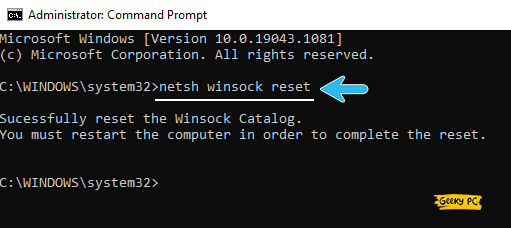
- Step 4: Now, press the following commands in the same way and hit enter: “nbtstat –r,” “netsh int ip reset,” “netsh winsock reset,” “netsh winsock reset catalog,” and “netsh int ipv4 reset reset.log”.
- Step 5: Once the TCP/IP is completely reset, type “Exit” and hit enter to close the CMD app.
Resetting your network configuration in this way will remove all the IPV4/IPV6 addresses along with the subnet mask and gateways.
So, it is better to note down those parameters before resetting it, especially if your ISP has given you a static IP address and a particular gateway address to use.
7. Delete WLAN Profiles
You may not know, but Windows always create a separate WLAN profile each time you connect to a wi-fi router.
It may also happen that the entire network issue is triggering from any one of those profiles. So, it is better to delete those profiles and create them afresh.
- Step 1: Press the “Windows Key + R” buttons to launch the “Run” command.
- Step 2: Type “CMD” in the command field and hit enter to launch the command prompt app.
- Step 3: Once the black screen appears, type “netsh wlan show profiles” and hit enter.

- Step 4: Note down the profile name that is currently in use (you can alternatively also delete all the profiles one by one to remain on the safer side).
- Step 5: Type netsh wlan delete profile name= “PROFILE NAME” and hit enter.
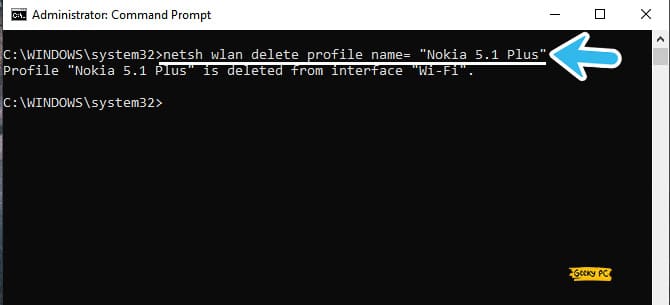
- Step 6: Once the profile is deleted, type “Exit” to close the command prompt window.
If the network change error is typically triggering while using the LAN or other connection, deleting the WLAN profiles will not going to solve it. In such cases, you also need to manually disable the LAN sign from the taskbar and then reenable it.
8. Disable Power Saver Mode
The latest Windows OS automatically triggers the power saver mode to minimize the overall energy consumption after the system remains idle for some time.
And that mode also shuts down the network adapter to save power. However, you can manually disable this mode.
- Step 1: Right-click on the “Windows” icon located at the bottom-left corner of your taskbar.
- Step 2: Once the additional menu appears, click on the “Device Manager” option.
- Step 3: Click on the “Network Adapters” option to expand the menu.
- Step 4: Now locate the adapter that you are currently using and right-click on that to bring the options.
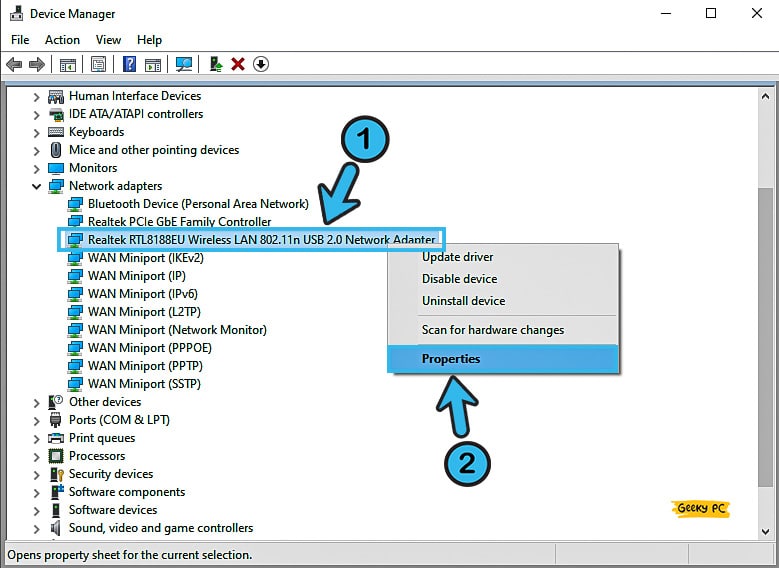
- Step 5: Click on the “Properties” option from that menu.
- Step 6: Once the new window appears, navigate to the “Power Management” tab from the header menu.
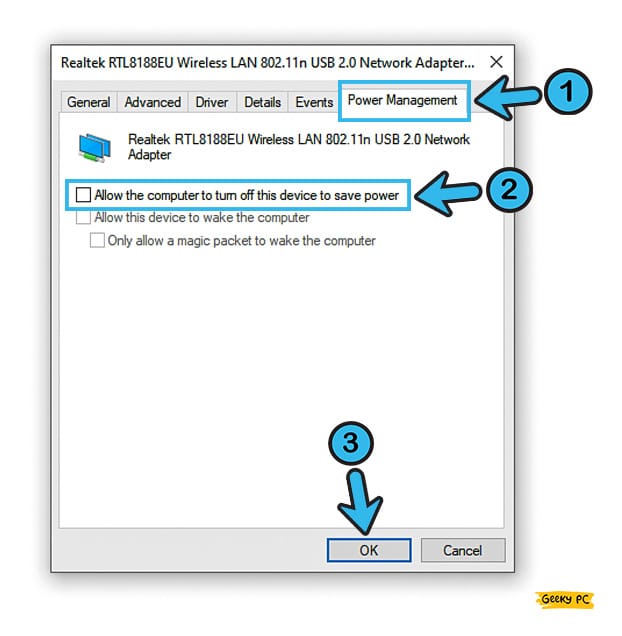
- Step 7: Uncheck the adjacent box of the “Allow the computer to turn off this device to save power” option.
- Step 8: Click “OK” to save the settings and exit from the device manager app.
If you are using any laptop that comes with company-installed UI and drivers, you may also need to disable the power saver mode from that preinstalled management software itself. If you can’t do it alone, you can always contact the customer support of that particular company.
9. Disable Proxy Server
Proxy servers are great as they hop from one IP to another to safeguard your system from the suspicious network and malware attacks. But at times, proxy servers may start acting weirdly.
And it is also possible to get this network change error if the proxy server constantly interferes with your network.
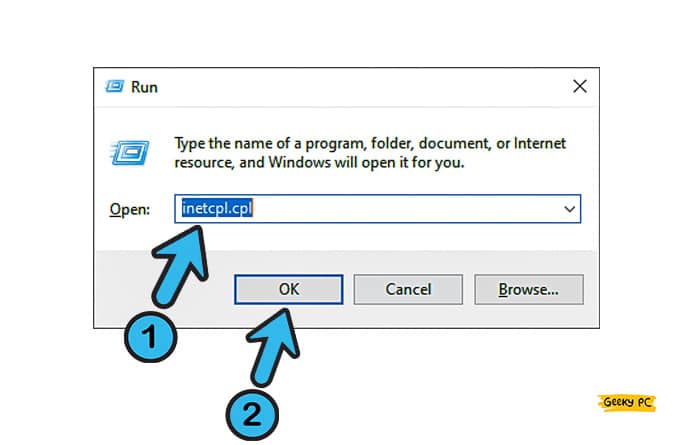
- Step 1: Press the “Windows Key + R” buttons altogether to initiate the “Run” command window.
- Step 2: Once the dialog box appears, type “inetcpl.cpl” in the command field and hit enter.
- Step 3: Once the “Internet Properties” window shows up, navigate to the header menu and click on the “Connections” tab.
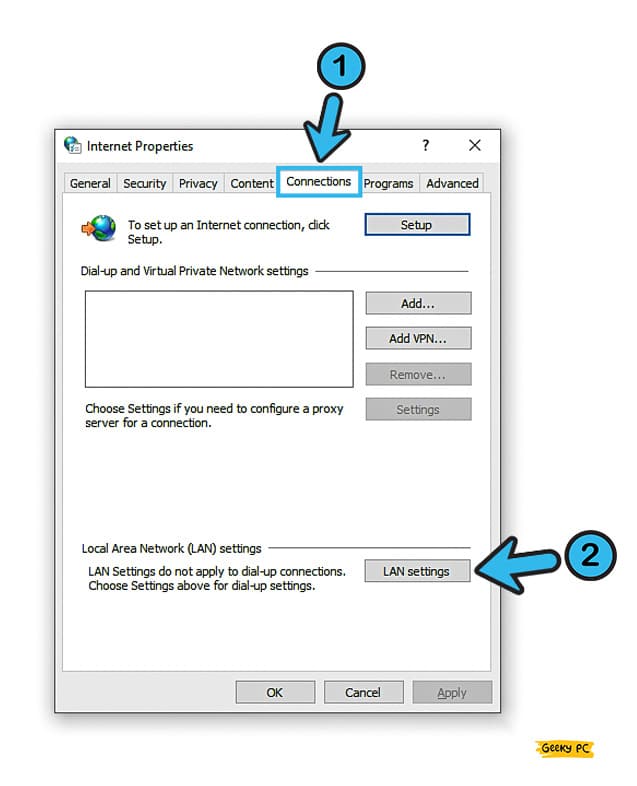
- Step 4: Now navigate to the bottom-right corner of that newly launched window and click on the “LAN settings” button.
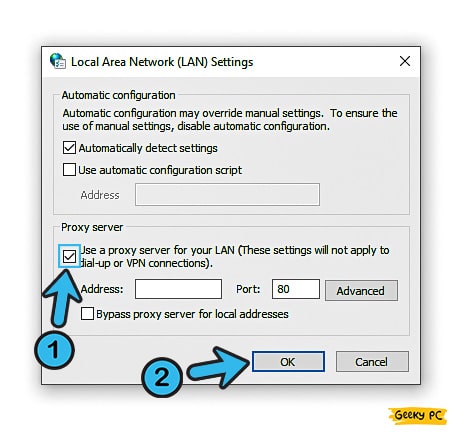
- Step 5: Uncheck the adjacent box to the “Use a proxy server for your LAN (These settings will not apply to dial-up or VPN connections)” option.
- Step 6: Click “OK” to save the settings and reboot your device.
After disabling their proxy servers, many people have reported getting a service optimization error. If you are also encountering similar situations, follow our detailed guide to fix Application Error 0xc0000142 in Windows devices.
10. Temporarily Disable Windows Defender
Days are gone when you need to buy expensive third-party antivirus software to safeguard your system from phishing attacks and malware. Now, Windows Defender comes prebuilt in any latest Microsoft OS.
However, this robust antivirus system may sometimes conflict with the network connection.
- Step 1: Launch the “Settings” app by pressing the “Windows Key + I” buttons together.
- Step 2: Once the new window appears, click on the “Update & Security” button.
- Step 3: Now navigate to the left column and click on the “Windows Security” option.
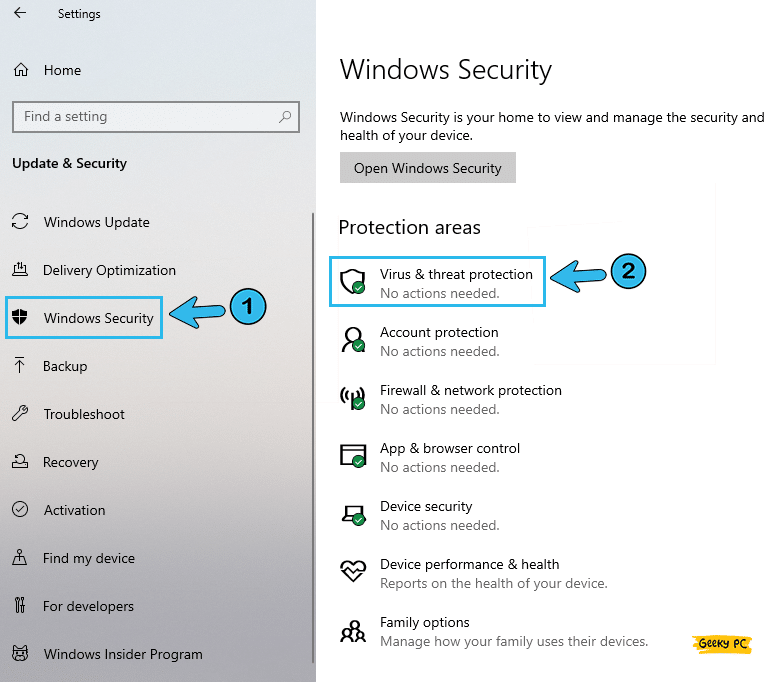
- Step 4: Navigate to the right panel and click on the “Virus & threat protection” option.
- Step 5: Once the new settings menu launches, navigate to the “Virus & threat protection settings” option.
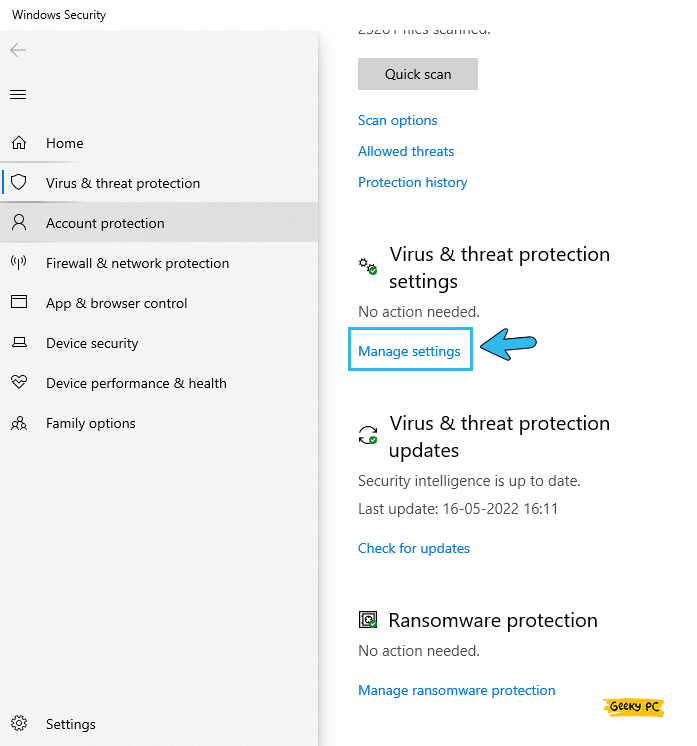
- Step 6: Scroll down and toggle the switch beside the “Real-time protection” option.

- Step 7: Click “OK” to save the settings and reconnect to a network.
If you use your system under a system administrator and suddenly stop the Windows Defender on your device, you may get a group policy error message.
In that case, follow our detailed guide to fix the “This program is blocked by group policy” error in Windows devices.
11. Clear Cache In Google Chrome
Not just in Windows, but you can even get the error that reads ERR_NETWORK_CHANGED in Chrome.
Yes, the browser can be prone to this particular message, although it is highly dubbed as one of the fastest browsers to work with. However, this issue can be sorted with a few simple steps.
- Step 1: Open the Chrome Browser and let the homepage load fully.
- Step 2: Press the “Ctrl + H” buttons (“Command + Y” in macOS) together to go to the browsing “History” tab.
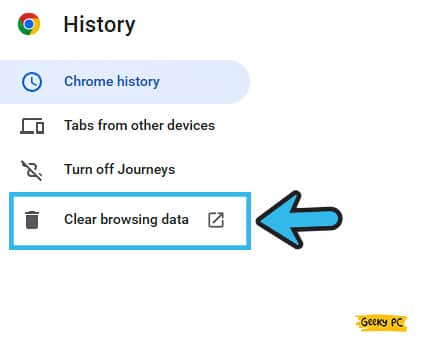
- Step 3: Navigate to the left panel and click on the “Clear browsing data” option.
- Step 4: Once a new tab opens up, select the “All Time” option from the drop-down menu displayed beside the “Time Range” header.
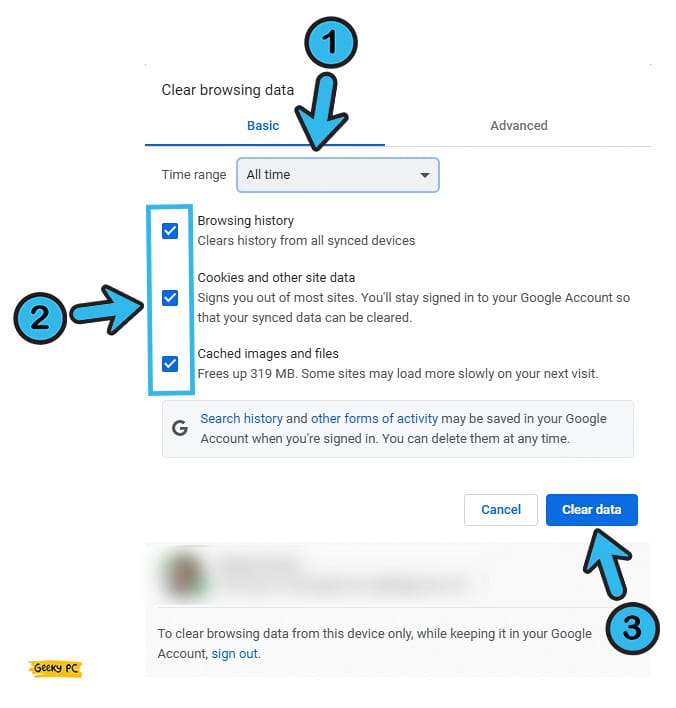
- Step 5: Tick the adjacent boxes beside the “Browsing History,” “Cookies and other site data,” and “Cached images and files” options.
- Step 6: Click on the “Clear Data” button and wait for Chrome to delete the cookies and cache files.
- Step 7: Once it is done, relaunch your Chrome and check whether the problem is still persisting.
Your Chrome is probably corrupted if you are still getting the same error after clearing all your data and refreshing the app itself. In that case, it is better to delete the old version from your system and install the latest Google Chrome browser afresh.
12. Use Google DNS For Ethernet
Most of us use automatic IP assignment, as almost all the ISPs use dynamic connections. Even if they use a static IP connection, they provide the DNS address to use.
But not everyone knows that using a public DNS, especially Google DNS, can boost your internet speed and will fix minor network bugs.
- Step 1: Click on the “Magnifying Glass” icon located at the bottom-left corner of your taskbar.
- Step 2: Type “Settings” in the search field and click on the very first result that appears.
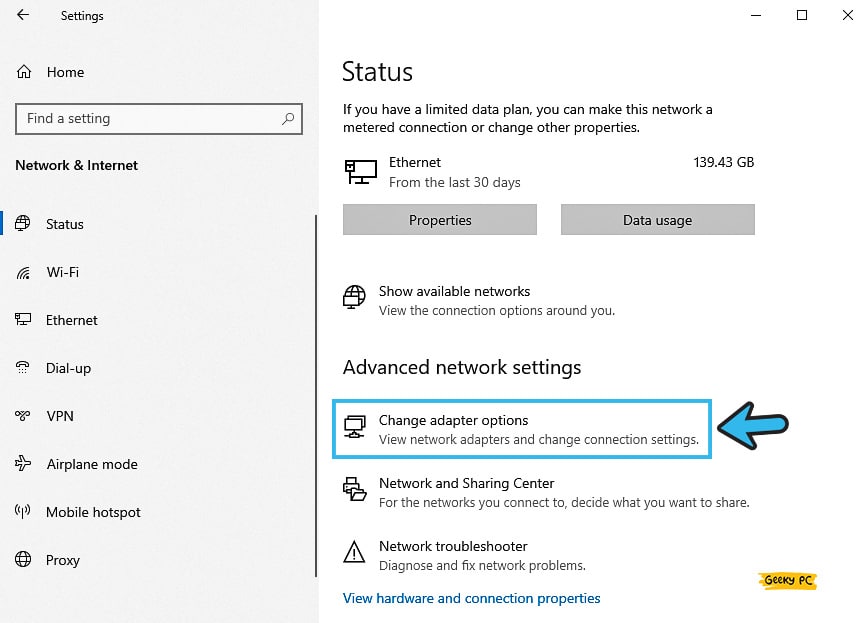
- Step 3: Once the “Settings” app launches, click on the “Network and Internet” option to proceed with the network settings.
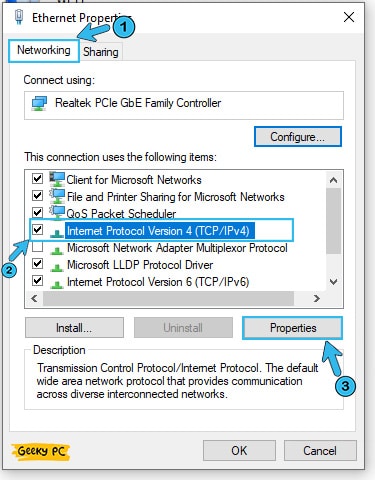
- Step 4: Navigate to the “Advanced network settings” on the right panel and click on the “Change adapter options” link.
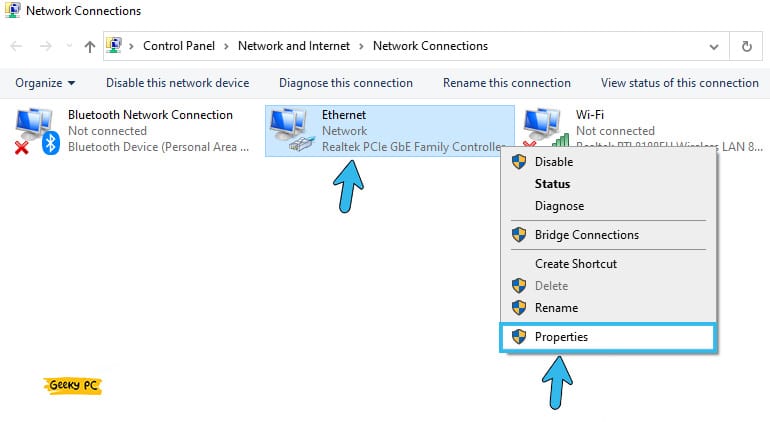
- Step 5: Once the new window pops up, right-click on the “Ethernet” icon and select the “Properties” option from the menu.
- Step 6: Tick the circle adjacent to the “Internet Protocol Version 4 (TCP/IPv4)” option and further click on the “Properties” option.
- Step 7: After the “Properties” tab launches, tick the box adjacent to the “Use the following DNS server addresses” option.
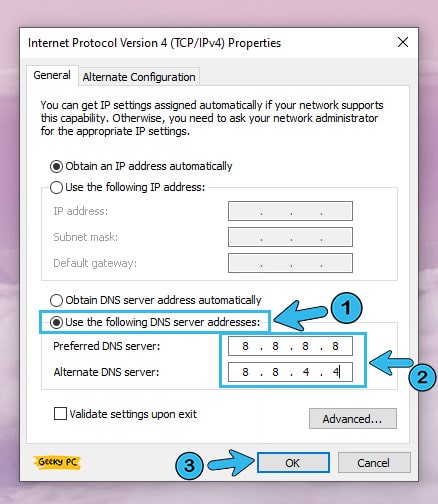
- Step 8: Once the new value field is unmasked, type the following parameters: “Preferred DNS server: 8.8.8.8” and “Alternate DNS server: 8.8.4.4” in the respective field.
- Step 9: Click “Apply” to save the settings and then “OK” to exit from the network settings app.
If your internet is struggling to resolve the queries through Google DNS, or your ISP has already blocked the Google DNNS address, you can alternatively use the Cloudflare DNS address. Just replace the DNS address at the seventh point with “1.1.1.1,” and you are done!
What Does The “ERR_NETWORK_CHANGED” Error Message Mean?
It is indeed annoying when we get an unexpected error message that says, “your connection was interrupted, and a network change was detected.” But do you even know what this error message actually means?
The ERR_NETWORK_CHANGED error is a common problem in Windows devices that can be triggered for various reasons. But in a broad spectrum, this appears whenever your OS fails to access the network connection all of a sudden.
If you have disabled the router or the DNS provided by your ISP is not responding, this error message can also trigger. You may also get this error if you have wrongly configured your network connection or have used any obsolete network drivers.
Conclusion
In the majority of the cases, the generic methods are sufficient to fix the ERR_NETWORK_CHANGED error in Windows devices. Besides, the generic methods are absolutely safe to try, even without any supervision. But, if you have to resort to any pro methods that need serious alteration of your system settings, create a restore point beforehand.
So, that’s all for today, and we hope you have solved your issue by following the steps we have mentioned above. But, if you think we have missed any possible solution, feel free to tell us about that solution in the comment box below. Thanks in advance, mate!
FAQs
Q. What does ERR_NETWORK_CHANGED mean?
The ERR_NETWORK_CHANGED message simply means that a change has been detected in the network configuration of your Windows device. And that unexpected change is interrupting or interfering with the existing network connection to work functionally.
Q. How do I fix the network change detected?
The best way to fix this error is by restarting your router or modem. Besides you can also reset or troubleshoot the network adapters through the troubleshooting tools. Several people have reported fixing this error just by clearing their browsing history along with the cache and cookie files.
Q. How do I fix an interrupted connection?
You need to manually flush the DNS and resent the entire network parameter to fix the interrupted connection. Besides, you can also just disable and reenable the LAN option altogether if you are getting this error in the local connection. And for wi-fi connectivity issues, it is better to delete all the WLAN profiles and then reconnect to a known network.
Q. Why do I keep getting the ERR_NETWORK_CHANGED error?
If the network adapter driver or the Windows OS is obsolete, you’ll keep getting the ERR_NETWORK_CHANGED error. This problem can also trigger if you have a broken router attached to your system. Many people also get this error while using a proxy server.