
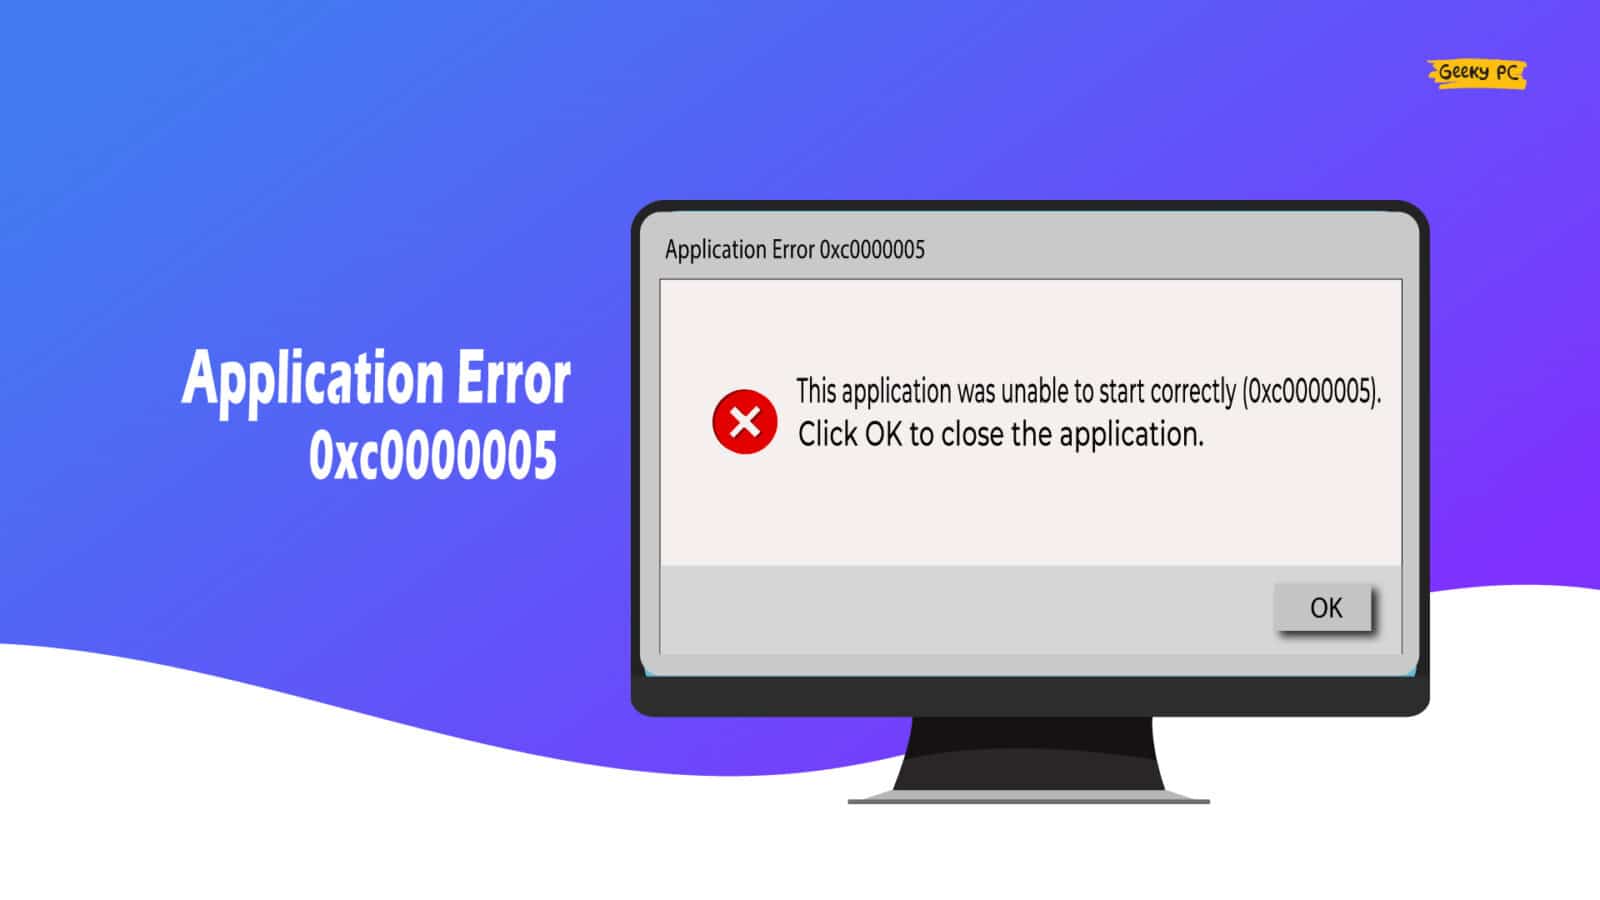
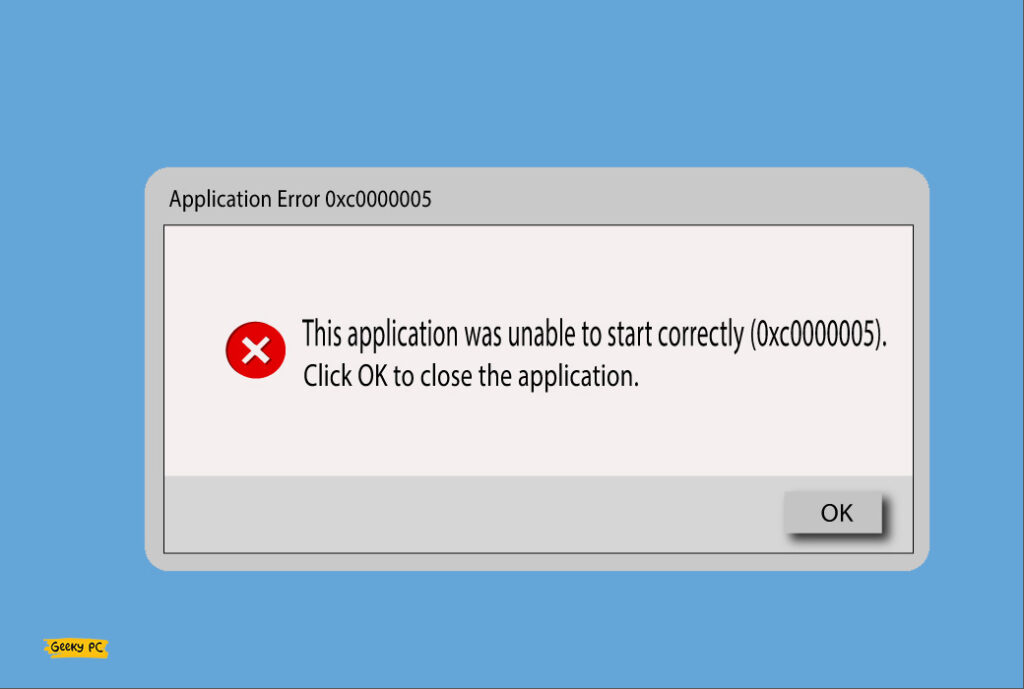
Everything is smooth until you start getting the application error 0xc0000005 while launching any app, isn’t it? Yes, although Windows 10 and 11 are relatively stable, you may still get this error frequently. But yes, this one can be rectified!
You should update your obsolete drivers along with your Windows to resolve this issue. Besides, you should also temporarily disable the firewall and antivirus. You may solve it by running the troubleshooter. Moreover, you can also run the SFC scan and the Memory Diagnostic Tool to fix it.
However, these are not the only solution that can effectively fix this application error. But before we delve deep into the solutions, let’s understand what this problem actually is!
What Are The Primary Reasons For Application Error 0xc0000005?
There can be many reasons why you keep getting the application error 0xc0000005 on your Windows devices. However, in a broader spectrum, this error can typically occur for six main reasons.
- You are using an obsolete version of Windows, or any of the system drivers are outdated.
- Windows Defender or Windows Firewall is interfering with the application.
- You may have a faulty root directory, or your memory may have bad sectors.
- The Data Execution Prevention (DEP) is activated on your device.
- The AppInit_DLLs are enabled on your system that is creating the interference.
- You have a wrong or corrupt partition while installing the Windows OS.
Besides these six main reasons, you may also get this error message if you have enabled a proxy in your internet settings. A wrong OS installation can trigger this error as well.
6+ Easy Fixes For Application Error 0xc0000005
You should first proceed with the easy and generic methods if you don’t know how to fix application error 0xc0000005. These generic methods don’t need advanced tweaks.
Besides, at least 90% of errors of these types will be solved by implementing these common fixes alone.
1. Update Your Windows OS
If you are using an obsolete version, the application error 0xc0000005 in Windows 10 can typically occur. Besides, it may also attract additional issues if you keep on running an outdated version of your OS. So, it is better to update your Windows before trying anything else.
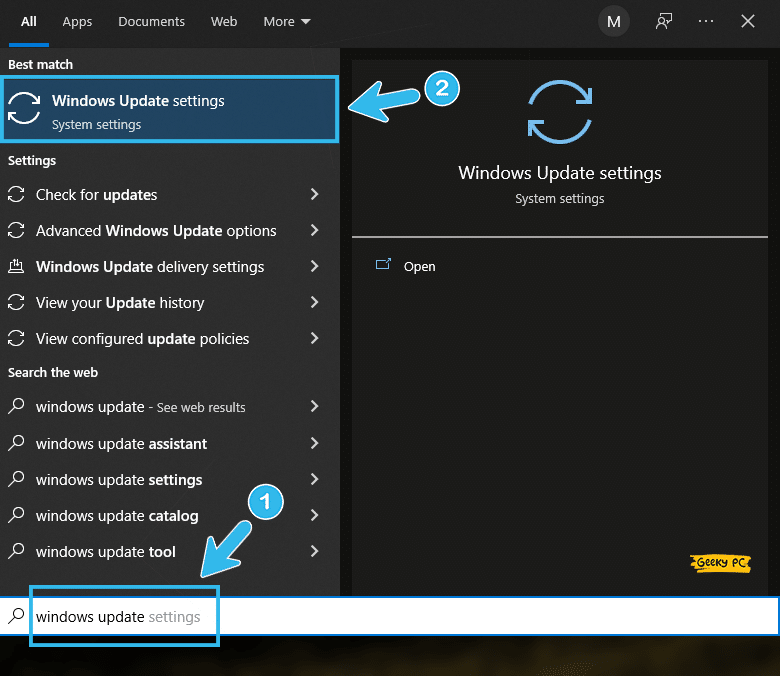
- Step 1: Click on the “Magnifying Glass” icon located at the bottom-left corner of your taskbar.
- Step 2: Type “Windows Update” in the designated search field and click on the first result that appears.
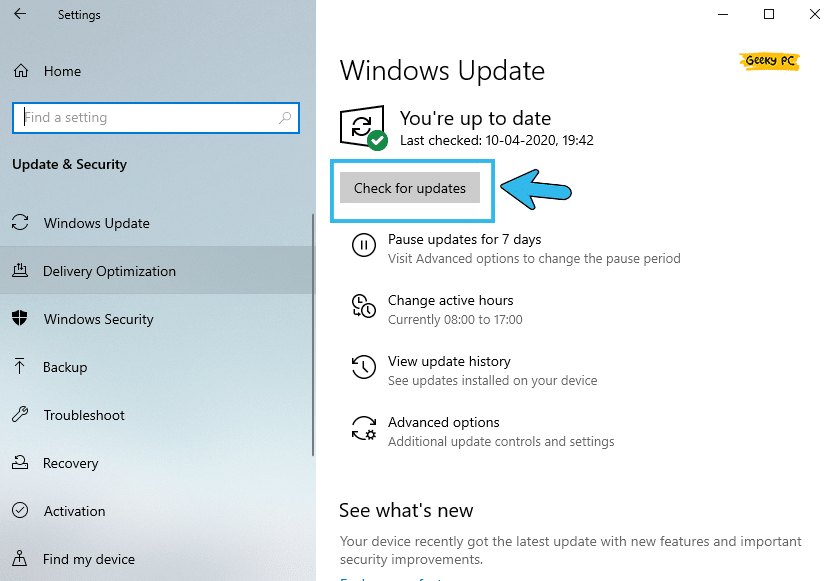
- Step 3: Once the update manager window launches, navigate to the left panel and click on the “Windows Update” option.
- Step 4: Now, navigate to the right panel and click on the “Check for updates” option.
- Step 5: Let Windows automatically search for the latest update and install it.
- Step 6: Once your OS is completely updated, reboot your system and check whether the problem is still there.
A few of our users have reported getting a nonresponsive taskbar after rolling out the latest update on Windows 10.
2. Enable Windows Firewall
If you are constantly getting Windows update error 0xc0000005, it is very much possible that an external connection is blocking your system from proceeding with the update files.
However, you can simply resolve this issue and block all suspicious connections by enabling a Windows firewall on your system.
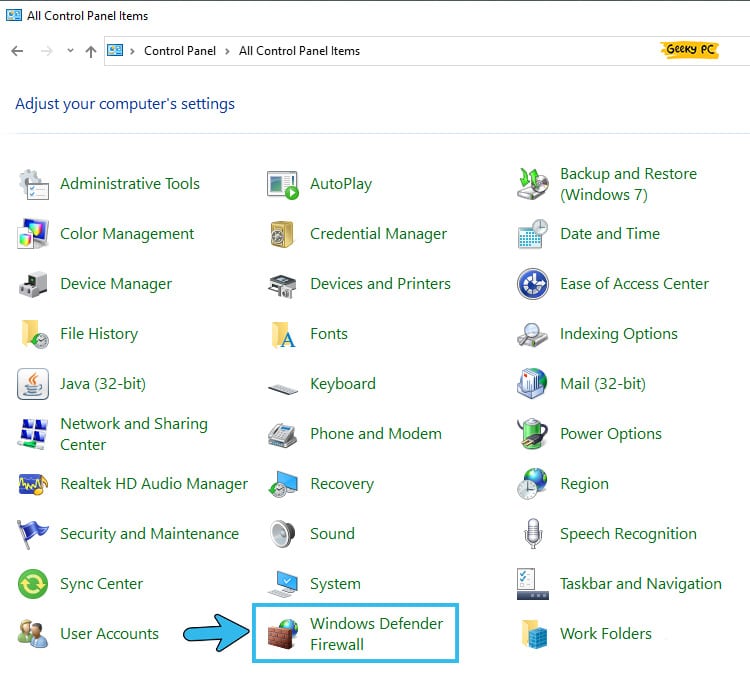
- Step 1: Press the “Windows Key + R” buttons together to launch the “Run” command window.
- Step 2: Type “Control Panel” in the command field and press “OK” to launch the app.
- Step 3: Navigate to the “View By” header in the top-right corner, click on the drop-down menu, and select the “Large Icons” option.
- Step 4: Now, click on the “Windows Defender Firewall” option.
- Step 5: Once the new window launches, click on the “Turn Windows Defender Firewall On or Off” option.
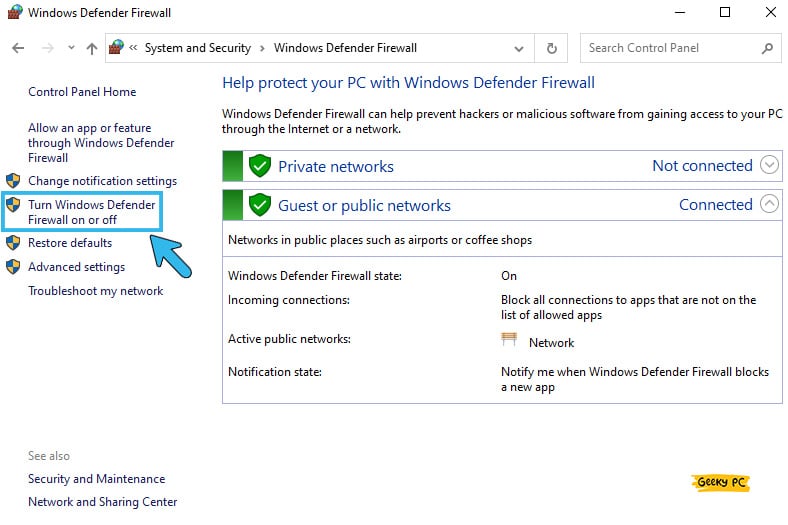
- Step 6: Now, click on the “Turn on Windows Defender Firewall” and ensure it is enabled in both options.
- Step 7: Exit from the window and check if the problem is still occurring.
If you are using a third-party antivirus and firewall rather than using the prebuild once, you should manually enable the firewall from that third-party software too.
Otherwise, it will override the Windows firewall and will not let the software block all connections.
3. Execute The SFC Scan
SFC or System File Checker is a prebuilt program in the latest Windows OS. With this unique program, you can manually check all the root directory files and resolve the bugs.
So, if you are encountering any application error, you should run the SFC scan to identify the root cause.
- Step 1: Press the “Windows Key + R” buttons together to initiate the “Run” command window.
- Step 2: Type “CMD” in the designated field and press “OK” to launch the “Command Prompt” app.
- Step 3: Once the black window appears, type “sfc /scannow,” and hit enter.
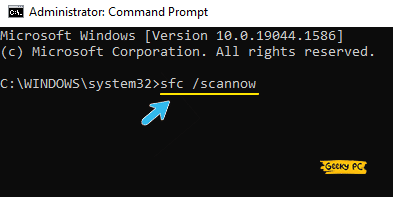
- Step 4: Let windows identify and repair the corrupted files on your root directories.
- Step 5: Once the operation is over, reboot your system and check whether the problem is still there.
Alternatively, you can boot up your Windows in safe mode and then run the SFC scan to minimize any interference from any third-party applications.
You can also choose a third-party root file scanner to detect and resolve these kinds of errors. Also, you can follow our detailed guide to fix Two-Finger Scroll Is Not Working on Windows devices.
4. Run The Memory Diagnostic Tool
Like SFC, the latest Windows OS now comes with prebuilt memory diagnostic tool too. And with this tool, you can effectively check and repair any bad sectors in your memory to resolve the error code 0xc0000005.
Besides, this tool also automatically fixes any glitch in the memory drivers.
- Step 1: Click on the “Magnifying Glass” icon located at the bottom-left corner of your taskbar to launch the “Search” field.
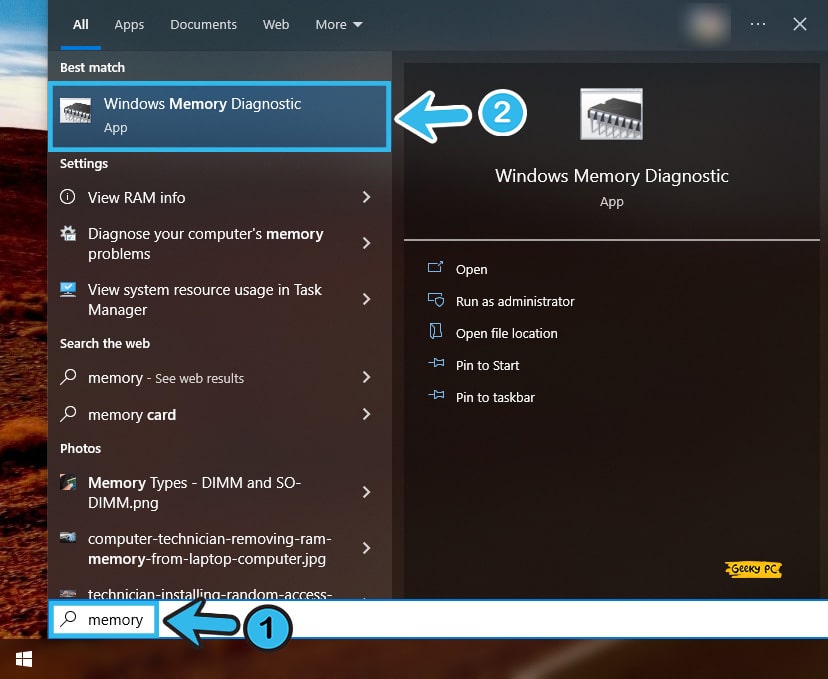
- Step 2: Type “Memory” in the designated field and hit the “Enter” button to launch the memory diagnostic tool.
- Step 3: Select the “Restart now and check for problems (recommended)” option once the new popup window appears.

- Step 4: Your system will automatically restart and check for any errors in your memory.
- Step 5: Once the process is over, reboot your system again.
If the memory diagnostic tool cannot repair the bad sectors, you can manually remove the RAM from your system, clean it with dry non-static clothes, and then insert it back.
Alternatively, you can also replace your RAM with a new one and check whether the problem still occurs.
5. Update Problematic Drivers
If you have any problematic driver installed on your system, or if you are using an obsolete variant of any driver, this application error can definitely occur.
So, it is highly recommended that once you identify the driver that is triggering this issue, you should update it.
- Step 1: Right-click on the “Start” button or “Windows Icon” (depending upon the OS version) located at the bottom-left corner.
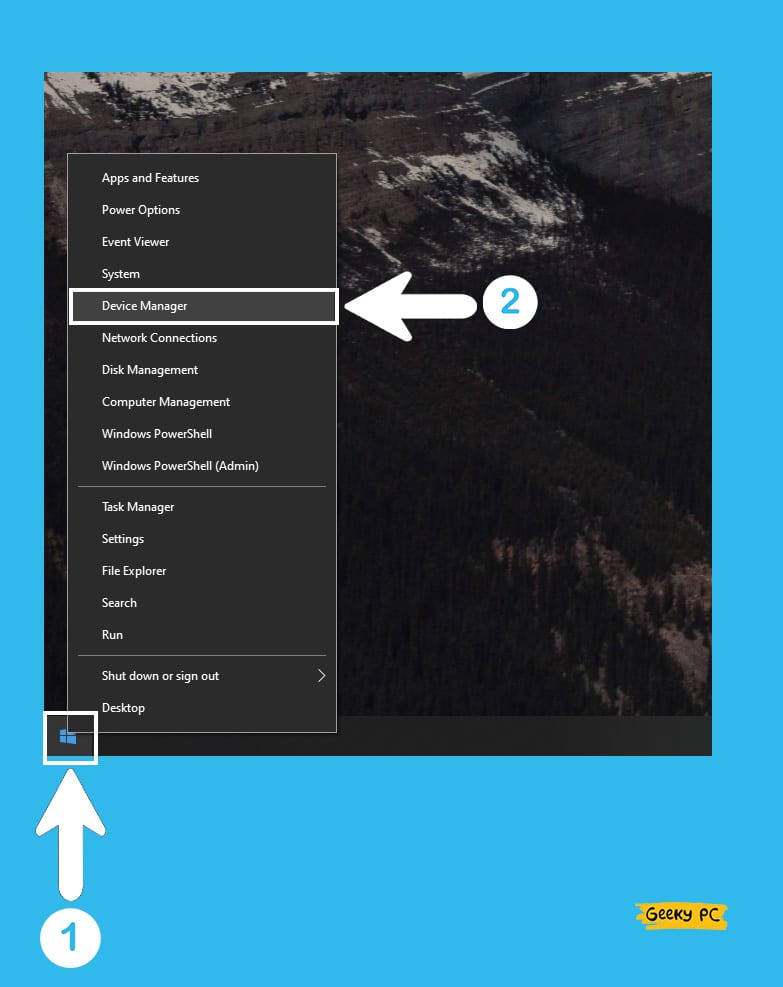
- Step 2: Click on the “Device Manager” option to launch the app.
- Step 3: Once the new window appears, navigate to the problematic driver and click to expand it.
- Step 4: Right-click on the problematic device and select the “Update Driver” option from the menu.
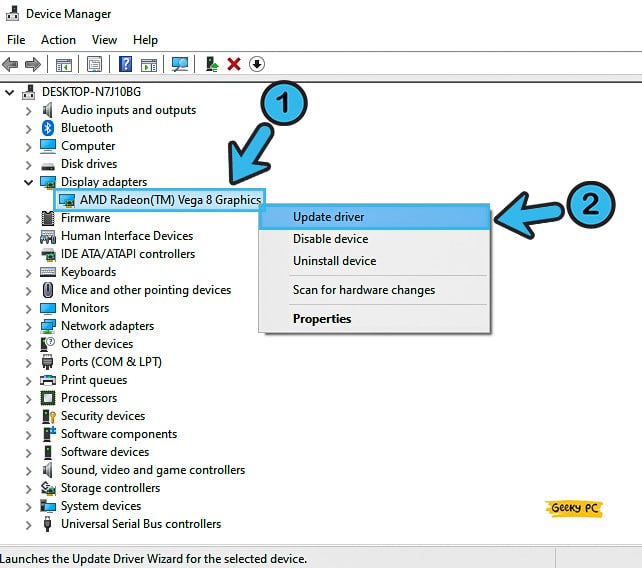
- Step 5: Once the new popup message appears, click on the “Search automatically for updated driver software” option.
- Step 6: Let windows find the latest driver from that device and reboot your system when it is done.
6. Temporarily Disable Windows Defender
There is no doubt that Windows Defender is one of the robust antivirus and security software that you can entirely rely upon.
However, at times, this program may interfere with other apps to trigger application errors. So, it is better to check the app after disabling the antivirus temporarily.
- Step 1: Press the “Windows Key + I” buttons together to launch the “Settings” app.
- Step 2: Once the new window launches, navigate to the “Update & Security” option.

- Step 3: Navigate to the left column and select the “Windows Security” option.
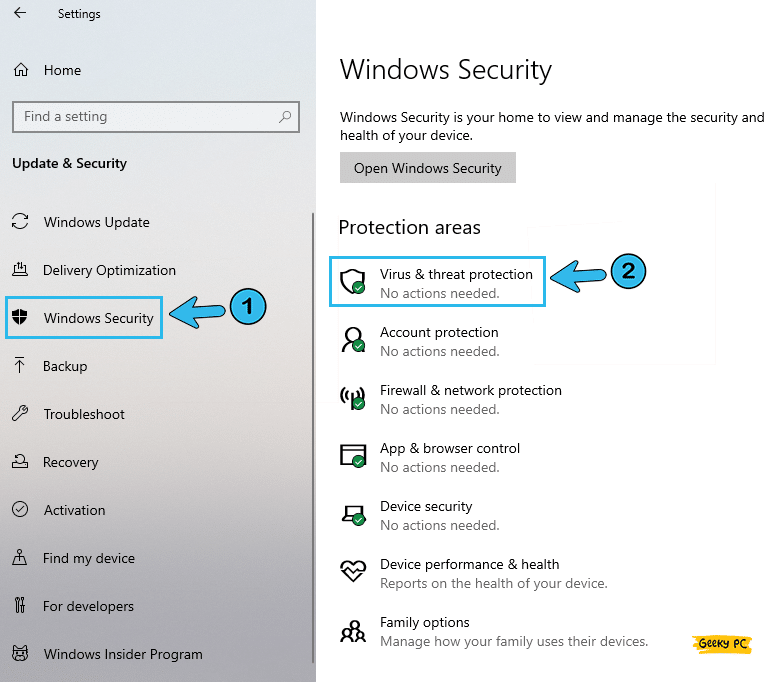
- Step 4: Navigate to the right panel and select the “Virus & threat protection” option.
- Step 5: Select the “Virus & threat protection settings” option once the new window appears.
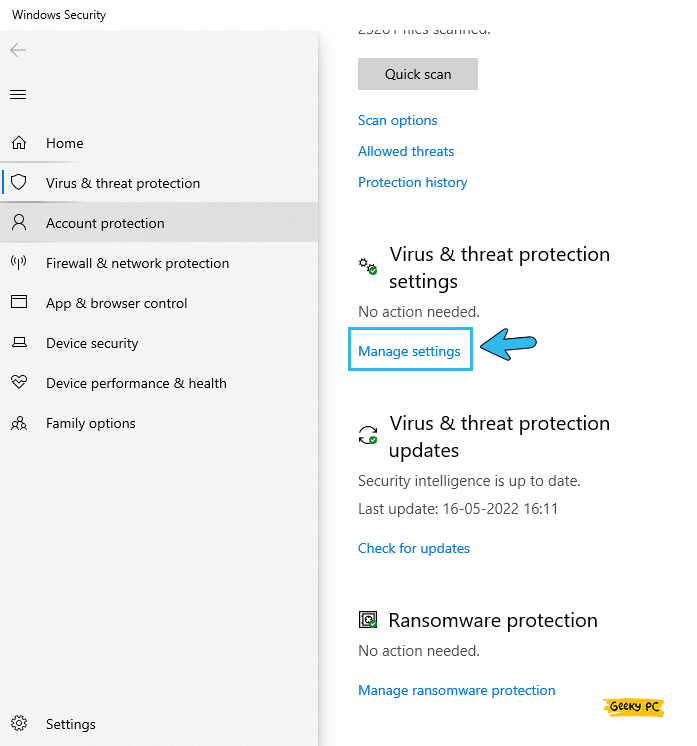
- Step 6: Now, scroll down and toggle the switch adjacent to the “Real-time protection” option.

- Step 7: Click “OK” to save the settings and close the window.
It is absolutely not recommended to disable Windows Defender for a long time. Otherwise, it can create serious security loopholes to make your device vulnerable.
On the other hand, you also need to disable the third-party antivirus if you are using any.
8+ Pro Methods To Resolve Error code 0xc0000005 In Windows
If you are still getting the application error 0xc0000005 even after trying all the generic methods we have listed above, your problem is way more deep-rooted than you can possibly assume. Following the advanced fixes is the sole option to fix this error in Windows devices.
7. Disable Data Execution Prevention (DEP)
The latest Windows 10 and 11 come with preinstalled Data Execution Prevention tool, which is a security software to prevent any damage from external bugs and viruses.
And if you are encountering application errors too frequently, you should check them by disabling the DEP.
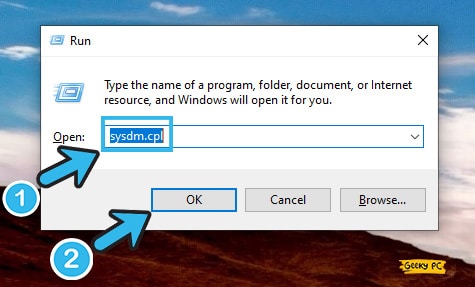
- Step 1: Press the “Windows Key + R” buttons together to launch the “Run” command.
- Step 2: Type “sysdm.cpl” in the command field and press the “OK” button.
- Step 3: Once the “System Properties” window launches, navigate to the “Advanced” tab from the header menu.
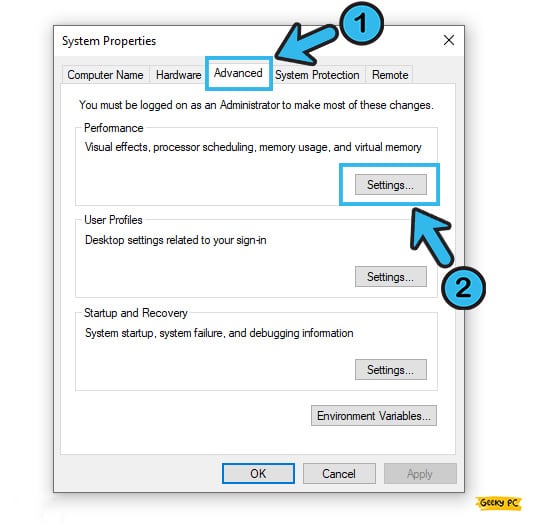
- Step 4: Now, click on the “Settings” button under the “Performance” segment.
- Step 5: Once the “Performance Options” window appears, navigate to the “Data Execution Prevention” tab from the header menu.
- Step 6: Tick the “Turn on Data Execution Prevention for all programs and services except those I select” option.
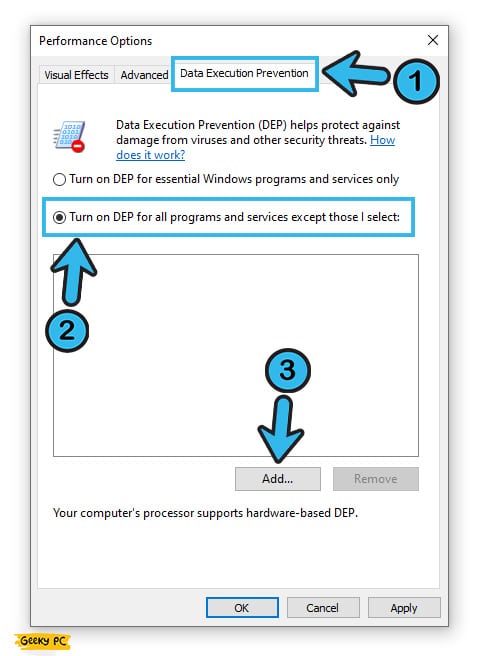
- Step 7: Now, click on the “Add” button and navigate to the problematic program file.
- Step 8: Click on the “Apply” button to save the settings and then “OK” to exit.
You may get a group policy error message if you have suddenly disabled the DEP amidst any operation, especially if you are using your system under a network administrator.
In that case, follow our detailed guide to fix the “This program is blocked by group policy” error in Windows systems.
8. Disable Proxy In Internet Settings
If you have enabled a proxy in your internet settings, it may happen that it is causing the application to run with errors and external interference. So, it is better to recheck the application after disabling the proxy settings on your internet profile.
- Step 1: Press the “Windows Key + R” buttons together to initiate the “Run” command.
- Step 2: Type “CMD” in the command field and press the “OK” button to launch the “Command Prompt” app.
- Step 3: Once the black window appears, type “netsh winhttp import proxy source=ie” and hit enter.

- Step 4: If you get an “Error writing proxy settings. (5) Access is denied” message, you need to check your proxy settings.
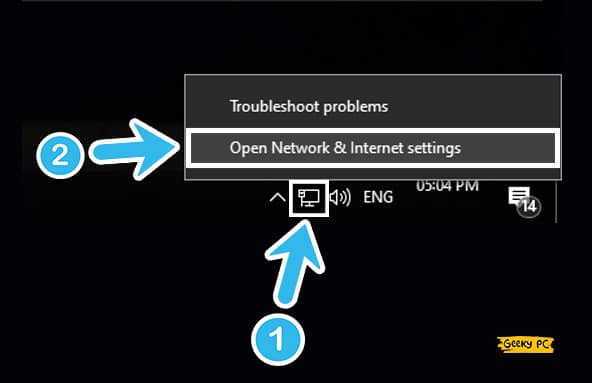
- Step 5: Now, click on the “LAN” icon located at the bottom-right corner of your taskbar and select the “Open Network & Internet Settings” option.
- Step 6: Once the new window launches, select the “Proxy” option from the left panel.
- Step 7: Navigate to the right panel and toggle the switches beside both the “Automatically detect settings” and “Use a proxy server” options.
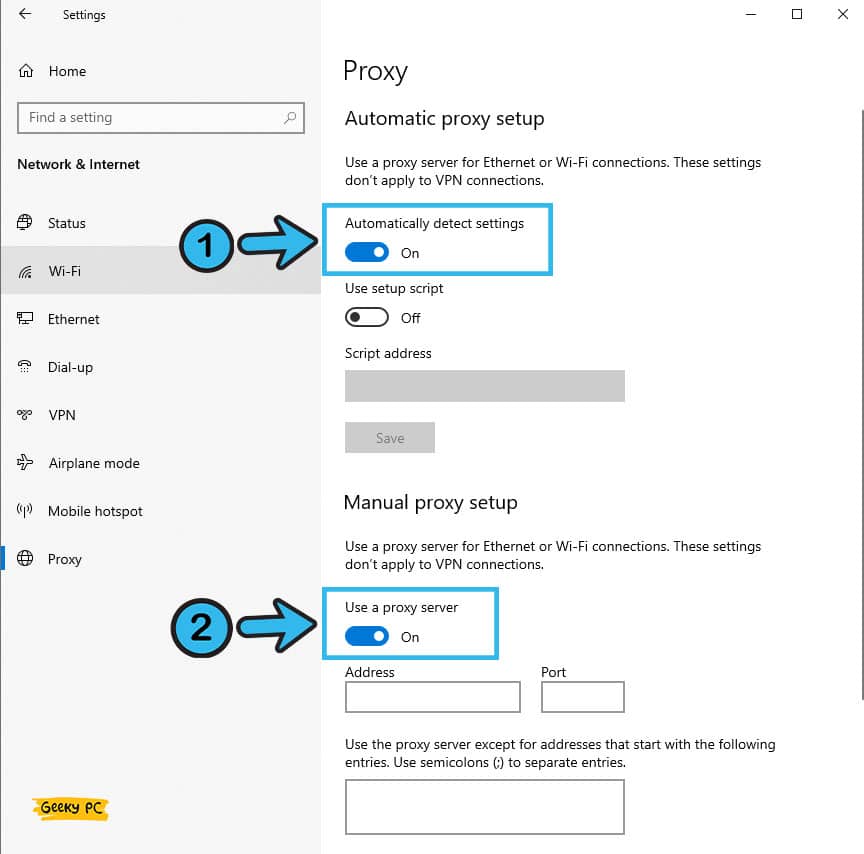
- Step 8: Click the “Save” button and exit from the “Settings” app.
Several people have reported getting a yellow triangle mark on their LAN icon after they have disabled the proxy settings. In such cases, follow our step-by-step guide to fix the “ERR_NETWORK_CHANGED” error in Windows devices.
9. Reset Your Windows OS
It may happen that the application error is constantly triggering because you have a bug or error in your root directory. In that case, you can either proceed with a fresh windows installation or can completely reset your Windows OS to resolve the root directory errors.
- Step 1: Press the “Windows Key + I” buttons together to launch the “Settings” app.
- Step 2: Navigate to the bottom of the newly launched window and click on the “Update & Security” option.
- Step 3: Now, navigate to the “Recovery” option located on the left panel.
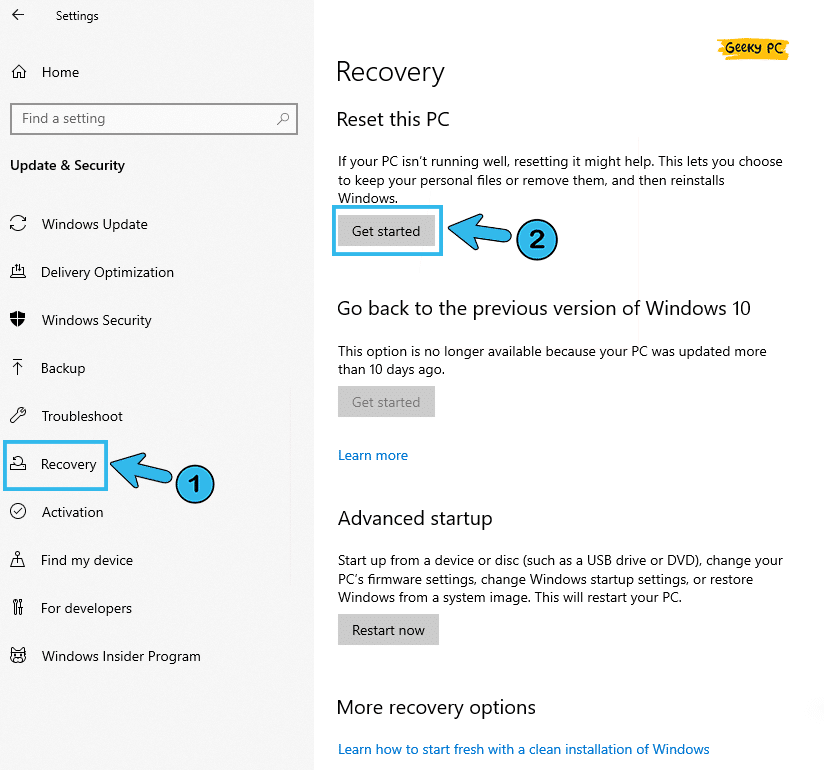
- Step 4: Come again to the right panel and click on the “Get Started” button located under the “Reset this PC” header.
- Step 5: Select the “Keep my files” option once you get a new prompt message.
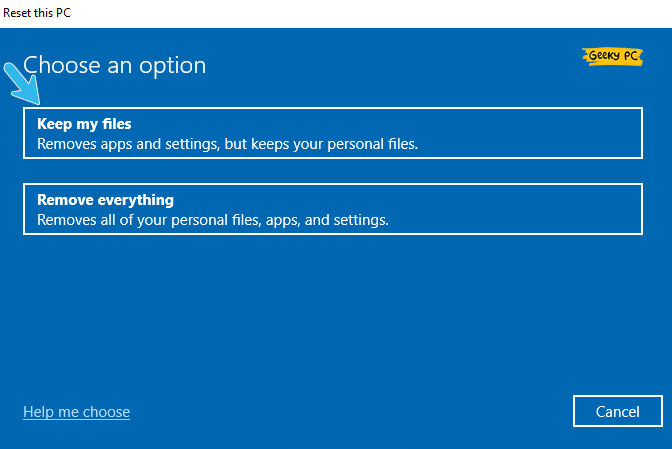
- Step 6: Proceed with the “Local reinstall” option and further click on the “Next” button.
- Step 7: Click on the “Reset” button to initiate the process and reboot your system once it is done.
If you are using any static IP connection provided by your ISP, you may get an undefined network error once you rest your Windows OS completely.
10. Perform System Restore
If you don’t want to reset your entire windows OS (which will uninstall all your applications), you can simply restore your system to a previous point.
In that way, you don’t need to uninstall all the apps, but you still get rid of the error. And now, the system restores feature is available in all Windows OS.
- Step 1: Right-click on “This PC” or “My Computer” (depending on your OS) and select the “Properties” option from the menu.
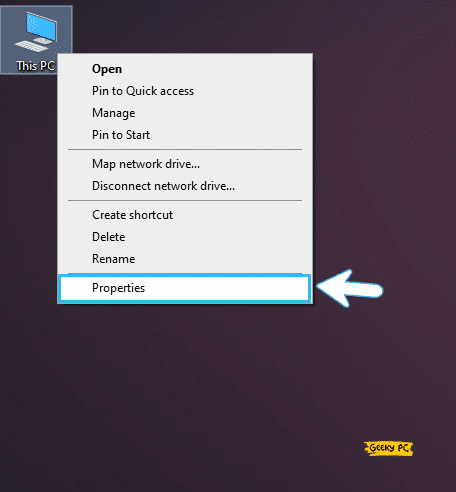
- Step 2: Once the new window appears, scroll down and click on the “Advanced system settings” option.
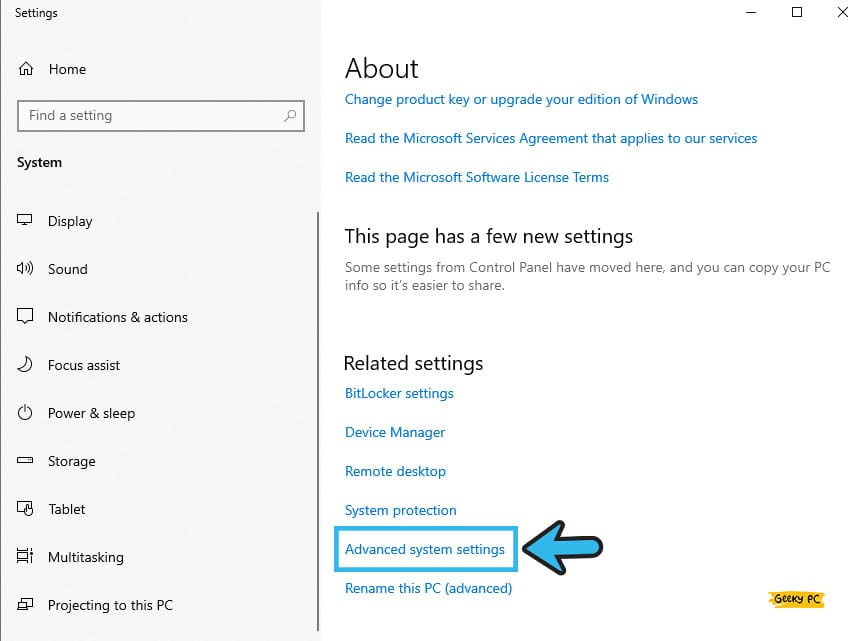
- Step 3: After the “System Properties” window launches, navigate to the “System Protection” tab from the header menu.

- Step 4: Click on the “System Restore” button and click on the “Next” button when the new window appears.
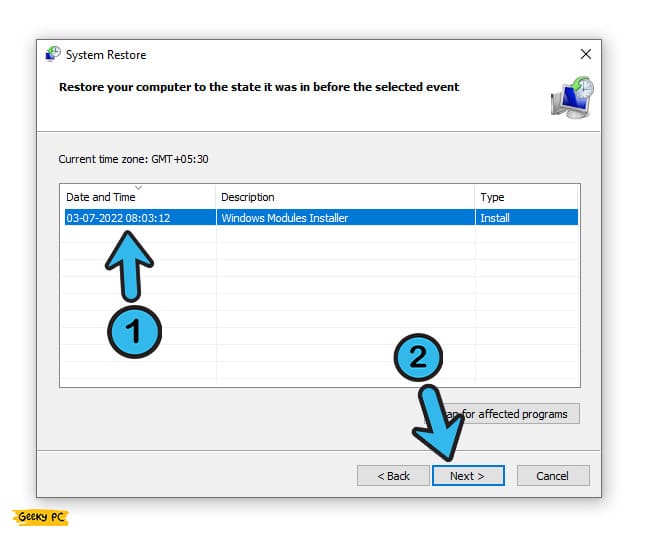
- Step 5: Click on the “Show more restore points” option and select one of your restore points.
- Step 6: Click on the “Finish” button when the confirmation dialogue box appears.
- Step 7: Once the system is fully restored, reboot your system and check if the problem still persists.
It is better to create a system restore point every few days or whenever your system is running smoothly. Because if any application error or other bugs occur, you can simply restore the entire system to a point where everything is going right.
11. Disable AppInit_DLLs in Windows Registry
You may not know, but the AppInit_DLLs can create several issues if it has a faulty line or a bug in it. Although this DLL is mainly targeted toward efficient use of your storage space, it can trigger several application errors if it has any bug in it. So, you need to manually disable it from the registry editor.
- Step 1: Press the “Windows Key + R” buttons to initiate the “Run” command window.
- Step 2: Type “regedit” in the command field and click on the “OK” button.

- Step 3: Once the “Registry Editor” window launches, navigate to the “HKEY_LOCAL_MACHINE\SOFTWARE\Microsoft\Windows NT\CurrentVersion\Windows” path.
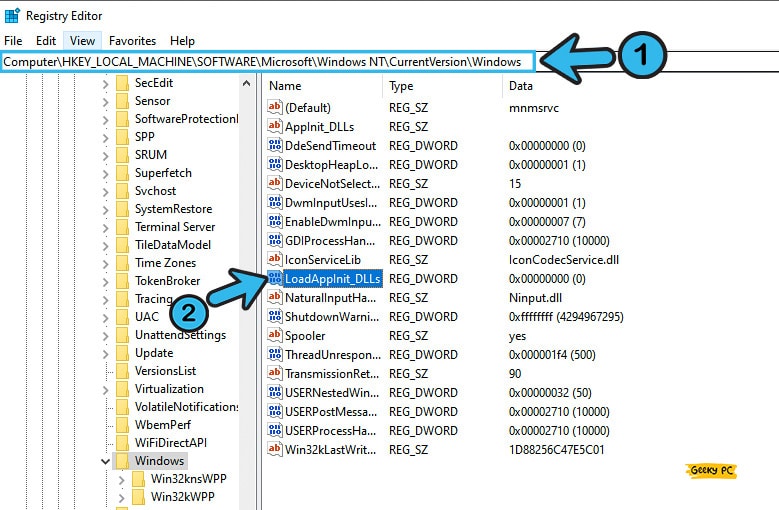
- Step 4: Now, navigate to the right panel and locate the “LoadAppInit_DLLs” file.
- Step 5: Double-click on the “LoadAppInit_DLLs” file and change the value from “1” to “0” in the Value field.
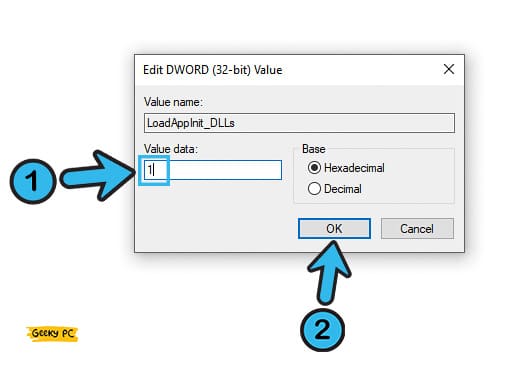
- Step 6: Press the “OK” button to save the settings and reboot your device.
Registry editing is an advanced mechanism that you must do under strict supervision. If you enter a wrong value in any of the DLL files from the registry editor, that value alone is sufficient to trigger a chain of errors in Windows devices. So, until it is absolutely necessary, don’t edit your registry files.
12. Recreate HDD Partitions
At times, you may encounter exception error 0xc0000005 while installing a fresh Windows OS on your system. It may happen that a faulty HDD partition is creating this issue.
So, it is better to delete the partitions and create fresh partitions before installing a new OS.
- Step 1: Once the installation process starts, click on the “user-defined installation type” for the advanced users.
- Step 2: Navigate to the “Primary” partition where the old OS is installed and click on the “Delete” button.
- Step 3: Now, follow the same process and delete the “System Reserved” partition as well.
- Step 4: Once you have deleted all the partitions, you will see a new “non-allocated storage space on drive 0” option.
- Step 5: Click on the “New” button and let the setup wizard automatically calculate the maximum storage size.
- Step 6: Click on the “Apply” button to proceed with the new partition.
- Step 7” Select the large partition (Other than the “System Reserved” drive) and click on the “installation drive for Windows” option.
- Step 8: Now, click on the “Next” button to initiate the installation process.
- Step 9: Set up your new windows and login into your Microsoft account to authenticate the Windows version.
If you are installing a new Windows OS on your old PC, don’t forget to take a backup of your data. Otherwise, your data will be permanently lost if you delete and recreate the partitions. So, it is better to keep it safe somewhere before proceeding with a fresh installation.
13. Run Windows Update Troubleshooter
Many people have reported getting this application error while trying to update their Windows OS. It may happen due to a faulty installation file or any error in the installation directory. So, you should manually run the troubleshooter to figure out this problem.
- Step 1: Click on the “Magnifying Glass” icon located in your taskbar and type “Troubleshooter” in the search field.
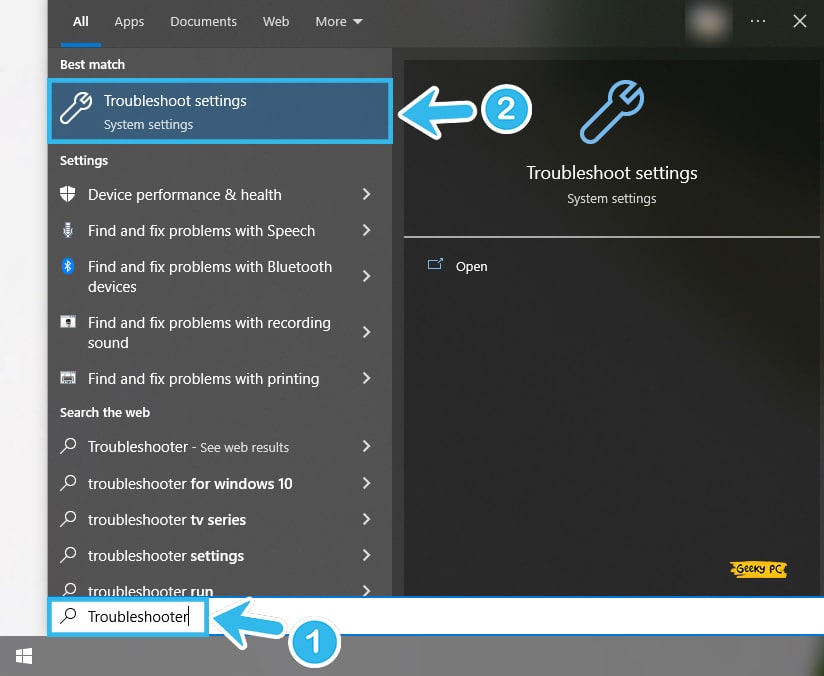
- Step 2: Click on the first result that appears to launch the “Troubleshoot Settings” window.
- Step 3: Navigate to the right panel and click on the “Additional troubleshooters” option.
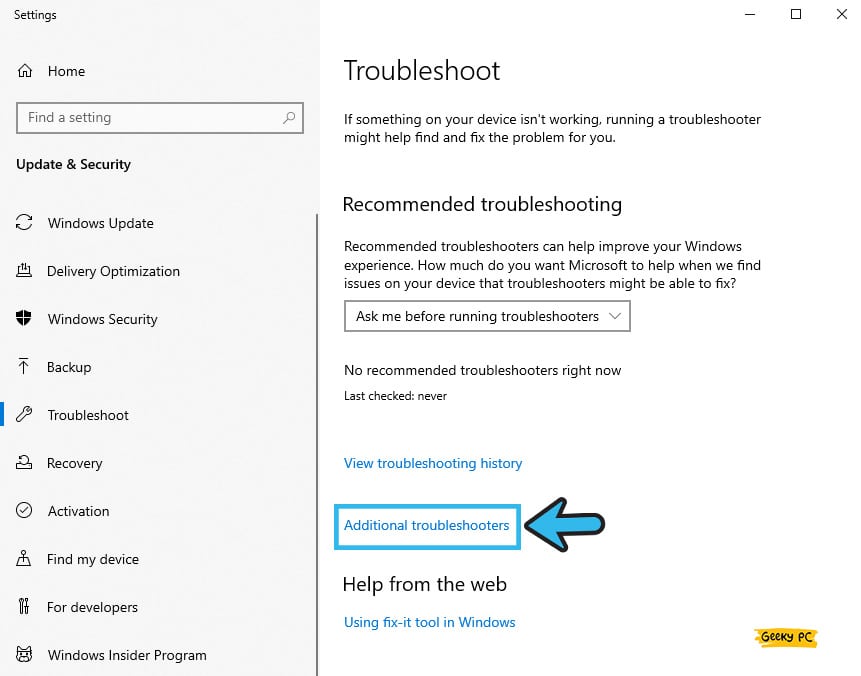
- Step 4: Once the new page opens, click on the “Windows Update” button to launch the troubleshooter.

- Step 5: Once the troubleshooting is done, press the “Windows Key + R” buttons together and type “CMD” in the command field.
- Step 6: Press “OK” to launch the black command prompt window.
- Step 7: Now, type each of these commands and hit enter after each line, “net stop wuauserv,” “net stop cryptSvc,” “net stop bits,” “net stop msiserver,” “ren C:\\Windows\\SoftwareDistribution SoftwareDistribution.old,” “ren C:\\Windows\\System32\\catroot2 catroot2.old,” “net start wuauserv,” “net start cryptSvc,” “net start bits,” and “net start msiserver.”
- Step 8: Once all the command lines are entered and executed, reboot your system.
You shouldn’t run the troubleshooter over and over again. If troubleshooting just once can’t solve the error, you shouldn’t re-run it. Instead, you should restore your entire system to a previous point. Or you can also proceed with a fresh installation.
14. Repair The Boot Configuration Data (BCD) File
If you have faulty boot configuration data, typically encountered after a malware infection, the application error may occur frequently. However, you can now manually resolve the BCD files with the installation disk or boot drive that you already have.
- Step 1: Insert the installation CD, DVD, or Pen Drive, and reboot your computer.
- Step 2: Once you get any installation message, click on the “Next” button in the language settings.
- Step 3: Now, click on the “Computer Repair Options” and then select the “Troubleshooter” button.
- Step 4: Once a new page appears, click on the “Advanced Option” and then proceed with the “Command Prompt” option.
- Step 5: Once the command prompt window launches, type the following command and hit enter after each line, “del D:\windows\system32\xntkrnl.exe,” “del D:\windows\system32\xosload.exe,” “del D:\windows\system32\drivers\oem-drv64.sys,” “attrib c:\boot\bcd -h -r -s,” “ren c:\boot\bcd bcd.old,” and “bootrec /rebuildbcd.”
- Step 6: Once all the operation is successfully executed, reboot your system.
- Step 7: Enter the license key on the welcome window to successfully activate your Windows OS.
You should take extreme care while editing or troubleshooting the kernel files on the root installation directory. If you enter any wrong value in those files, a series of errors will start in a cycle. So, you should strictly perform this operation under expert supervision.
What Application Error 0xc0000005 Actually Is?
Needless to say, error code 0xc0000005 is the most common error in the latest Windows OS. However, this error code can even pop up in older OS, like Windows 7 and 8. And this error mainly triggers in three ways.
- Windows Installation: You may get the error code 0xC0000005 while Windows installation. The error message also reads, “Unexpected error when installing Windows.”
- Access Violation: Your application may stop working suddenly, and you start getting the “Access violation when reading position” message.
- Application Starting: You may get this error message while initiating an application. And the message reads, “The application could not be started correctly.”
And not just Windows installation; you may also get this particular error code while updating your Windows OS.
Conclusion
Applying the generic fixes alone will solve the application error 0xc0000005 in most cases. And these methods are relatively safe to try and don’t need any expert supervision. However, if you have to try the pro methods we have listed above, it is better to create a restore point beforehand.
So, that’s all the possible solutions we have to rectify the application bug. If you think we have missed any, or if you have any other working methods, feel free to let us know in the comment box below!
FAQs
Q. What is the cause of 0xc0000005?
The application error code 0xc0000005 typically occurs when an app or software fails to initiate. It can even occur if you have a faulty installation file and trying to update your Windows OS with the file. This error can also occur even during a fresh OS installation.
Q. Why do I keep getting error code 0xc0000005?
There are two main reasons why you keep getting the error code 0xc0000005 in windows. Firstly, if you have a faulty installation file or a faulty root installation file of the Windows OS. And second, any third-party app from interfering with the system, thus disabling the app initiation.
Q. How to quickly resolve error 0xc0000005 in Windows?
It is better to start with updating Windows OS and the problematic drivers if you want to resolve the error code 0xc0000005 quickly. You can also try to reinstall the application by disabling the antivirus and the Windows firewall.
Q. How do I fix 0xc0000005 on steam?
Start by opening your steam library and then right-click on the game that is showing you the error. You need to select the properties and then proceed with the Local Files tab. And then, you should click on the Verify Integrity of Game Files to resolve this issue.