
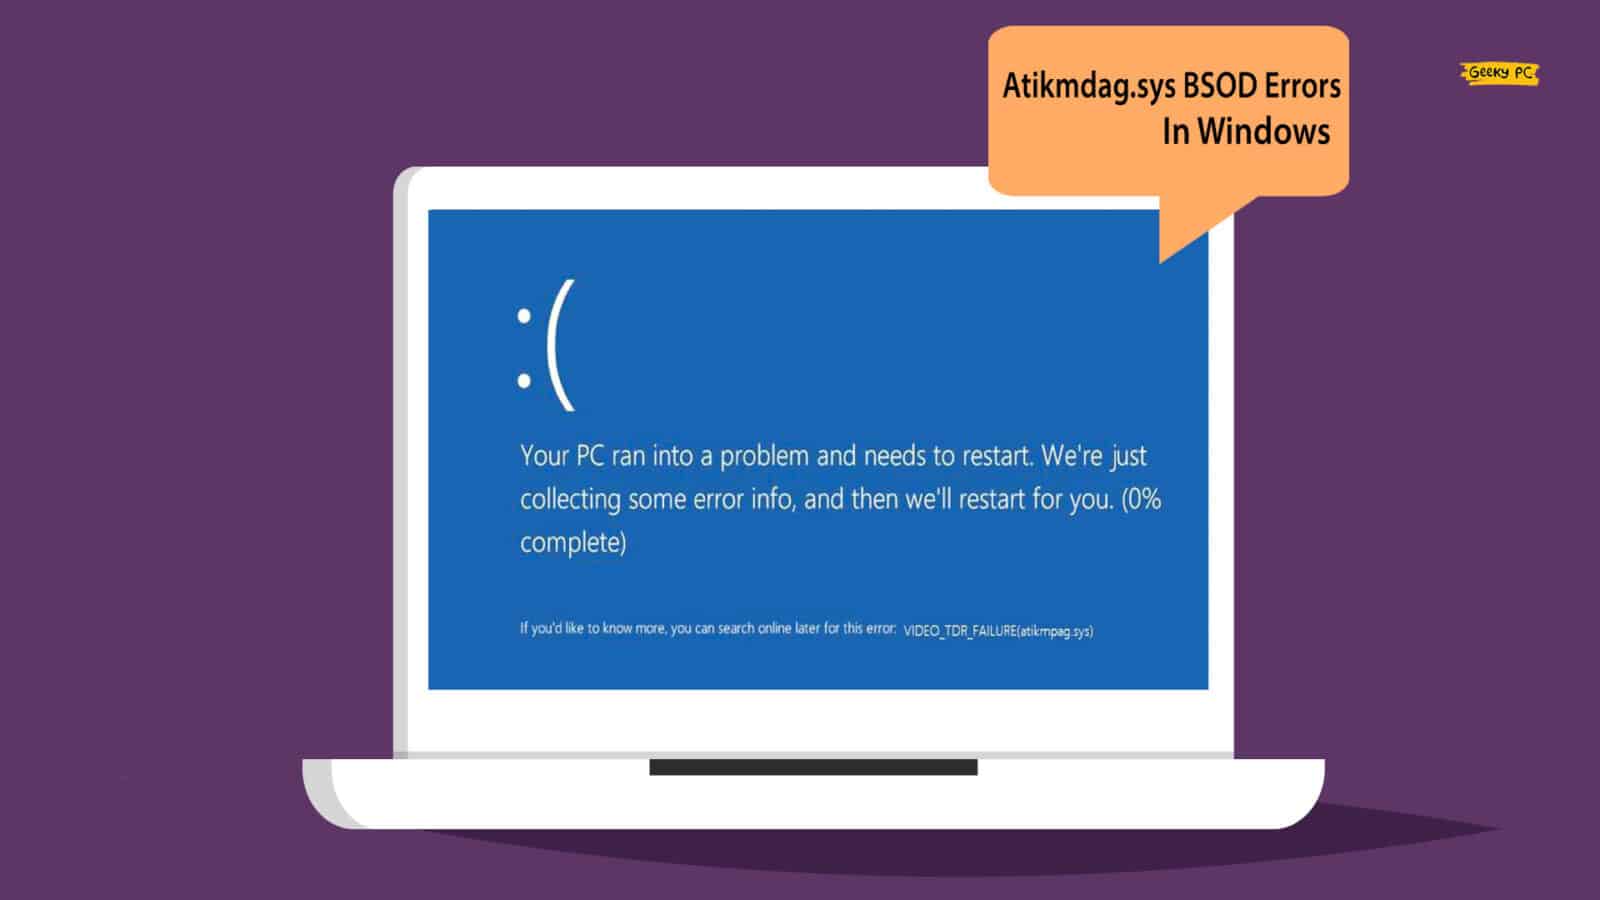
Everything was running smoothly with your ATI Radeon graphics card, and then suddenly, the Atikmdag.sys BSOD errors start popping up, isn’t it? Yes, we have all faced this issue while using this particular brand of GPU.
You can fix the Atikmdag.sys error by ending all the conflicting programs, disabling all the startup applications, and then restarting your device into safe mode. Besides, you also can run the “Check Disk,” and “SFC” scans. This error can be solved by updating your OS and GPU driver as well.
However, these are not all, as we have many more effective solutions to resolve this error. But before we reveal those, let’s understand what this error actually is and what are the reasons behind it.
What Are The Primary Reasons Behind Atikmdag.sys BSOD Errors?
Although it is pretty common to get Atikmdag.sys BSOD errors on your system while using an ATI Radeon graphics card; these errors can seriously disturb your overall visual experience. And there are six main reasons for which this particular error can occur.
- You are using an outdated version of the Windows OS that needs an update.
- Some of the drivers, especially the GPU drivers, installed on your system are obsolete.
- Any third-party application or startup process is interfering with the system.
- You have corrupted, malicious, or buggy system files in your root directory.
- Your hard disk drive has some dead or bad sectors in it.
- The Atikmpag.sys file itself is corrupted and needs to be replaced manually.
Besides these six primary reasons, there are several other reasons for which this error can typically trigger. However, we have some generic fixes and some advanced tweaks to resolve this issue in no time.
6+ Easy Fixes For The Atikmdag.sys BSOD Errors
Before trying any advanced methods that need pro-level tweaks on your system, you should try the generic methods to fix the Atikmdag.sys BSOD errors. And in almost 95% of cases, these generic methods alone are sufficient to resolve this bug.
1. Reboot Your Device Into Safe Mode
At times, any of your startup applications or other third-party applications may start interfering with the system files, which can instantly trigger the Atikmpag.sys BSOD in Windows 10.
So, before trying anything, it is better to restart your Windows devices into safe mode to eliminate interference.
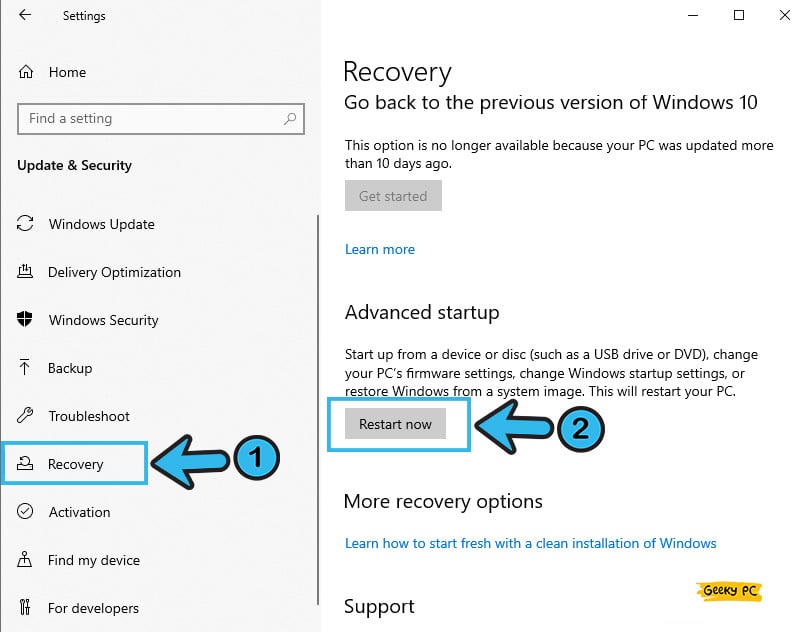
- Step 1: Press the “Windows Key + I” buttons together to launch the “Settings” app on your device.
- Step 2: Once the app opens, scroll down, and click on the “Update & Security” option.

- Step 3: Now, navigate to the left panel once the menu launches and click on the “Recovery” tab.
- Step 4: Come to the right panel, locate the “Advanced Startup” option, and click on the “Restart” button.
- Step 5: Let Windows automatically restart itself and select the “Safe Mode” option from the boot screen.
- Step 6: Once your OS is completely loaded, check whether you are still getting this issue.
Many people have already told us that they have witnessed a strange error after restarting their device into safe mode, where the start button stops working completely.
If you are facing the same, you can follow our step-by-step guide to fix the “Start button is not working” on Windows devices.
2. Change Windows Startup Behavior
Some of the startup applications (along with a few third-party apps) may not end even if you restart your system into safe mode.
And in that case, you can manually change the overall startup behavior of your Windows OS to completely eliminate the interference issues.
- Step 1: Press the “Power Button” on your cabinet to switch on your device.
- Step 2: Once the logo of the motherboard manufacturer appears, long-press the “Power Button” again to shut it down.
- Step 3: Repeat these steps a few times until you get the “Preparing Automatic Repair” message on your startup screen.
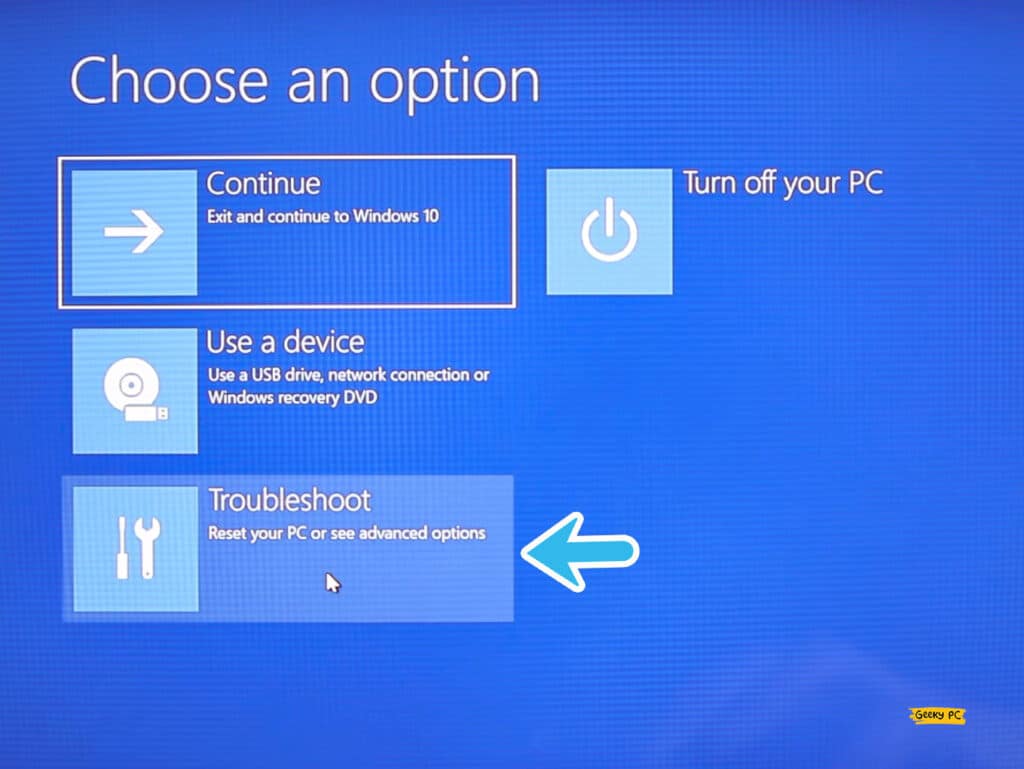
- Step 4: Once the “Startup Repair” screen appears, click on the “Advanced Option” tab.
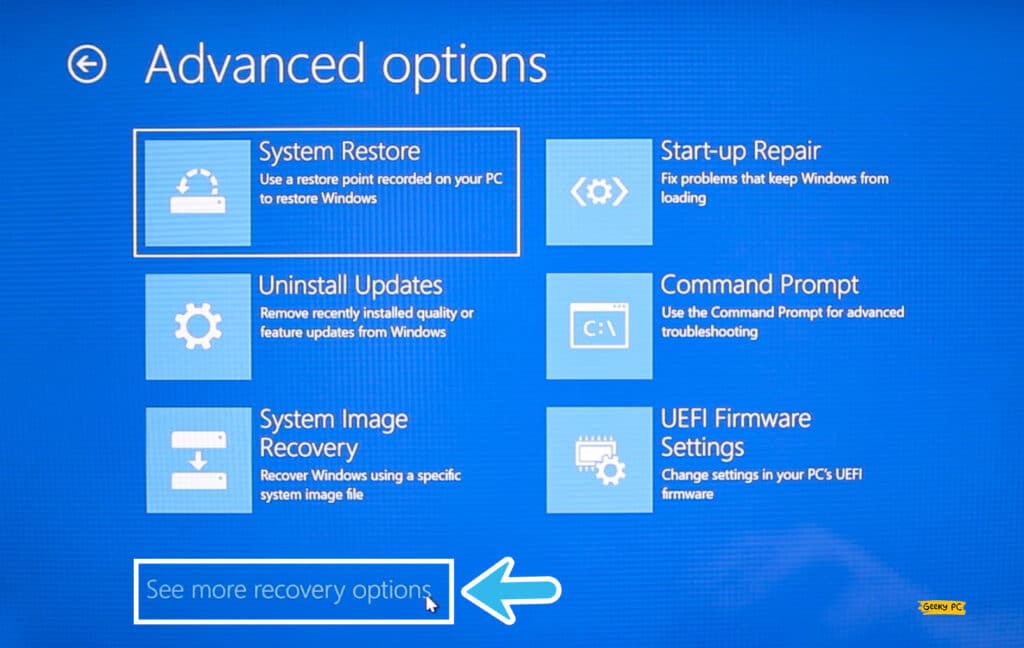
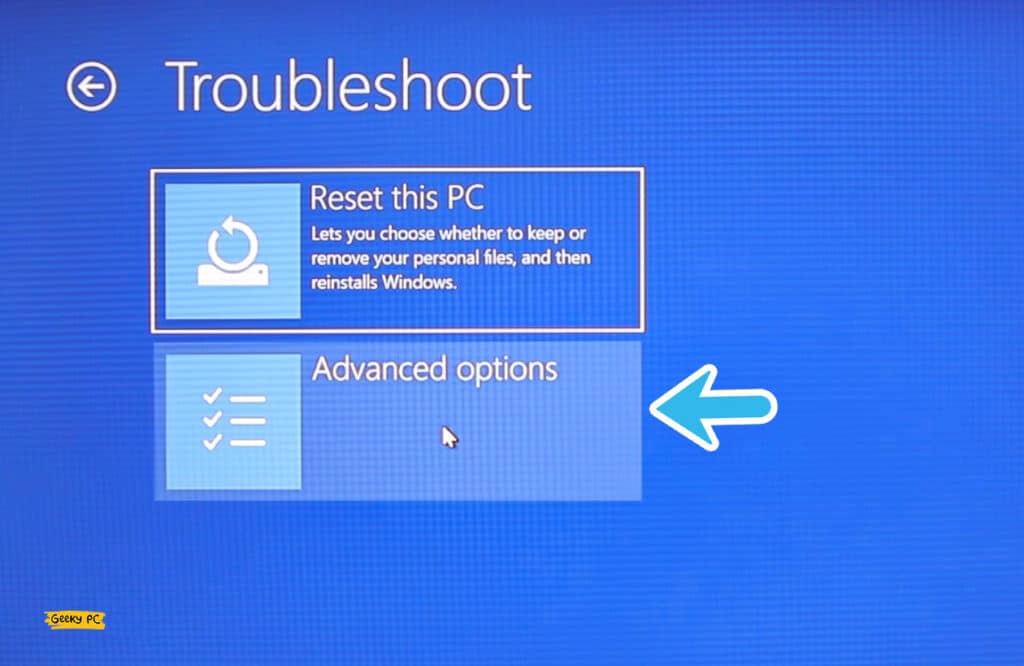
- Step 5: After you get a new window, select the “Troubleshoot” option.
- Step 6: Once the troubleshooting window popup, click on the “Advanced Option” button.
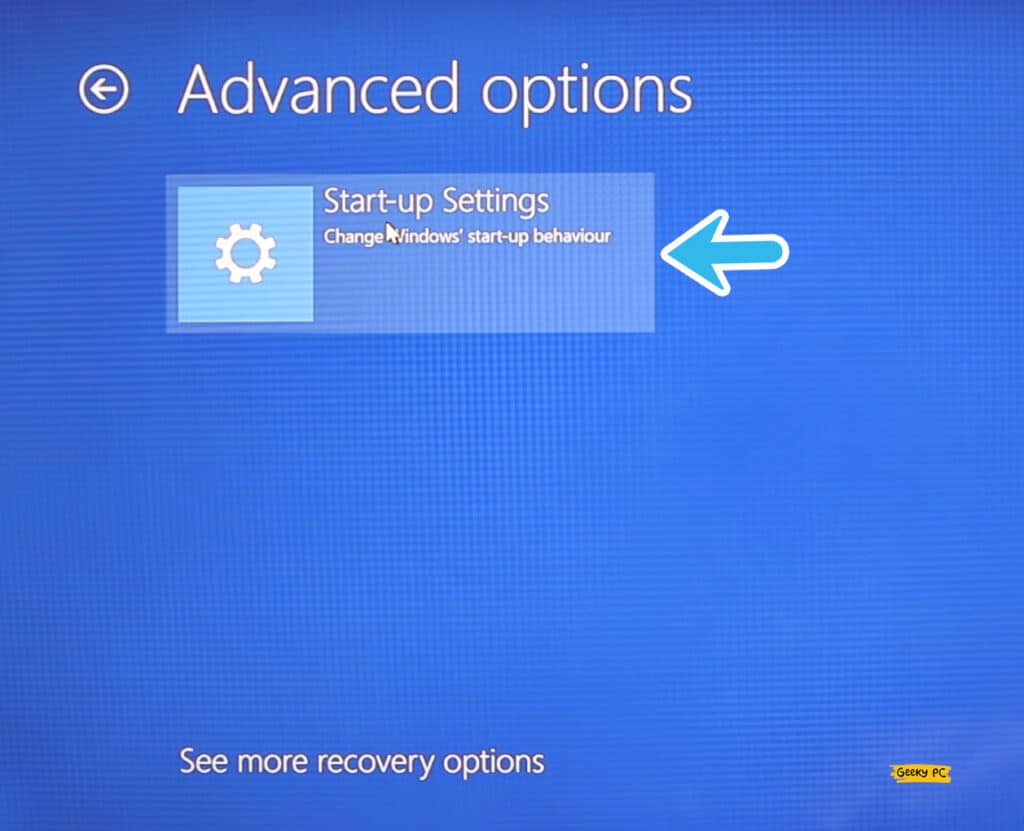
- Step 7: Now, navigate to the bottom of the screen, and click on the “Startup Settings” option.
- Step 8: Once you get a new window, click on the “Restart” button at the bottom of the page.
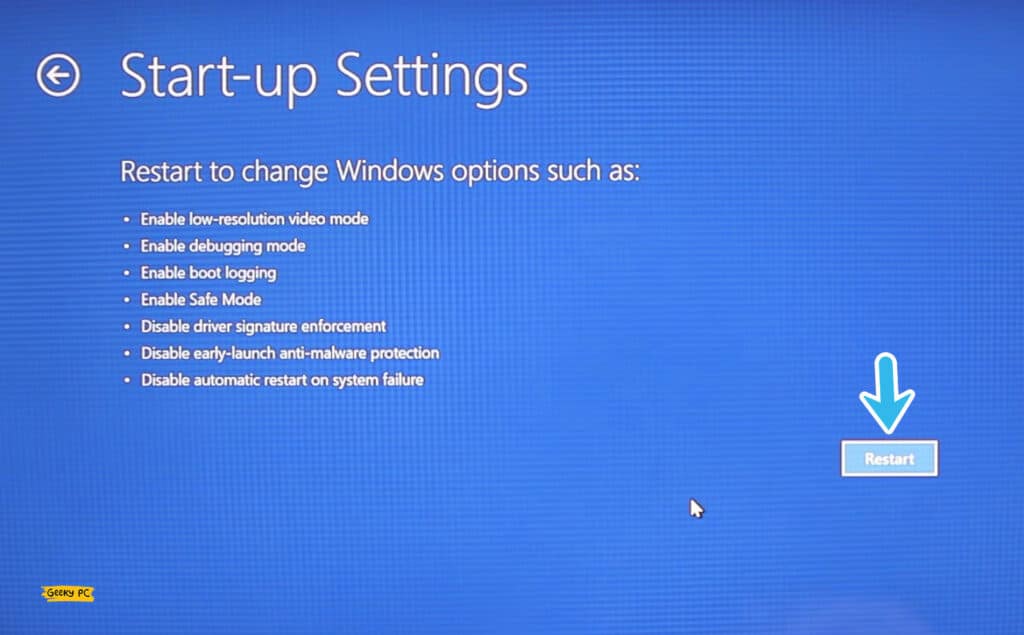
- Step 9: Now, press the numeric “4” or “5” button and let your windows restart.
Once your window restarts after you have successfully changed the startup behavior, check whether you are still getting the BSOD errors. Besides, you may also need to disable your antivirus first to minimize interference from the antivirus or firewall applications.
If you are also facing a similar situation, follow our comprehensive guide to fixing the “Error 0x80070017” in Windows systems.
3. End All The Conflicting Programs
Not just the startup application, but some of the programs on the same platform may also start interfering with each other, which can trigger the error.
In such cases, you need to end all the conflicting programs on your device and give your system a fresh start.
- Step 1: To launch the “Task Manager” app, press the “Ctrl + Alt + Del” buttons altogether.
- Step 2: Once the new window launches, click on the “Processes” tab from the header selection menu.
- Step 3: Right-click on each item from that list one after another to fetch the additional options.
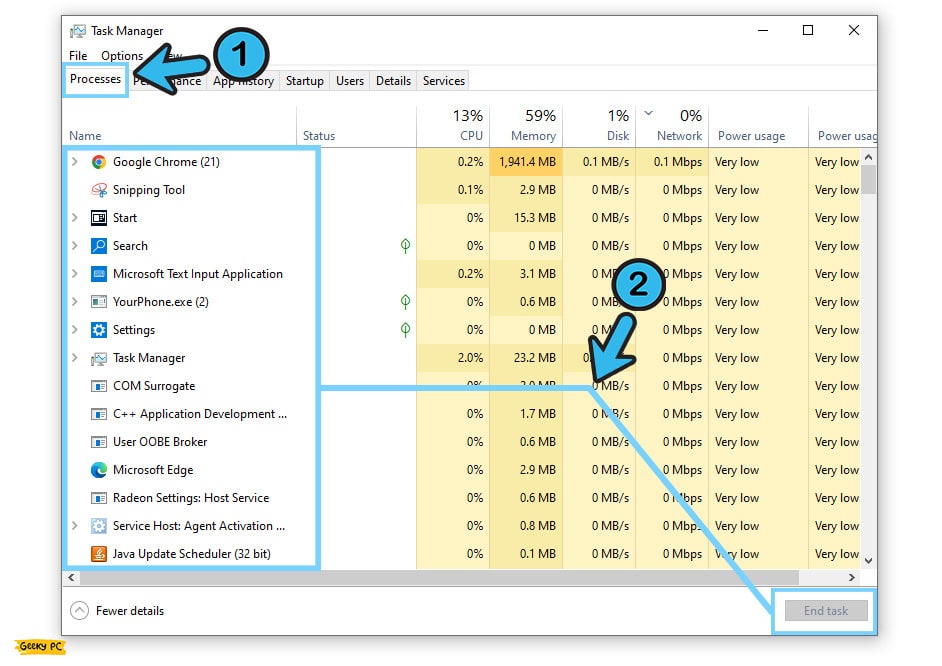
- Step 4: Once the menu launches, click on the “End Task” button to stop that particular app.
- Step 5: Once all the applications are closed from the task manager app, restart your system.
Many people have reported getting an unidentified network error with a yellow triangle on their LAN option once they have ended all the applications from the task manager app.
4. Update Your Windows OS
If you are using an outdated version of the Windows OS, it may trigger Atikmdag.sys error with a page_fault_in_nonpaged_area message.
So, you need to update your OS first, not only just to fix this particular error but also to resolve all the minor glitches in your OS.
- Step 1: Click on the “Magnifying Glass” icon located at the bottom-left corner of the taskbar to launch the “Search” field.
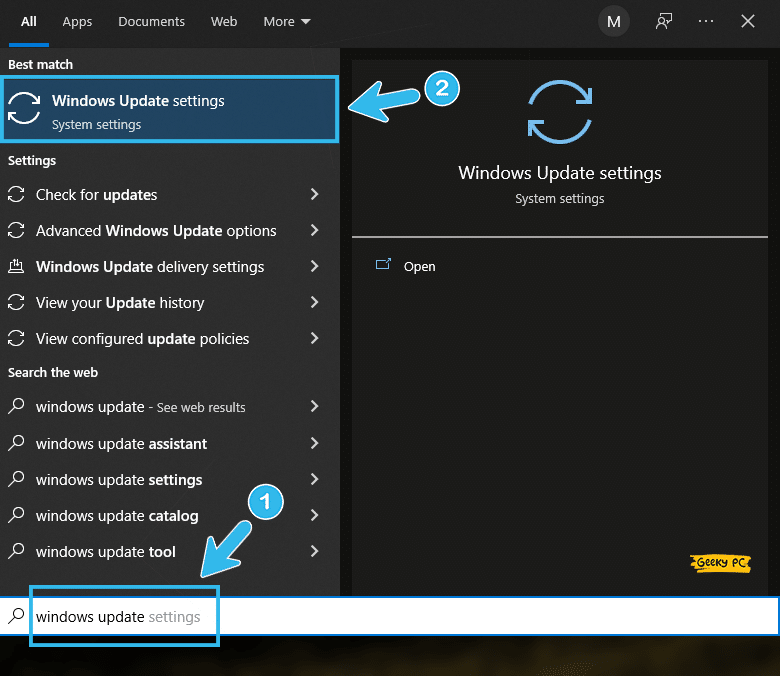
- Step 2: Once the new popup window appears, type “Windows Update” in the designated box and click on the first result that appears.
- Step 3: Once the “Update” window initiates, navigate to the left panel, and click on the “Windows Update” button.
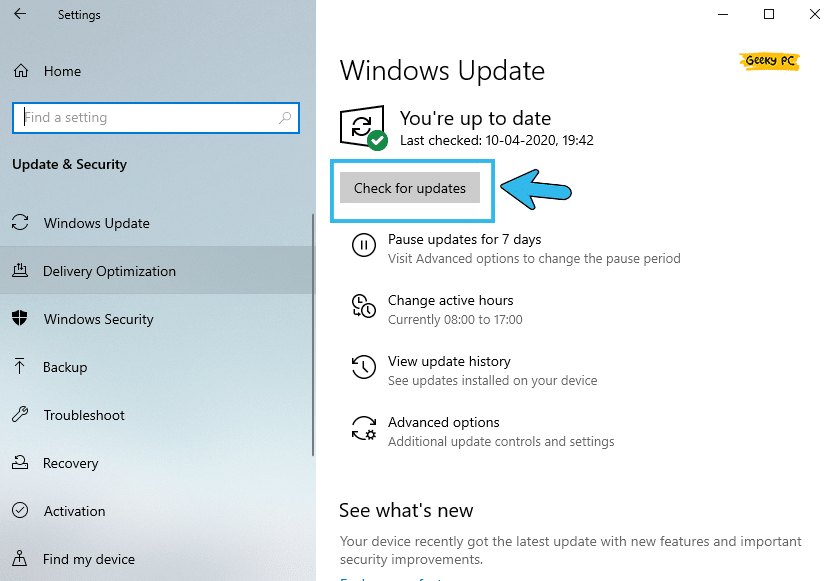
- Step 4: Navigate to the right panel and click on the “Check for updates” option.
- Step 5: Let Windows find the latest update from the Microsoft server and install it.
A few of the Windows users have reported getting an unresponsive taskbar all of a sudden once they have installed the latest update.
5. Update Your GPU Driver
Not just the Windows OS, you may also get the same error even if you are using an outdated version of your GPU driver.
And you need to keep your GPU drivers updated to ensure a seamless visual experience while minimizing the glitches from the graphics card.
- Step 1: Right-click on either the “Start” button or the “Windows” icon, depending on your OS type.
- Step 2: Click on the “Device Manager” option to launch the app.
- Step 3: Once a new window pops up, click on the “Display Adapter” option to expand the menu.
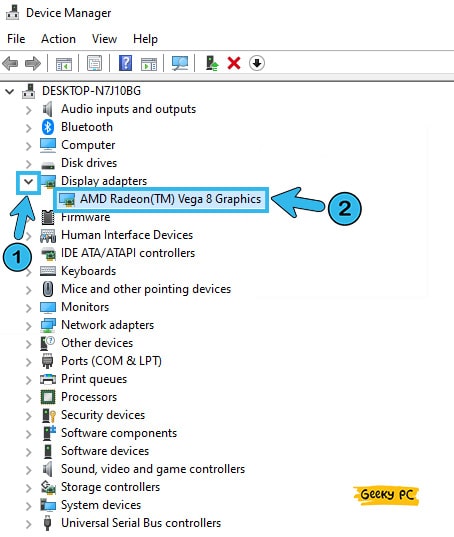
- Step 4: Now, locate your GPU from the list and right-click on it to fetch the additional options.
- Step 5: Click on the “Update Driver” option, and once you get a new prompt, select the “Search automatically for drivers” option.
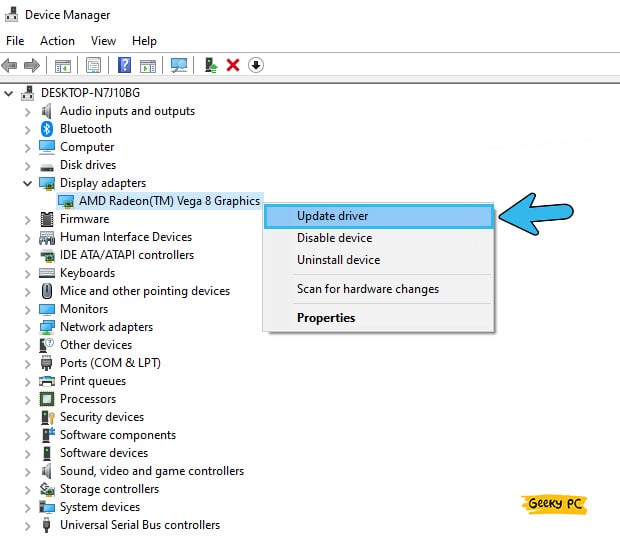
- Step 6: Let Windows find the updated version of your GPU driver and install it.
- Step 7: Now, follow the same steps to update all your graphics-related drivers.
- Step 8: Once all your GPU drivers are updated, give your system a fresh reboot.
6. Update All Your Outdated Drivers
Not just the GPU driver, but many of the other obsolete drivers can also interfere with your system, which can also trigger the Atikmpag.sys error in Windows devices.
So it is better to update all your drivers to ensure a smooth computing experience without any glitches and errors.
- Step 1: Click on the “Magnifying Glass” icon located at the bottom-left corner of the taskbar.
- Step 2: Once the search window opens, type “Control Panel” and click on the first result.
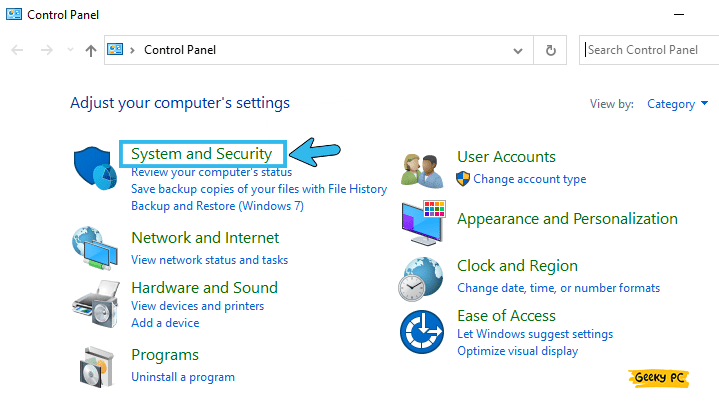
- Step 3: After the “Control Panel” app launches, navigate to the top-right corner, and select the “Category” option from the drop-down menu located under the “View by:” header.
- Step 4: Now, select the “System and Security” option from the menu to launch it.
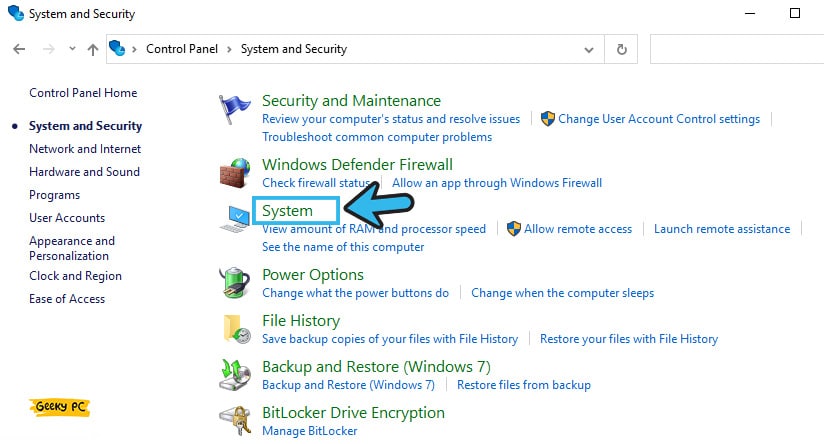
- Step 5: Navigate to the right panel and then click on the “System” option.
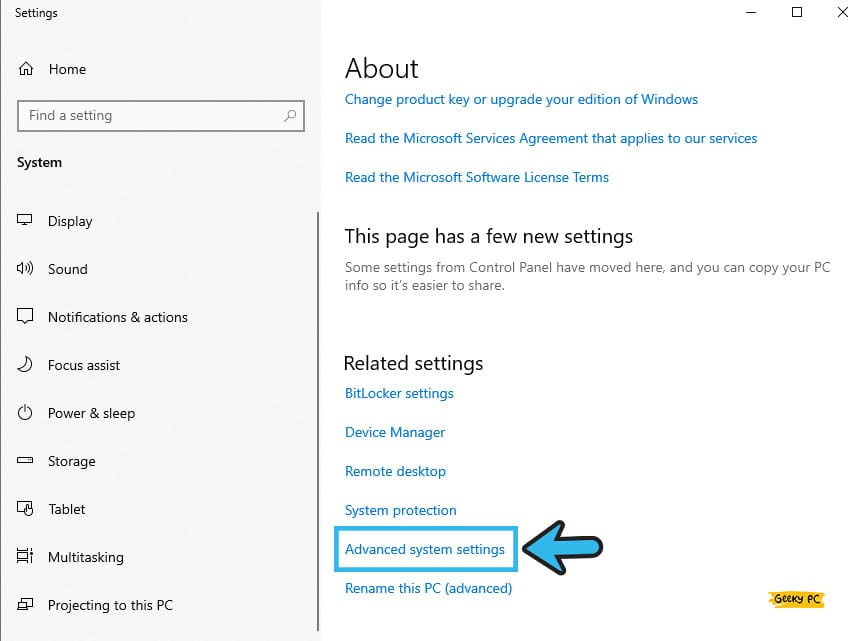
- Step 6: Once you get the new window, click on the “Advanced System Settings” option.
- Step 7: Once the “System Properties” window launches, click on the “Hardware” tab from the header selection menu.
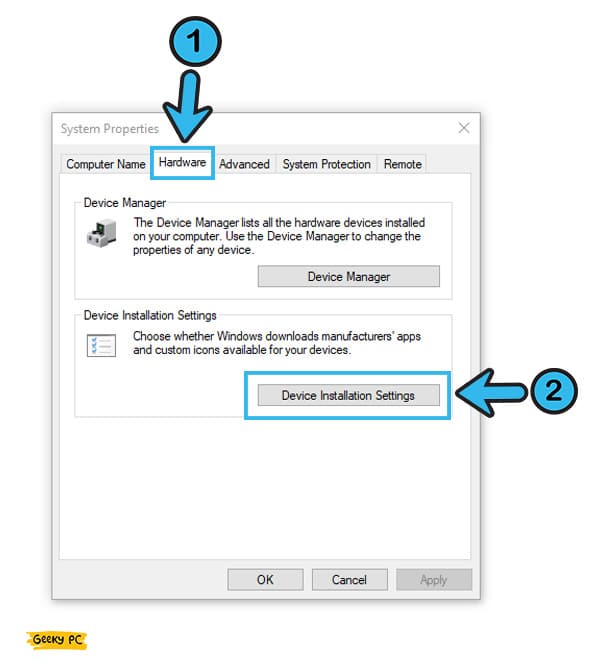
- Step 8: Now, click on the “Device Installation Settings” option from the menu.
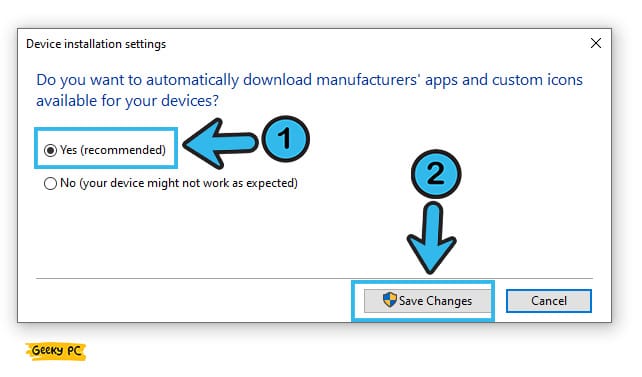
- Step 9: Once you get a new prompt, click on the “Yes” button followed by the “OK” button.
- Step 10: Let Windows automatically find and install the latest drivers on your system and reboot once the operation is done.
Many people have started getting a generic PnP monitor error once they have updated all their drivers, especially while using a low-end monitor.
If you are also witnessing similar issues, follow our step-by-step guide to fix the “Generic PnP monitor” error in Windows devices.
6+ Advanced Fixes For The Atikmdag.sys BSOD Errors In Windows
If none of the generic methods we have listed above are working to resolve the Atikmdag.sys BSOD errors on your system, there are no other options than resorting to advanced tweaks. However, you should try these advanced methods with extreme precaution.
7. Execute Full System Scan
At times, Windows starts to behave quite abnormally if it is infected with any malicious program or after a phishing attack that has deleted or corrupted some of the system files.
In such cases, you can opt for a full system scan to identify and rectify the corrupted system files on your device.
- Step 1: Click on the “Magnifying Glass” icon located at the bottom-left corner of your taskbar.
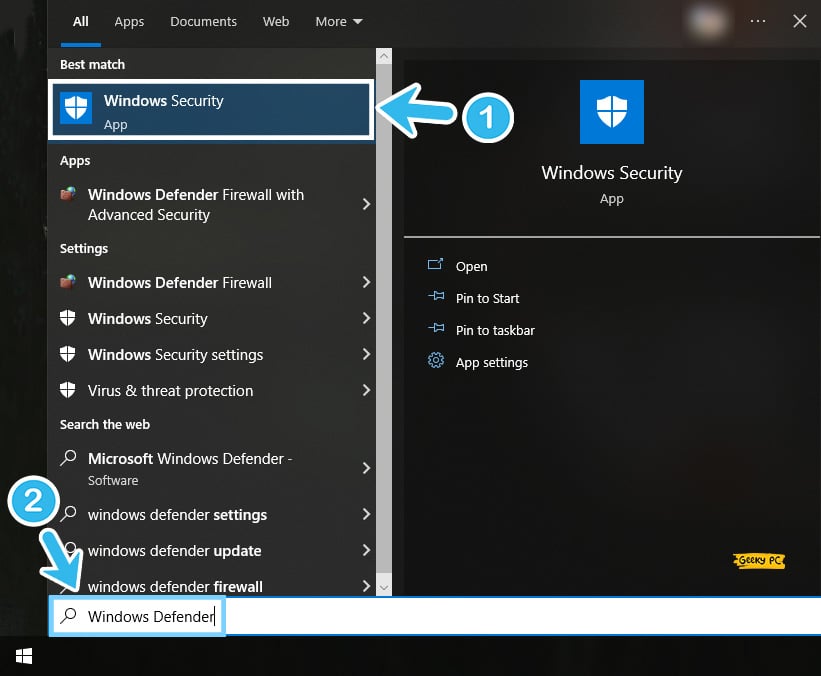
- Step 2: Once the search window appears, type “Windows Defender” in the designated field and click on the first result that appears.
- Step 3: After the “Windows Defender” app launches, navigate to the left panel, and click on the “Shield” icon.

- Step 4: Select the “Scan options” option from the menu once the new window appears.
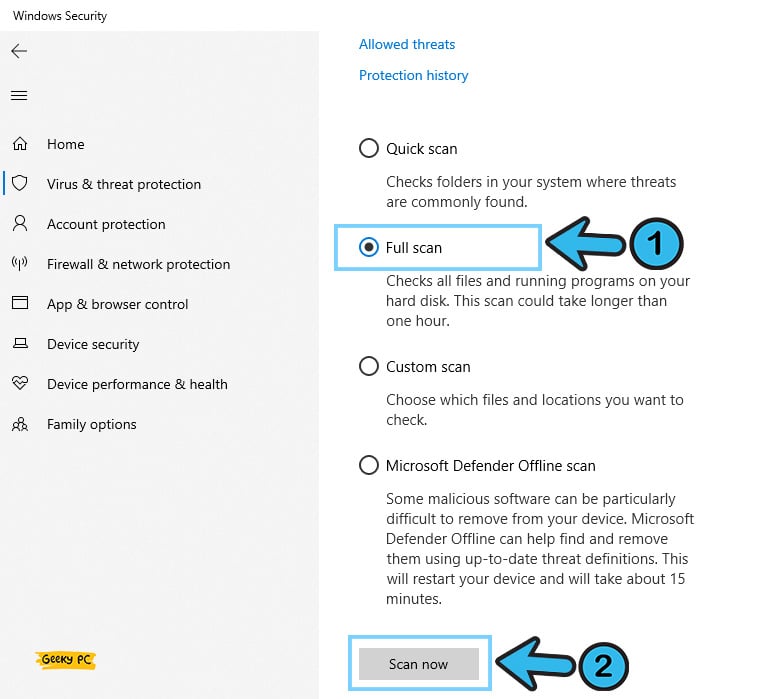
- Step 5: There select “Full Scan” & press scan now.
- Step 5: Let the “Windows Defender” automatically search and rectify the corrupted files.
- Step 6: Reboot your system once the scan is over and check whether the issue still arises.
Not just while you get a glitch or error on your system, you should always execute the full system scan through Windows Defender with specific time intervals. And in that way, you can make your devices free from any viruses or malicious software.
8. Execute SFC Scan
SFC or System File Checker is an advanced tool that now comes preinstalled with the latest generation of Windows OS, such as Windows 10 and 11.
And this particular tool is efficient in finding and rectifying all the BSOD errors, including the Atikmpag.sys blue screen error on Windows systems.
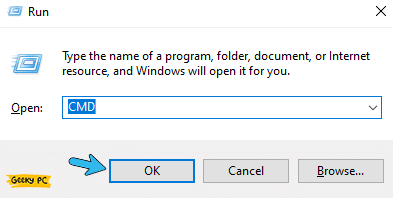
- Step 1: Press the “Windows Key + R” buttons together to launch the “Run” command.
- Step 2: Once the command field appears, type “CMD” and click on the “OK” button.
- Step 3: After the black “Command Prompt” window launches, type the “sfc /scannow” command and hit the “Enter” button.
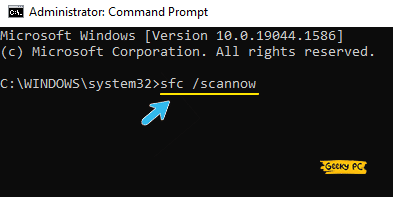
- Step 4: Let the SFC tool automatically find and fix the errors and glitches on your system files.
- Step 5: Once the procedure is over, type “Exit” in the “Command Prompt” window to close it.
- Step 6: Now, restart your device and check whether the issue is still triggering.
9. Check Bad Sectors On Your HDD
Not just the Atikmdag.sys but various other BSOD errors can typically trigger on your Windows system if you have any dead or bad sector on your hard drive.
So, you need to check your HDD first to identify those sectors and fix them to resolve this issue.
- Step 1: Press the “Windows Key + R” buttons together to launch the “Run” command.
- Step 2: Once the new field appears, type “CMD” in the designated field and click on the “OK” button to launch it.
- Step 3: After the black “Command Prompt” window launches, type “chkdsk /r c:” (if “C:” is your default system drive) and hit the “Enter” button.
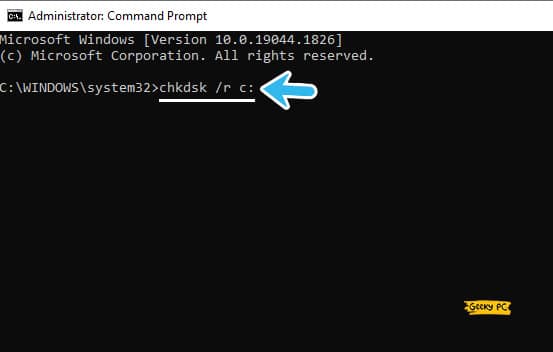
- Step 4: Let the disk checker application analyze your HDD and fix the glitches.
- Step 5: Once the operation is done, type “Exit” to close the “Command Prompt” app.
- Step 6: Restart your device and check whether the BSOD errors are still appearing.
A few people have reported getting a gateway error on their system once they have executed the “check disk” operation, especially while using a static IP connection.
If you are also witnessing a similar situation, follow our detailed guide to the “Wi-Fi Keeps Disconnecting” error in Windows systems.
10. Manually Replace Atikmpag.sys File
If none of the methods are working to fix the Atikmdag.sys file on your system, you can still manually replace the file with a new one (error-free) to resolve the Atikmdag.sys BSOD errors.
However, you may need to disable your Windows Defender or any other antivirus before proceeding with this operation.
- Step 1: Navigate to the “C:\Windows\System32\drivers” path from the file explorer and locate the “Atikmpag.sys” file.
- Step 2: Right-click on the file and select the “Rename” option from the menu.
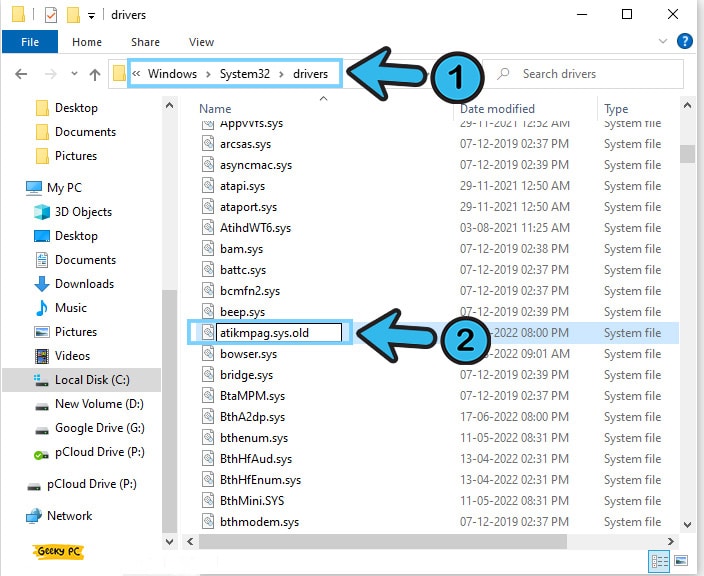
- Step 3: Rename the file to “atikmpag.sys.old” and save it.
- Step 4: Now, download the GPU driver manually from the manufacturer’s site and install it.
- Step 5: Once it is successfully installed, navigate to the installation folder and find the “atikmpag.sy_” file.
- Step 6: Now, copy that file to your desktop (don’t change the name).
- Step 7: Press the “Windows Key + R” buttons together to launch the “Run” command.
- Step 8: Type “Command Prompt” in the designated field and click on the “OK” button to open it.
- Step 9: Once the black “Command Prompt” window launches, type “chdir desktop” and hit the “Enter” button.
- Step 10: Now, type the “expand.exe atikmpag.sy_ atikmpag.sys” command and hit the “Enter” button again.
- Step 11: Exit from the “Command Prompt” window and copy the “sys” file on your desktop.
- Step 12: Now, navigate to the “C:\Windows\System32\Drivers” path again and paste the file.
If you can’t find the “atikmpag.sy_” file on the installation directory of your graphics card, you can manually search it. And to do it, click on the “Magnifying Glass” icon on your taskbar, type “atikmpag.sy_,” and click on the very first result that appears.
11. Tweak With Registry Editor
Besides manually replacing the file with a new one, you can also tweak the Atikmdag.sys file with the registry editor.
And if you can do it right, this method can effectively Fix the BSOD Atikmdag.sys error in Windows devices. However, you need to execute it with extreme precaution.
- Step 1: Press the “Windows Key + R” buttons together to launch the “Run” command.
- Step 2: Type “regedit” in the designated field and click the “OK” button to launch the app.

- Step 3: Once the “Registry Editor” window launches, navigate to the “Atikmpag.sys” file.
- Step 4: Select the file, click on the “File” option from the header menu, and click on the “Export” button.
- Step 5: Once you get a new prompt, select a location to save the file.
- Step 6: While saving, rename the file to a different name and then click on the “Export Range” box.
- Step 7: Make sure to tick the “Selected Branch” option before saving.
- Step 8: Now, click on the “Save” button and exit from the “Registry Editor” window.
- Step 9: Once the operation is successfully completed, reboot your device.
Several people have started getting a group policy violation message once they have tweaked the file with the registry editor app, especially if they are using their system under a network administrator.
If you are also facing the same, you can follow our comprehensive guide to fixing the “This policy is blocked by group policy” error in Windows devices.
12. Restore Your Windows OS
If none of the above methods are working, as malicious software or a virus may have already modified the root directories, you can still resolve this issue by restoring your Windows OS to a previous point when everything was running smoothly. And you can do it in a few simple steps.
- Step 1: Right-click on either the “This PC” or “My Computer” icon, depending on your OS version.
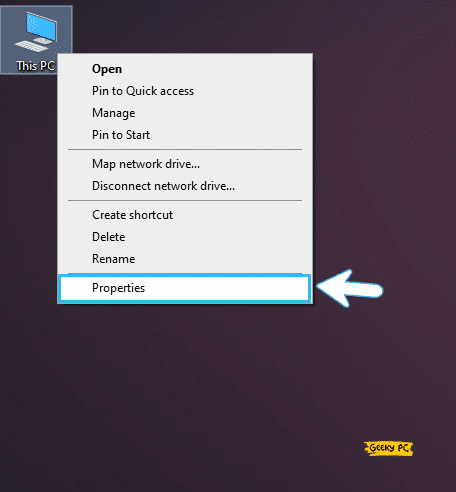
- Step 2: Now, select the “Properties” option from the menu to open the system settings.
- Step 3: Once a new window appears, click on the “Advanced System Settings” button.
- Step 4: Navigate to the header menu and click on the “System Properties” tab.

- Step 5: Now, click on the “System Restore” option and then click on the “Next” button.
- Step 6: Once you get a new prompt, click on the “Show more restore points” button.
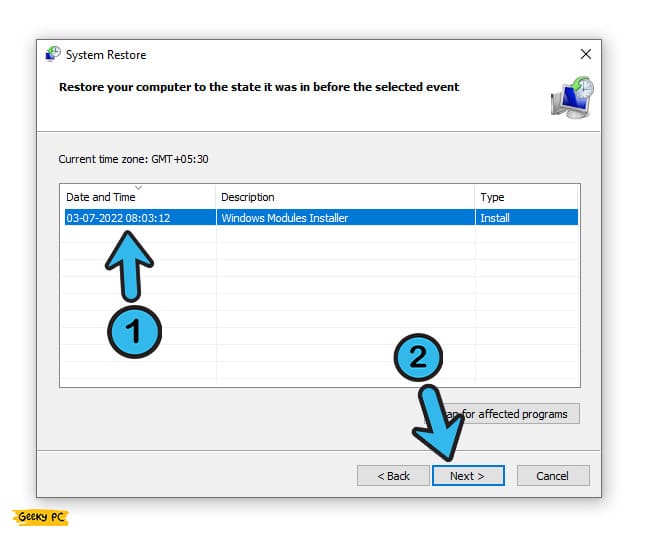
- Step 7: Now, select any of the previous points from the list when everything was running smoothly on your device.
- Step 8: Click on the “Finish” button to complete the OS restoration process.
It is better to create a system restore point on your Windows OS whenever everything is running smoothly without any errors or bugs.
If you do that in a timely manner, you can restore your OS to that particular point if any errors or bugs start to appear on your device.
Why Am I Keep Getting Atikmdag.sys BSOD Errors In My Windows Systems?
Atikmdag.sys simply stands for ATI Radeon Kernel Mode Driver Package. And as the name itself suggest, this system file is associated with the ATI Radeon graphics card or integrated GPU.
This particular file is actually a system driver that establishes the communication channel between the GPU hardware and the software to ensure a seamless experience.
However, you will start to get this error if you are using an outdated version of the Windows OS or the graphics card driver itself. Besides, this error can also repeatedly trigger if you have any startup process or application on your system that is interfering with the GPU driver.
Conclusion
It is absolutely safe to try all the generic methods we have listed above to fix the Atikmdag.sys BSOD errors in your system. However, if you really need to resort to advanced methods, you should make system restore points first. Otherwise, you can’t roll back if something goes wrong.
So, that’s all the solutions we have. If you think we have missed any, or if you have any effective solution for this error, don’t forget to drop your suggestions and feedback in the comment box below.
FAQs
Q. How do I fix Atikmdag.sys?
Disabling all the startup applications, conflicting programs, and antivirus will likely solve the Atikmdag.sys error in Windows devices. You should also update your OS and your GPU driver. And if nothing works, you can manually download and replace the Atikmdag.sys files as well.
Q. What is Atikmdag.sys?
Atikmdag.sys stands for “ATI Radeon Kernel Mode Driver Package” driver file. It is actually a system driver that lets the graphics card installed on your device directly communicate with the OS. And this file is absolutely essential to maintain a smooth visual experience.
Q. Can I delete Atikmdag.sys?
No, you can’t delete or modify the Atikmdag.sys file on your system, especially if you are using an ATI Radeon graphics card. Even if you forcefully delete the file from the installation directory, it will automatically download the next time you reboot your system or update your GPU driver.
Q. Can the BSOD error be fixed?
Almost 95% of the “blue screen of death” error can be fixed simply by updating the Windows OS along with the drivers installed on your system. Besides you can also fix it by temporarily disabling the antivirus and then restarting your device into safe mode.