Minecraft is truly a fun game, especially when you play it in multiplayer mode with your buddies! But we frequently witness the infamous “Minecraft connection timed out” error that annoys us to the core, isn’t it? However, there are some easy solutions to fix this common bug.
Reconnecting to the server, restarting the router, and updating the network adapter will solve the connection error in Minecraft in most cases. You can allow it on Windows Firewall or temporarily disable the Windows Defender as well. Besides, port forwarding can also solve this issue.
However, there are some advanced tweaks as well if none of the common methods are working. But before we reveal those, let’s understand what this error is all about and what are the causes behind it.
Table of Contents
- 1 What Are The Primary Causes Of Minecraft Server Connection Timed Out Error?
- 2 6+ Quick Fixes For “Connection Times Out” Error In Minecraft
- 3 6+ Pro Methods To Solve “Connection Timed Out” Error In Minecraft
- 4 Bonus Point: Use VPN
- 5 What Does The “Connection Timed Out” Error In Minecraft Actually Mean?
- 6 Conclusion
- 7 FAQs
What Are The Primary Causes Of Minecraft Server Connection Timed Out Error?
The connection error in Minecraft, especially in the multiplayer mode, can arise for various issues. But on a broader horizon, the Minecraft Lan connection timed out error can typically trigger for five main reasons that are as follows.
- The game server you are trying to connect to is offline, or the host server is unreachable.
- You are using an obsolete version of the network adapter driver or an outdated version of Minecraft itself.
- The network discovery option is turned off in your settings.
- Windows Firewall, Windows Defender, or any other third-party security software is blocking the connection in the background.
- The “25565” port is blocked in your system or in your router, and you need to port forward it manually.
Besides these five, you may also get this error if you have wrongly configured your internet connection settings. This issue can also arise if you haven’t restarted your router or modem for a long time.
6+ Quick Fixes For “Connection Times Out” Error In Minecraft
Before you resort to any pro methods that need advanced modifications to rectify the “Minecraft connection timed out” error, you need to try six of the generic fixes. And in most cases, these generic fixes will fix the connection-related errors.
1. Check Minecraft Server Status
If you are trying to connect to a server that you have played earlier, that server itself may not be online! So, you should check the server status beforehand before you even try to connect to it for a multiplayer game.
- Step 1: Open any web browser (Google Chrome preferred) and visit the official site of MC-SRV-Status, which is a completely free tool.
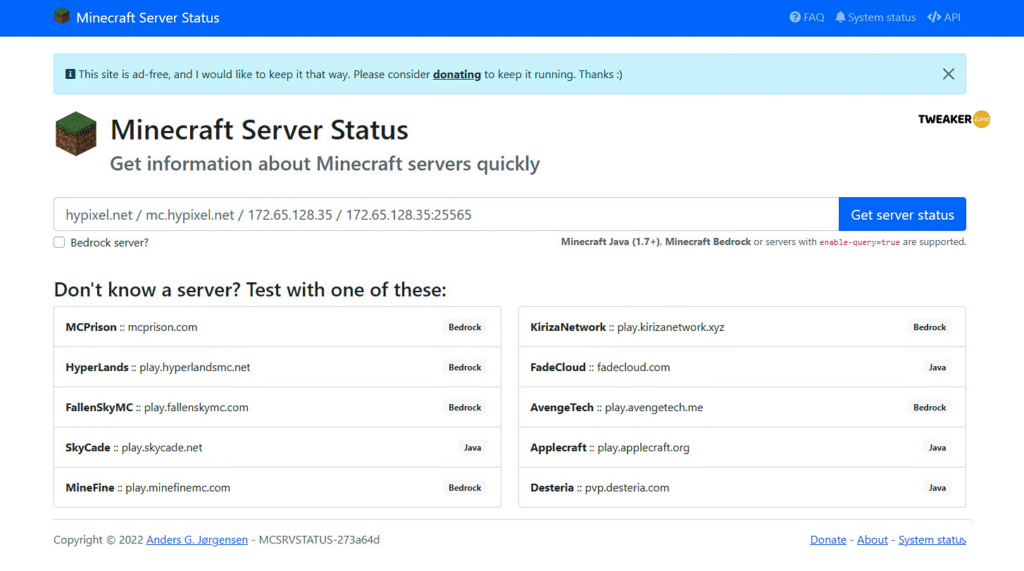
- Step 2: Once the tools open, paste the server IP you want to connect in the designated box.
- Step 3: Click on the “Get Server Status” button adjacent to the search box and wait for the tool to find the real-time status.
- Step 4: If the result page shows it online, try connecting to that server again after relaunching your game.
There are several online servers available for Minecraft that remain online 24×7. You can also choose one of those public servers to host your game. And in that you, you can bypass this issue of a nonresponsive host.
2. Restart Your Router
If you haven’t switched off your router or modem for quite some time now, you need to restart your router first before trying anything else. Not just to solve connection errors, restarting the router once a week is ideal for keeping it in the best possible condition.
- Step 1: Locate the “Power” button (typically located at the back panel) and press it to switch it off.
- Step 2: Unplug your router from the power socket and let it remain unplugged for at least two minutes.
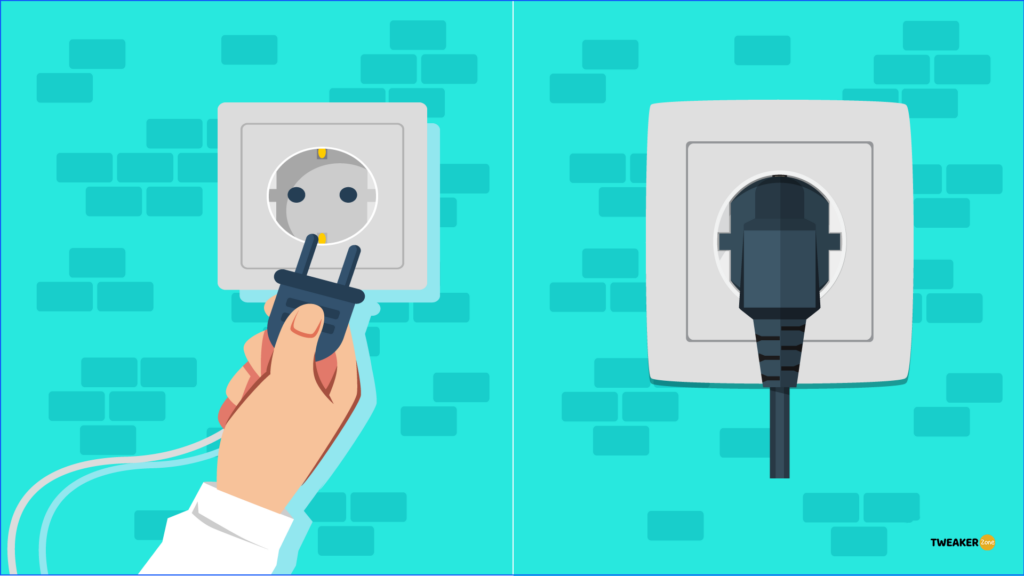
- Step 3: Plug your router into the power socket and wait for one more minute.
- Step 4: Press the “Power” button again to switch it on and let all the lights stop flickering.
- Step 5: Once all the lights in your router are stable, relaunch Minecraft and try to connect again.
Not just the router, you should power cycle all the peripherals attached to your computer, from printer to scanner, from modem to even your external sound card. And by doing that at timely intervals, you can increase the overall life of those peripherals.
3. Update Network Adapter
Various connection-related issues can definitely trigger if you are using an obsolete version of the network adapter driver. Besides, it can attract further bugs as well! So, always keep your network driver updated.
- Step 1: Right-click on either the “Start” or the “Windows” button (depending on your OS version) located at the bottom-right corner of your taskbar.

- Step 2: Navigate to the “Device Manager” option to initiate the utility window.
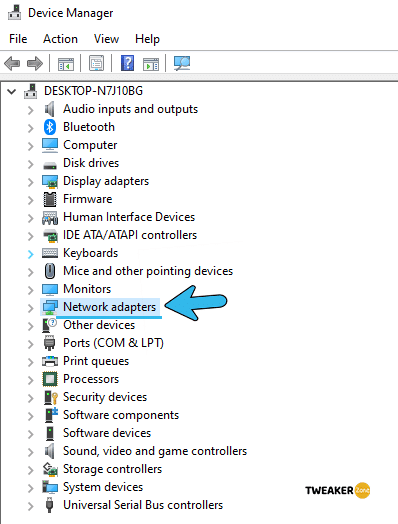
- Step 3: From the main list of hardware peripherals, click on the “Network Adapters” option to expand it.
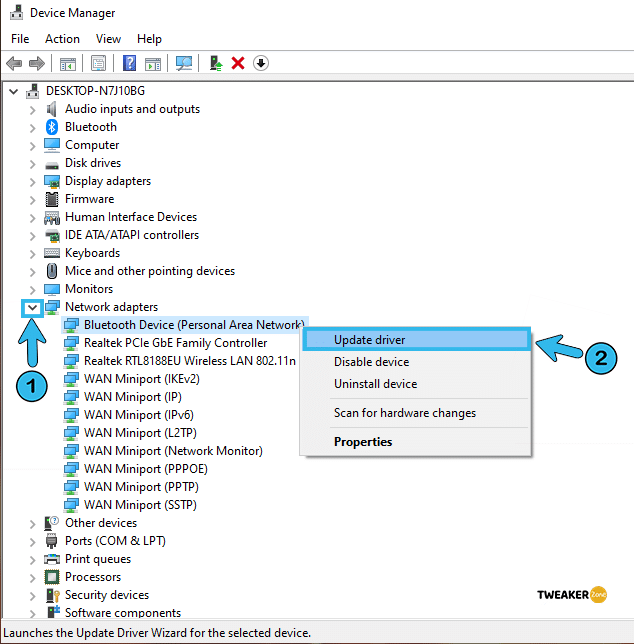
- Step 4: Find your network adapter driver (typically Realtek) from that list, right-click to expand the additional menu and click the “Update Driver” option.
- Step 5: Once the new window pops up, select the “Search automatically for updated driver” option.
- Step 6: Follow the on-screen instruction to update the driver and reboot your system.
4. Use The Latest Version Of Minecraft
Minecraft still has several flaws and bugs even after staying in the market for so long! However, Mojang developers frequently release updates to deal with those bugs. So, you should always keep your game updated and exclusively use the newest version to fix connection issues or similar errors.
- Step 1: Double-click on the “Minecraft Launcher” icon on your desktop to launch the game and log in to your account with the right ID and Password (if you haven’t enabled automatic login).
- Step 2: From the welcome screen, click on the “Edit Profile” button located at the bottom-left corner.
- Step 3: After the new profile editor window appears, click on the “Use Version” button to expand the menu.
- Step 4: Navigate and select the latest version of Minecraft.
- Step 5: Click on the “Save Profile” button to apply the settings and exit from the menu.
- Step 6: Come back to the welcome screen again and try to connect to any online server.
You may get graphics-related errors after updating to the latest version of Minecraft, especially if you are using an Nvidia graphics card. In such cases, follow our step-by-step guide to fix “io.netty.channel.abstractchannel$annotatedconnectexception” Error.
5. Enable Network Discovery
If you repeatedly face the “Minecraft server connection timed out” error, you may have unknowingly disabled the network discovery option from the windows settings. So, you should check this parameter first to ensure a seamless connection establishment.
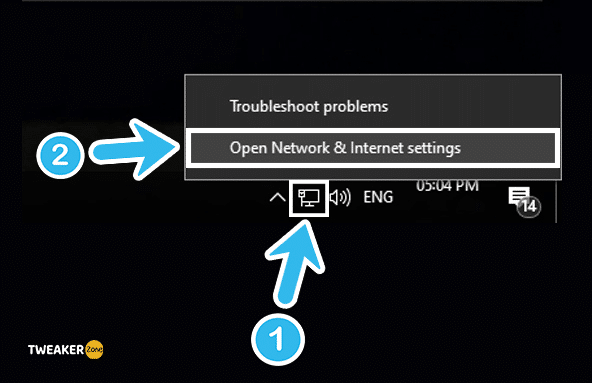
- Step 1: Right-click on the “Ethernet” or “Wi-Fi” icon (depending on the type of internet connection you are using) located at the bottom-right corner of your taskbar.
- Step 2: Select the “Open Network & Internet Settings” option from the menu.
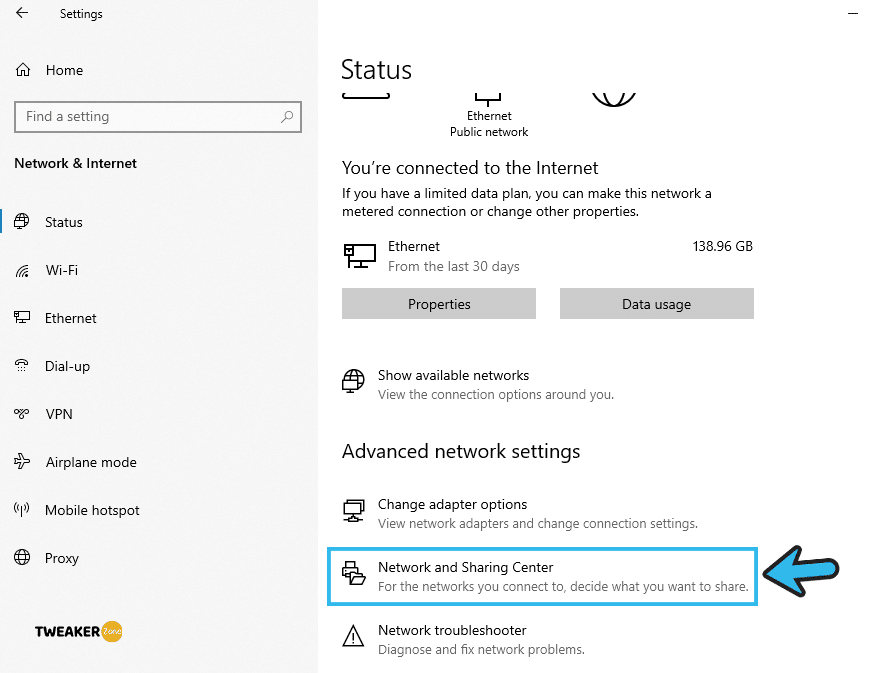
- Step 3: Once the setting window launches, navigate to the “Network And Sharing Center” option.
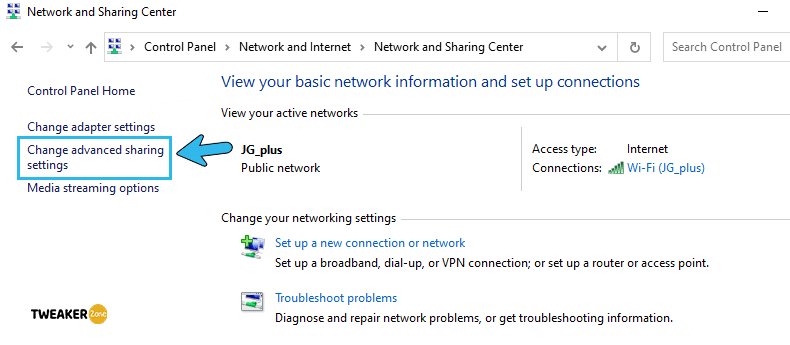
- Step 4: Find the “Sharing options” tab under the menu and navigate to the “Advanced” sharing settings.
- Step 5: Locate the “Private” header and check if you have enabled the “Turn on network discovery” option.
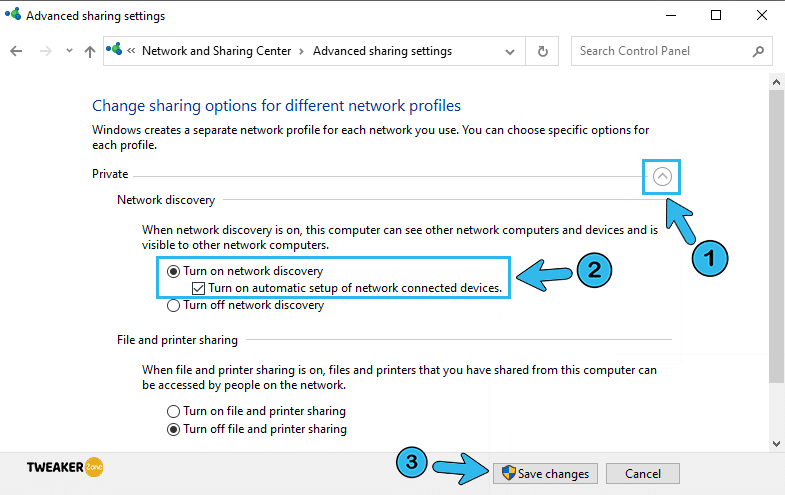
- Step 6: Enable network discovery for the “Guest or Public” profile as well and click on the “Save Changes” option.
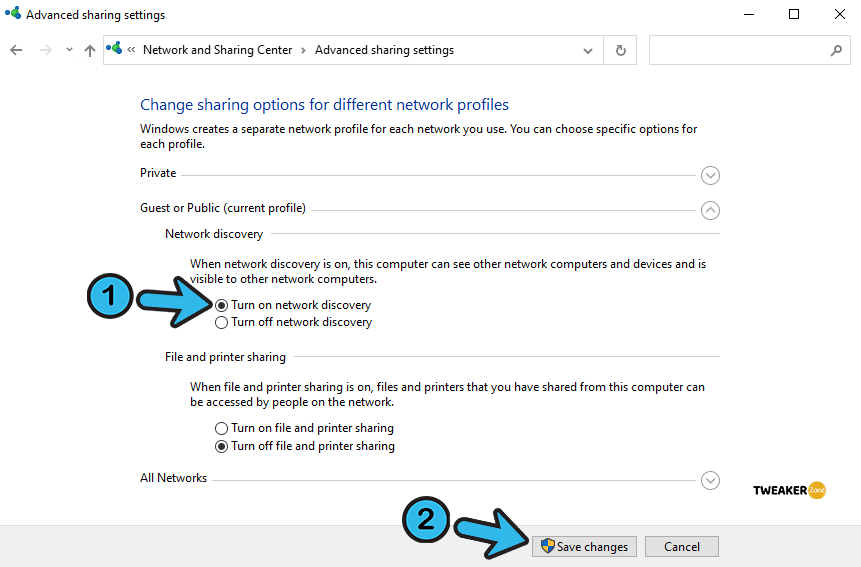
- Step 7: Reboot your system and try to connect to the Minecraft server again.
If you are using any third-party firewall or internet shield, you may also need to enable the “network discovery” option from that application too, as the windows setting alone won’t do much! You can simply disable that third-party application and try the method mentioned above as well.
6. Try Direct Connect
There are two ways to connect to any game server in Minecraft! First, you can search and connect to a list of available server options from your game itself. And second, you can manually join any server or a LAN party simply by connecting through IP.
- Step 1: Double-click on the “Minecraft” icon to launch the game and click on the “Open to LAN” option on the welcome screen.
- Step 2: Once a new world is created, you’ll get a pop-up message saying “Local game hosted on port XXXXX” on the main screen,
- Step 3: Note down the five-digit port number and minimize the game.
- Step 4: Press the “Windows Key + R” buttons together to launch the “Run” command.
- Step 5: Type “CMD” and hit enter to launch the “Command Prompt” window.
- Step 6: Type “ipconfig,” hit enter, and note down the complete IP address under the “IPv4 Address” header.

- Step 7: Now launch Minecraft on the computer that is facing connection issues and click on the “Multiplayer” option on the welcome screen.
- Step 8: Navigate to the “Direct Connect” option and type the IP address and port number in the “XXX.XX.XX:XXXXX” format. (E.g., 192.168.01.01:25505)
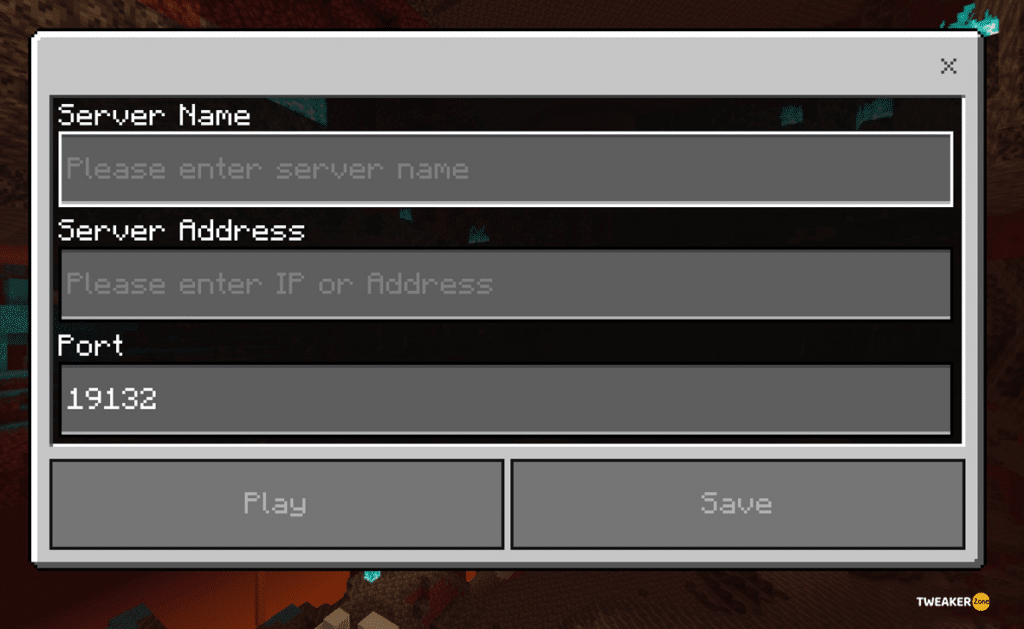
- Step 9: Click on the “Join Server” button to connect to the game server.
You should enable the “Network Discovery” option on all the computers that want to connect to a single server, especially if you are joining any LAN party. Besides, you may also need to disable the LAN firewall from each of those systems.
6+ Pro Methods To Solve “Connection Timed Out” Error In Minecraft
If you are still getting the Minecraft connection timed out error with no further information even after trying the generic methods we have listed above, your problem is way more deep-rooted than you actually assumed. In such cases, the pro methods mentioned below will sort this error in no time.
7. Reset Network Configurations
Your network may have cache issues if you haven’t reset all the configurations for a long time. So, before you attempt to play Minecraft in multiplayer mode, try resetting your network configuration to solve the connection-related bugs.
- Step 1: Press the “Windows Key + R” buttons together to initiate the “Run” command.
- Step 2: Once the new window appears, type “CMD” and hit enter to launch the “Command Prompt” application.
- Step 3: Type the following command lines one after another, hitting the “Enter” key after each command: “ipconfig /flushdns,” “ipconfig /release,” “ipconfig /renew,” “netsh winsock reset,” and “netsh int ip reset.”
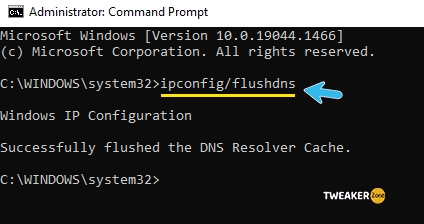
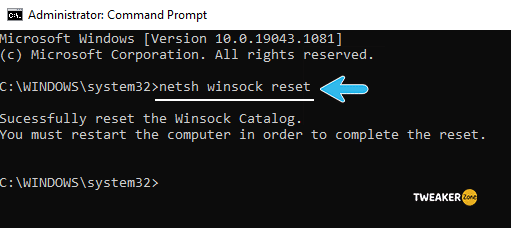
- Step 4: Type “Exit” to close the command prompt and reboot your system.
If you are using a static IP connection where your ISP has given you a particular IP and subnet mask to use, you may face an undefined network error after flushing your DNS and resetting the configuration.
8. Allow Minecraft On Windows Firewall
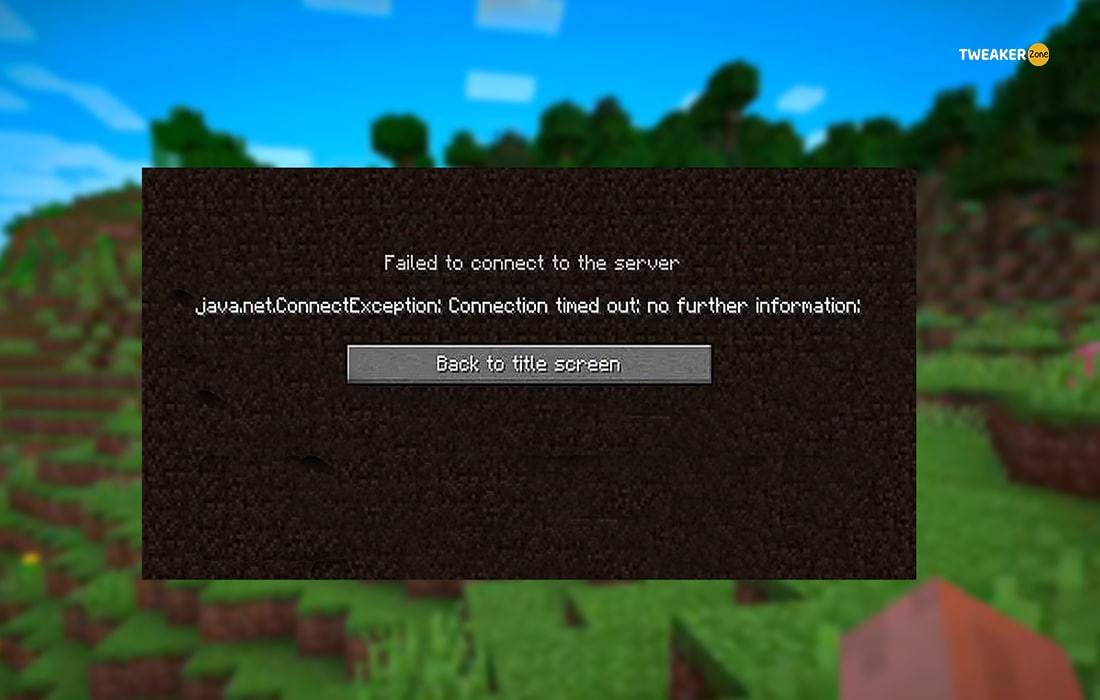
If you are using the Java variant of Minecraft, you may frequently get the java.net.connectexception connection timed out error while trying to connect to a multiplayer server. In such cases, the high chances are your Windows Firewall is blocking the connection in the background. And you need to manually whitelist Minecraft to rectify this error.
- Step 1: Click on the “Magnifying Glass” icon, type “Control Panel” in the search bar, and click on the first application from the result page.
- Step 2: Locate the “View by” option at the top-right corner of the “Control Panel” window and select the “Large icons” from the drop-down list.
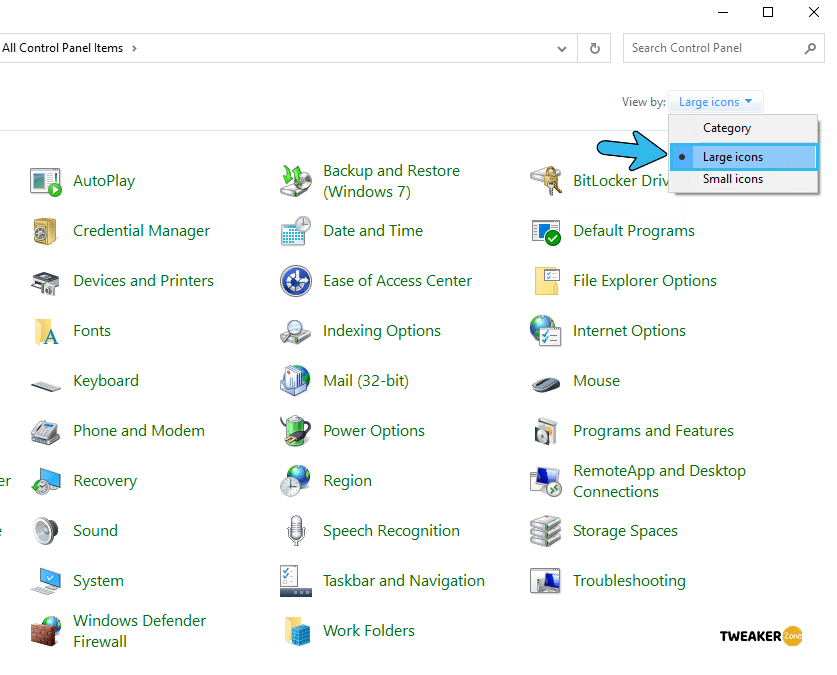
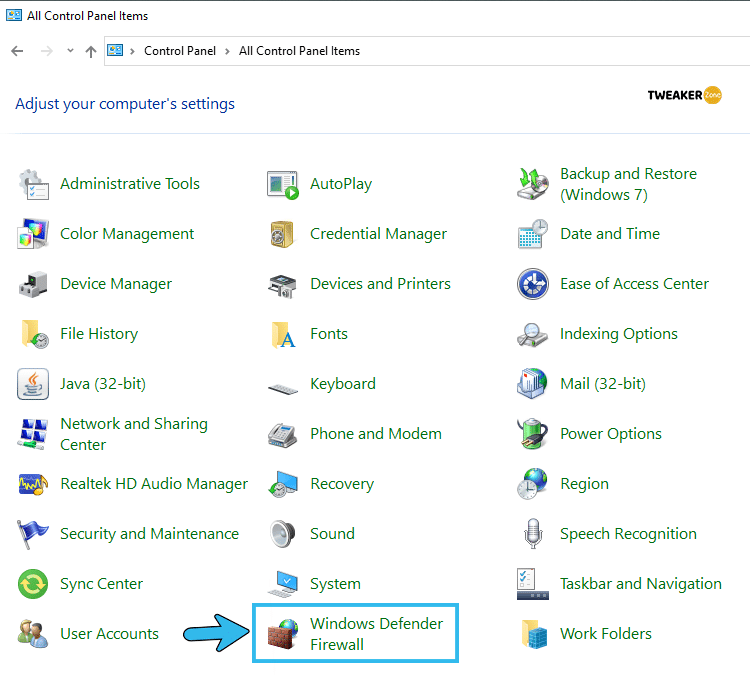
- Step 3: Scroll down, find the “Windows Defender Firewall” option, and click to open it.
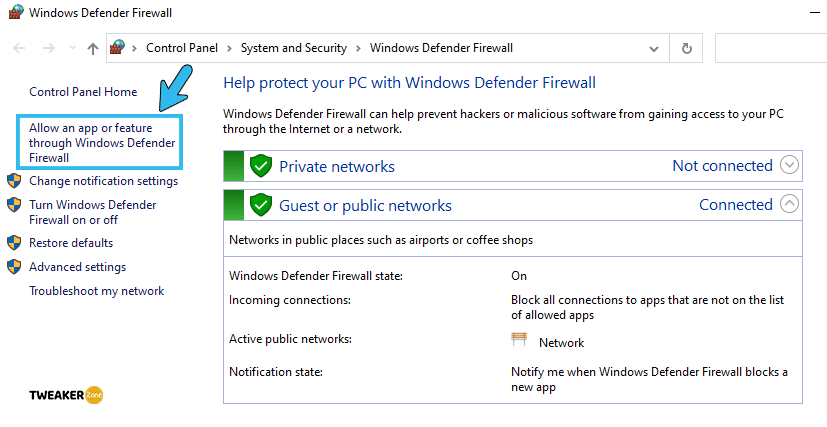
- Step 4: After the new window launches, click on the “Allow an app or feature through Windows Firewall” option from the left column.
- Step 5: Click on the “Change Settings” button on the right panel to expand the complete list of allowed apps.
- Step 6: Find and put a tick mark beside each of these three options from that list: “Minecraft,” “exe,” and “Java (TM) Platform SE binary.”
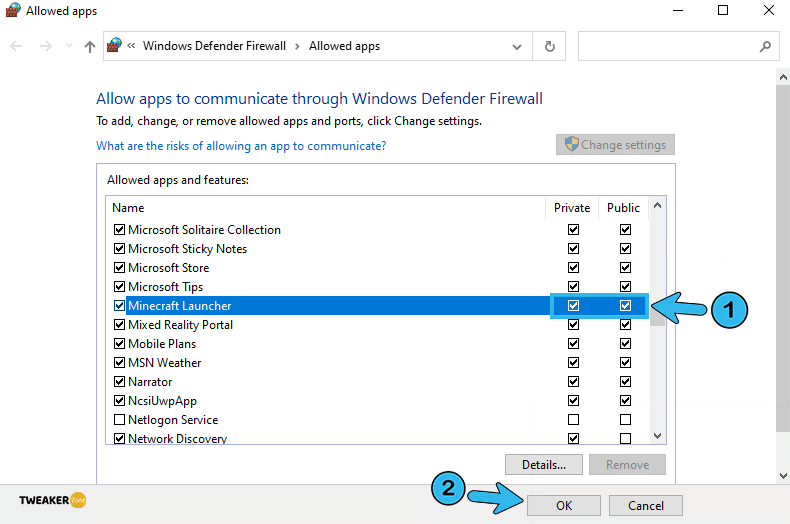
- Step 7: Click on the “OK” button to save the modification and close the “Control Panel” window.
- Step 8: Relaunch Minecraft and try to connect to an online server.
If you are using any other third-party firewall besides Windows Firewall, you either need to disable that, or you should whitelist Minecraft on that third-party firewall as well. Besides, you also need to keep your firewalls updated to eliminate any interference issues.
9. Temporarily Disable Windows Defender
Days are gone when we need to install third-party antivirus to safeguard our Windows systems. The Windows Defender app that comes in-built with Windows 10 or above is indeed a robust antivirus that works perfectly. But you may need to disable it temporarily to check if it is blocking the Minecraft connection in the background.
- Step 1: Press the “Windows Key + I” buttons together to launch the “Settings” app.
- Step 2: Click on the “Update & Security” button after the new window launches.
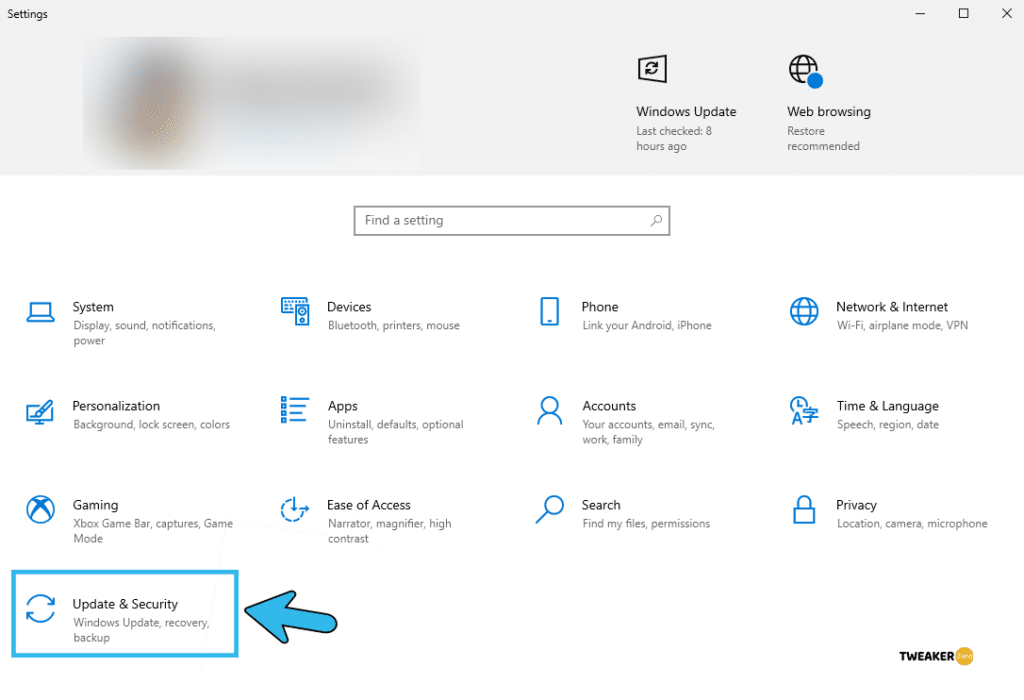
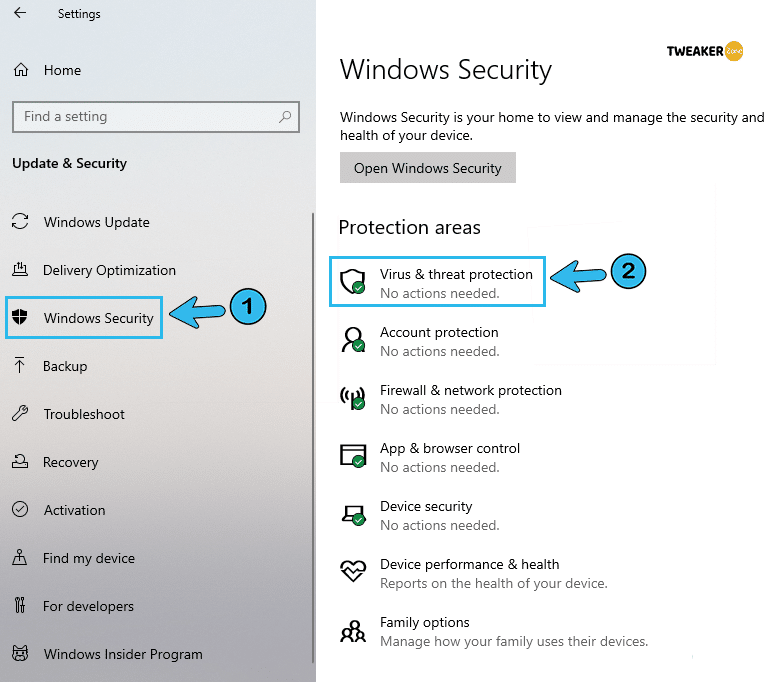
- Step 3: Click on the “Windows Security” option located in the left column.
- Step 4: Once the new menu loads in the main panel, click on the “Virus & threat protection” option.
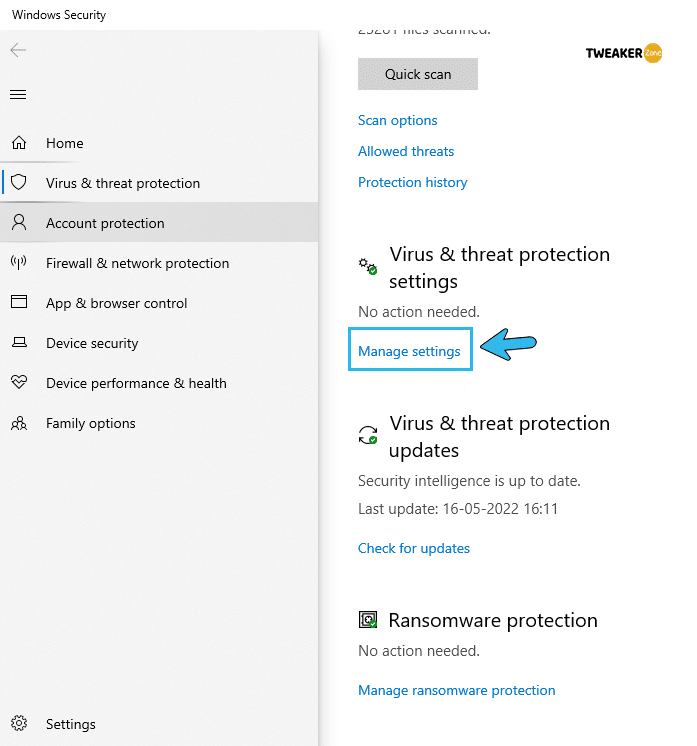
- Step 5: After the new window launches, click on the “Virus & threat protection settings” option.
- Step 6: Scroll down, locate the switch beside the “Real-time protection” option, and toggle to disable it.
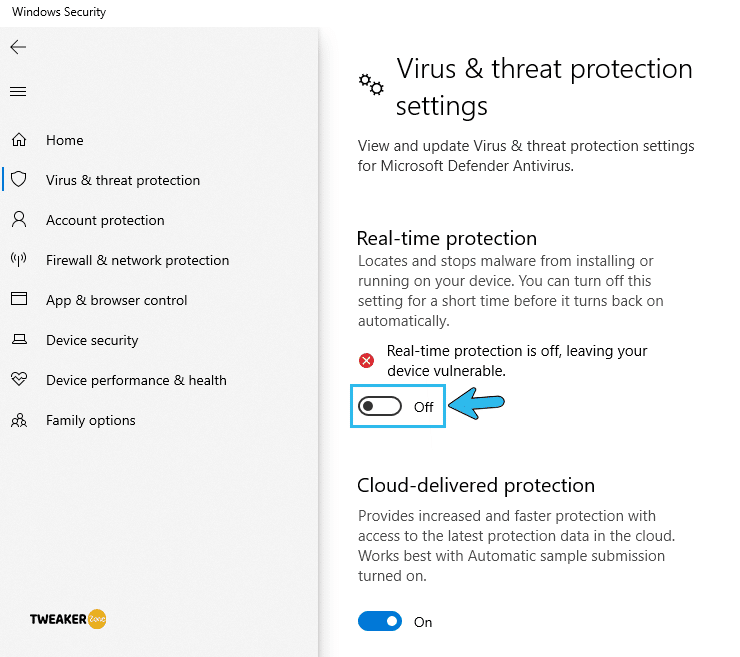
- Step 7: Click “OK” to save the settings, close the app, and relaunch Minecraft.
10. Uninstall Third-Party Antivirus
If you are using any other third-party antivirus besides the preinstalled Windows Defender, you need to manually disable or completely uninstall that security software to check whether it is creating any interference issues in the background.
- Step 1: Click on the “Magnifying Glass” icon on your taskbar and type “Control Panel” on the search bar.
- Step 2: Click on the first application that appears on the result page to open the “Control Panel” application.
- Step 3: Click on the “View by:” option located at the top-right corner and select “Category” from the drop-down list.
- Step 4: Navigate to the “Programs” option and further click the “Uninstall a Program” button
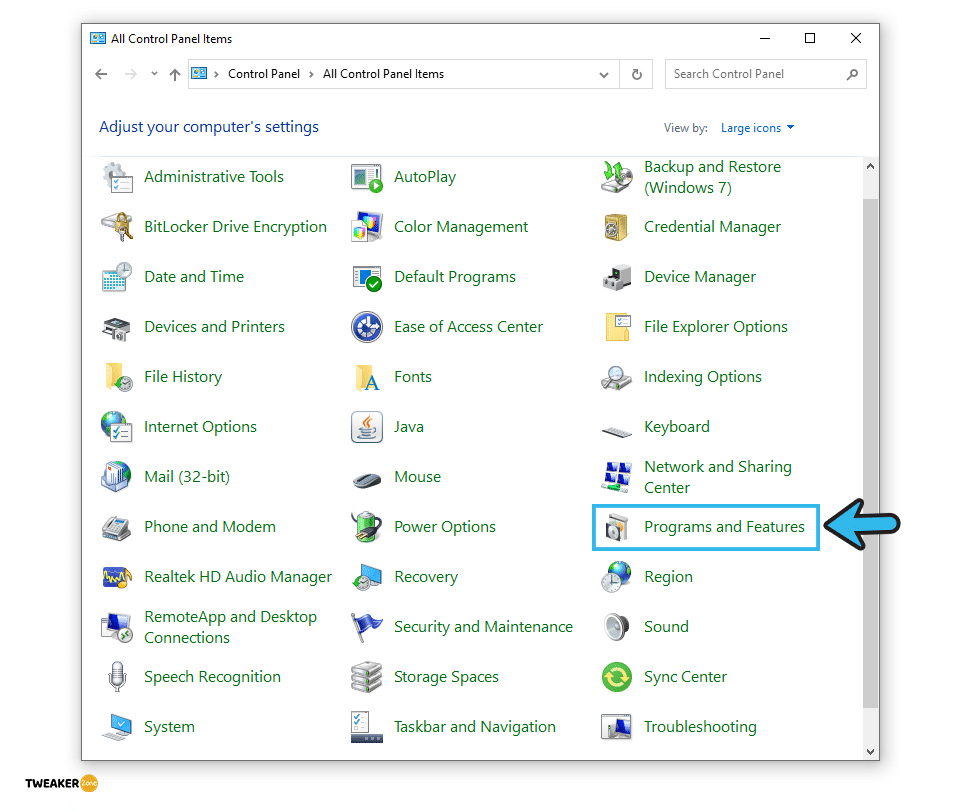
- Step 5: Once the new list launches, navigate to the third-party software on that list, right-click to open the additional options, and click the “Uninstall” button.
- Step 6: Follow the on-screen instructions to delete the third-party antivirus completely and reboot your system.
Many gamers have reported getting an unresponsive taskbar after uninstalling the security software, especially while deleting heavy software like Norton or Avast.
11. Use Port Forwarding
While different applications use different ports to connect to any system, Minecraft exclusively uses port 25565. So, you should always keep this port open for other computers to connect with the host server. And you can easily do it from the Windows Firewall settings themselves.
- Step 1:Press the “Windows Key + S” buttons together to launch the search bar and type “Windows Firewall” inside the box.
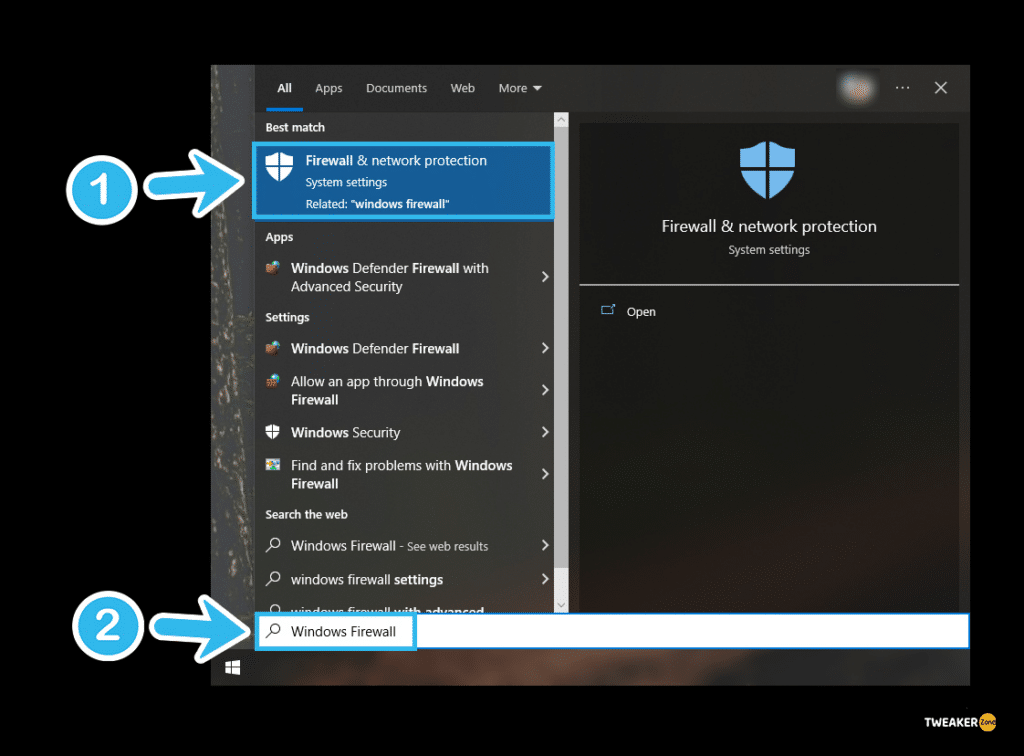
- Step 2: Click on the first result to launch the “Windows Firewall” application.
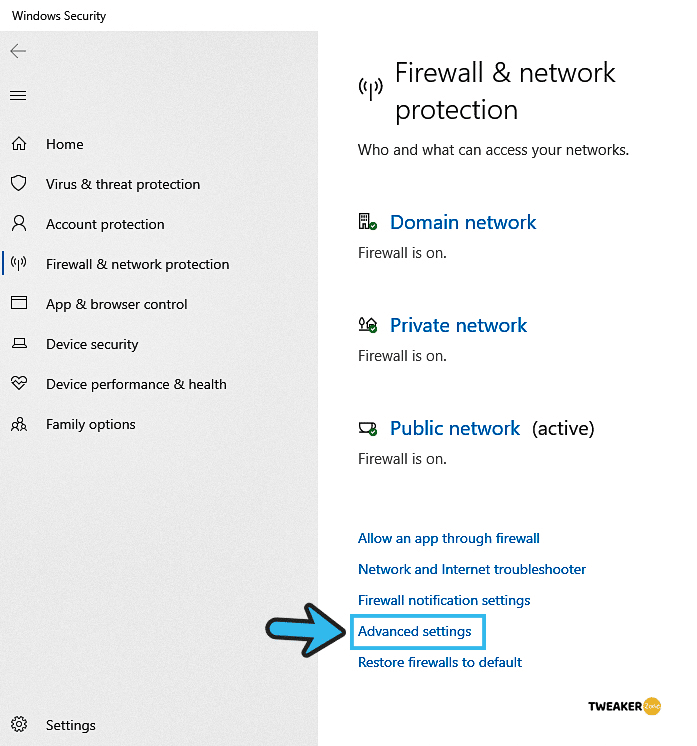
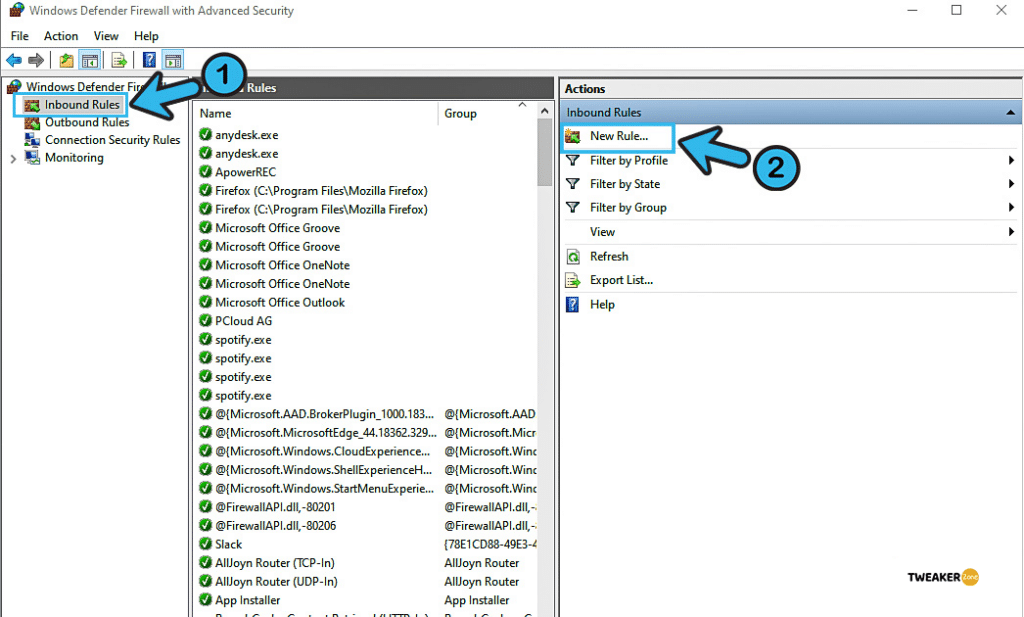
- Step 3: Click on the “Advanced Settings” button and further click on the “Inbound Rules” option.
- Step 4: Once the new window appears, click on the “New Rule” button.
- Step 5: Navigate to the “Ports” option and click on the “Next” button to initiate new incoming rules on your firewall.
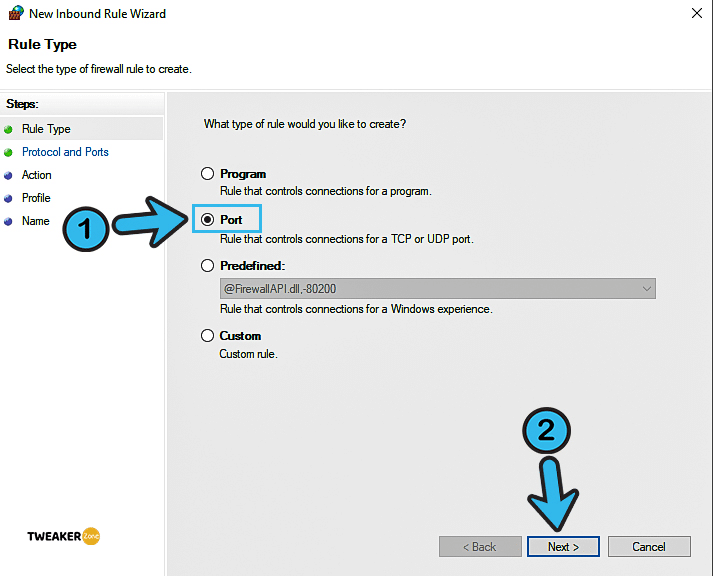
- Step 6: Click on the “TCP” button and then navigate to the “Specific Local” option to launch the new dialog box.
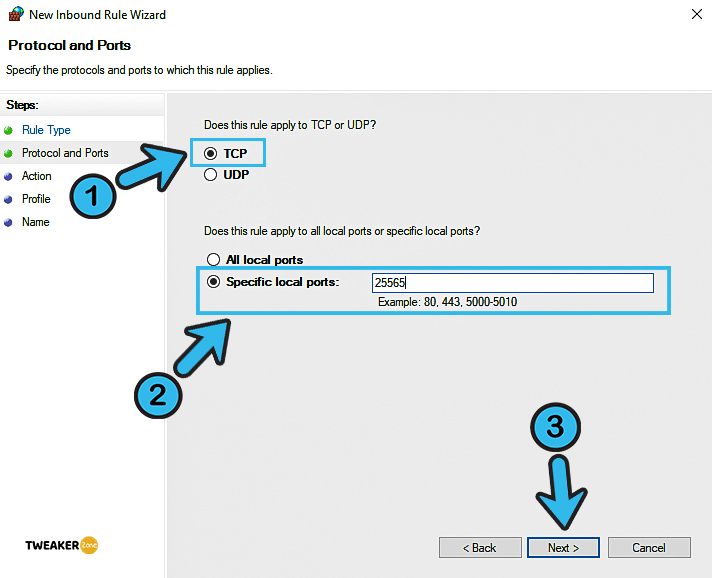
- Step 7: Type “25565” inside the dialog box and click on the “Next” button.
- Step 8: Once a new pop-up appears, click on the “Allow Connection” option, and save the settings.
- Step 9: Relaunch Minecraft and check whether this problem still exists.
Port forwarding is a very advanced method that you should only try if you know how to deal with it properly. Or else, it can create some severe security threats if you leave any open ports in your router for phishers to connect.
12. Port Forward In Your Router
Port forwarding in Windows Firewall alone won’t solve the issue if you frequently get the “Minecraft connection timed out” error while using an external router or modem. In that case, you also need to port forward in the router itself to fix this error.
- Step 1: Press the “Windows Key + R” buttons together to launch the “Run” command, type “CMD” inside the box, and hit enter.
- Step 2: Once the Command Prompt launches, type “ipconfig /all” and hit enter.
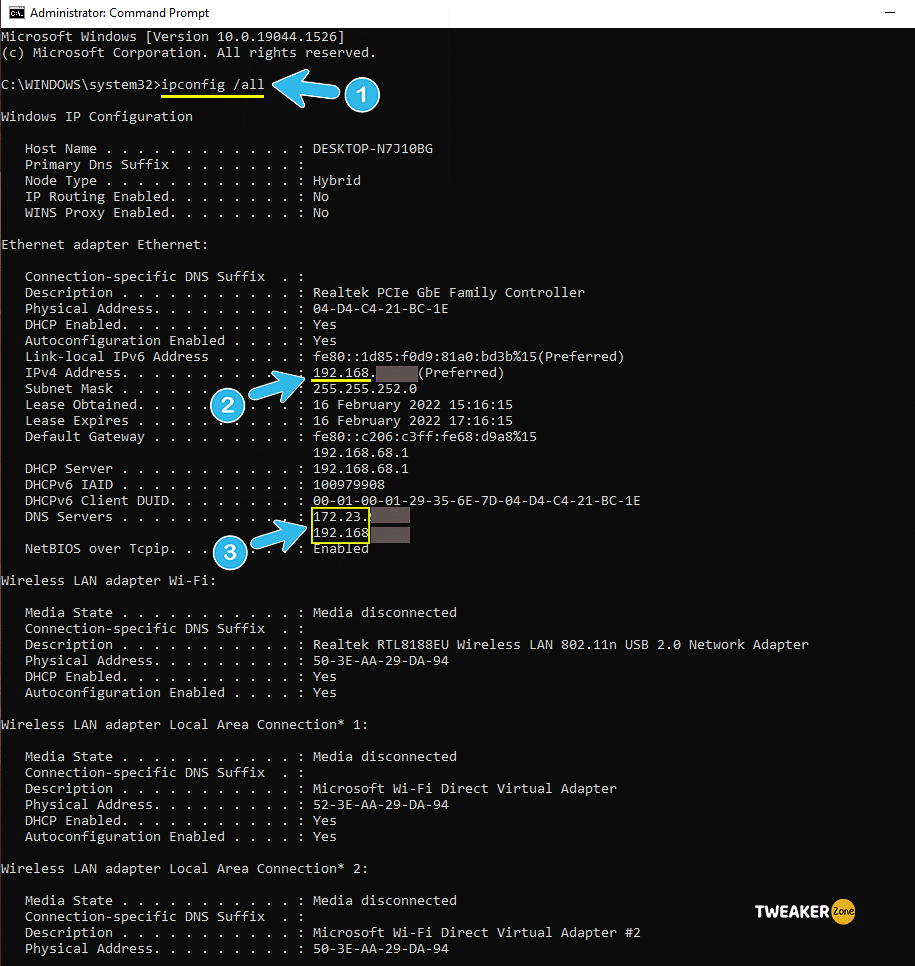
- Step 3: Now note down the parameters besides the “Default Gateway,” “Subnet Mask,” “MAC Address,” and “DNS” options.
- Step 4: Exit from Command Prompt and press “Windows Key + R” again to launch the “Run” dialog.
- Step 5: Type “ncpa.cpl” and hit enter to launch the internet connection settings.
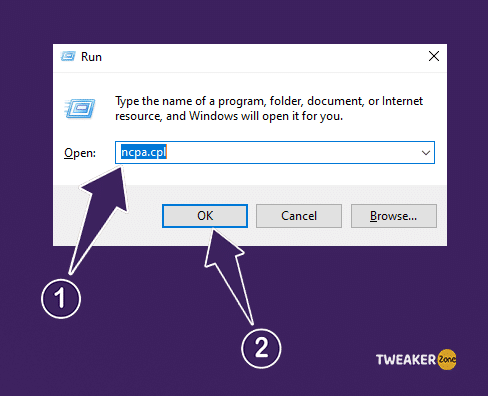
- Step 6: Right-click on your active network connection and select “Properties” from the menu.
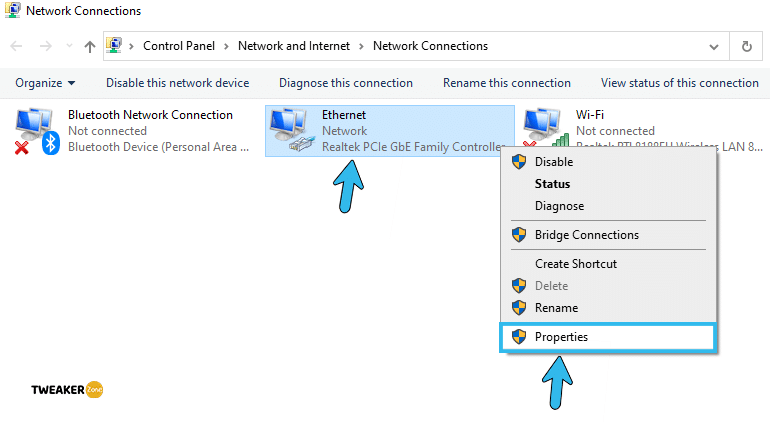
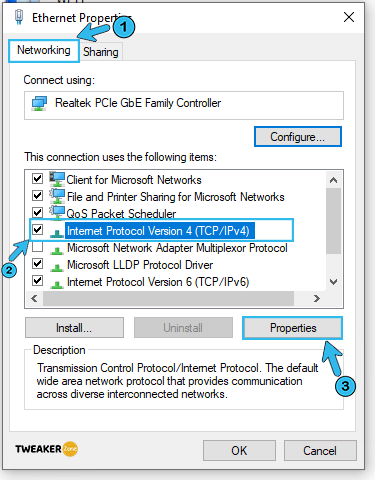
- Step 7: Once the new window opens, select the “Internet Protocol Version 4 (TCP/IPv4)” option, and click on the “Properties” button.
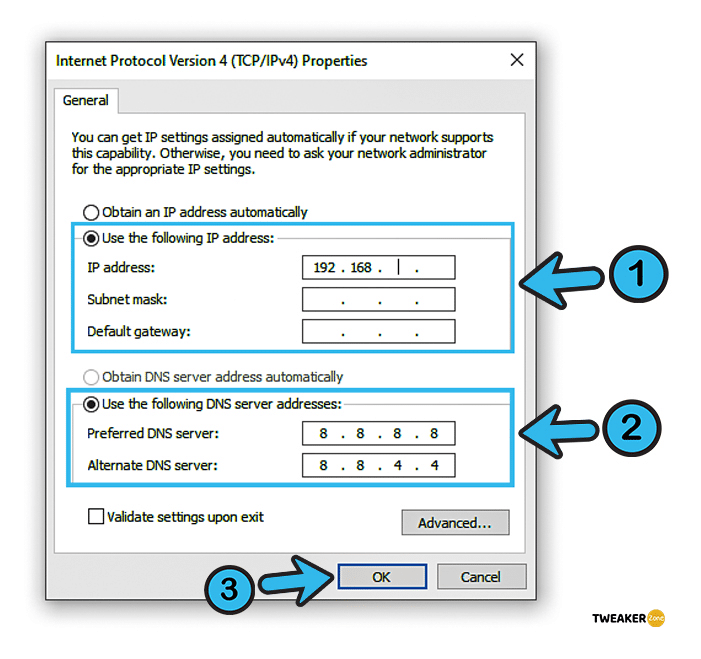
- Step 8: Click on the “Use the following IP address” option and type the IP address you have already noted (you can change the last digit of that IP too).
- Step 9: Click on the “Use the following DNS server addresses” options and type “8.8.8.8” and “8.8.4.4” in their respective fields.
- Step 10: Exit back to your desktop, open any web browser and type the IP of your router (the default is 192.168.0.1).
- Step 11: Log in to your router with admin ID and passwords and find the “Enable Manual Assignment” settings.
- Step 12: Put MAC address and IP address inside the respective fields which you have already noted.
- Step 13: Locate the “Port Forwarding” option, click “Next” to start the setup, and type “25565” in both the TCP and UDP fields.
- Step 14: Enter the “Static IP” address (if prompted), which you have already noted, and click the “Apply” button to save the settings.
- Step 15: Relaunch Minecraft and try to connect to the game server manually.
You can simply avoid the first few steps to assign a static IP to your system if your ISP has also given a static IP and a gateway to use. However, you need to note down that IP, subnet mask, and the gateways to restore them back if anything goes wrong!
Bonus Point: Use VPN
VPN or Virtual Private Network is a robust system that technically extends a private or home network to all across a public network to safeguard the system if it is directly connected to the network. And in that way, VPN can bypass various connections and hop through different proxy servers to make it secure.
If nothing is working and you are still getting the connection timed out error in Minecraft, you should install either a free VPN or a paid one on your Windows PC. And you should enable it before you try to establish a connection to the host server of Minecraft.
What Does The “Connection Timed Out” Error In Minecraft Actually Mean?
Not only just connection timeouts, but you can also frequently get the “io.netty.channel.abstractchannel$annotatedconnectexception” error message in Minecraft, especially in the multiplayer mode. And these two errors typically trigger if there is a failed connection attempt from your Windows system.
Your system will prompt a connection timeout message if the network is misconfigured. Besides, it can also be any other underlying causes that restrict a secure connection between the players and the host servers.
But yes, connection errors are not the only bug that frequently triggers in Minecraft, as many gamers also reported getting graphics-related issues like a broken bow or a blurry background. In such cases, you can follow our complete guide to repair bows in Minecraft in no time!
Conclusion
Although the six generic methods we have mentioned above are absolutely safe to try, you must create a “System restore point” before trying any of the pro methods that need serious alteration of Windows settings. You can restore to a previous point if anything goes wrong after the tweaks.
So, these are all the tested fixes to solve the “Minecraft connection timed out” error. But if you think we have missed any other methods, feel free to tell us in the comment box! GG, folks!
FAQs
Q. How do you fix the connection timed out on Minecraft?
Start by restarting your router and updating the network adapter driver. Besides, you can also try disabling the antivirus software or whitelisting Minecraft on Windows Defender. Many gamers also solved this issue simply by port forwarding the “25565” port on their system or router.
Q. What does it mean when Minecraft says connection timed out?
The “connection timed out” message in Minecraft simply means that the game failed to establish a secure connection with the host server. It can also pop up if the host server is not reachable, not responding, or accepting an incoming connection to make contact.
Q. How do I fix the connection timeout?
You can simply fix this error by restarting your router and updating the network driver. Besides, you should also disable antivirus programs and whitelist Minecraft on Windows Firewall. Moreover, you also need to port forward the “25565” port to fix this bug.
Q. Can Minecraft connection time-out error trigger on Lan?
The “connection time out” error in Minecraft can surely trigger on LAN, especially if you are trying to connect to a LAN party in multiplayer mode. It can even trigger if all the systems in the LAN party are not using the same version of the game itself.

Leave a Reply
View Comments