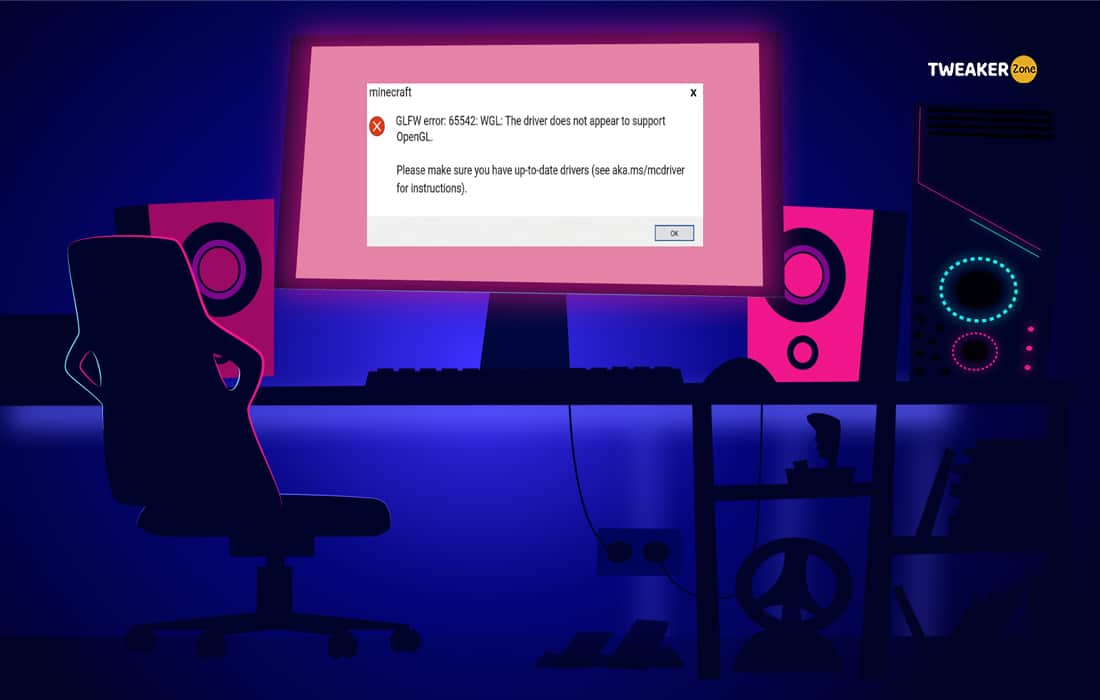
Minecraft is one of the most popular sandbox video games that everyone loves. But one of the most annoying things about playing this game is when the Minecraft GLFW Error 65542 causes some interruption.
The best ways to solve the GLFW Error 65542 are reinstalling Minecraft, modifying graphics settings, and updating Windows. You may also need to update GPU driver, reinstall it, install the latest Java package, disable OpenGL, or add OpenGL.DLL manually.
Let’s find out in detail why this problem occurs and the exact steps of fixing the issue.
What Are Primary Reasons For OpenGL Errors on Minecraft?
We all want to know how to fix Minecraft GLFW error 65542 without understanding the actual reasons that are causing this error. Typically, there are eight primary reasons why you keep on getting this error while playing Minecraft. And those are as follows!
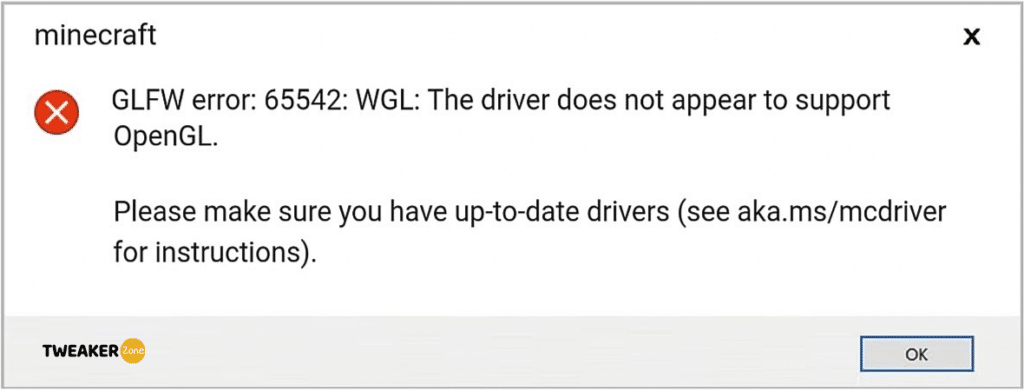
- The graphics card driver is corrupt, broken, or completely missing from the system.
- Corrupt or buggy shader and associated files
- Incomplete Java installation or outdated version of Java
- Obsolete or outdated version of Windows operating system
- The in-game graphic setting is too high to handle by the GPU.
- Improper OpenGL setup or the OpenGL file path is wrong.
- Glitch or bug in OpenGL.DLL or other DLL files in the installation package.
- The hardware specification is below the minimum requirement.
Although Mojang Studio tried to make this game flawless, many gamers reported getting this error. You may also get frequent graphics errors while playing the game, especially while using bow and arrows. In that case, you can follow our step-by-step guide to repair bows in Minecraft.
3 General Methods To Solve Minecraft GLFW Error 65542
The Minecraft GLFW error can trigger due to several reasons. But before you try anything exotic, follow these three basic steps to quickly solve this issue without changing the core files of the game.
Table of Contents
- 1 1. Reinstall Minecraft
- 2 2. Modify Graphics Settings
- 3 3. Update Your Windows
- 4 4. Update GPU Driver
- 5 5. Reinstall Graphics Card Drivers
- 6 6. Install the Latest Java File Package
- 7 7. Disable OpenGL
- 8 8. Disable Showing OpenGL Errors
- 9 9. Add OpenGL.DLL Manually
- 10 10. Uninstall DisplayLink (If Applicable)
- 11 11. Use Display Driver Uninstaller
- 12 Additional Fix – Update Your Hardware
- 13 FAQs
- 14 Conclusion
1. Reinstall Minecraft
If you want to solve the GLFW error in Minecraft quickly, start with reinstalling your Minecraft again. Restarting the game often solves the OpenGL errors. But yes, your user data will be lost if you reinstall the game again without backing up the core data.
- Step 1: Press “Windows Key” to launch the start button & headover to settings in the Microsoft system.
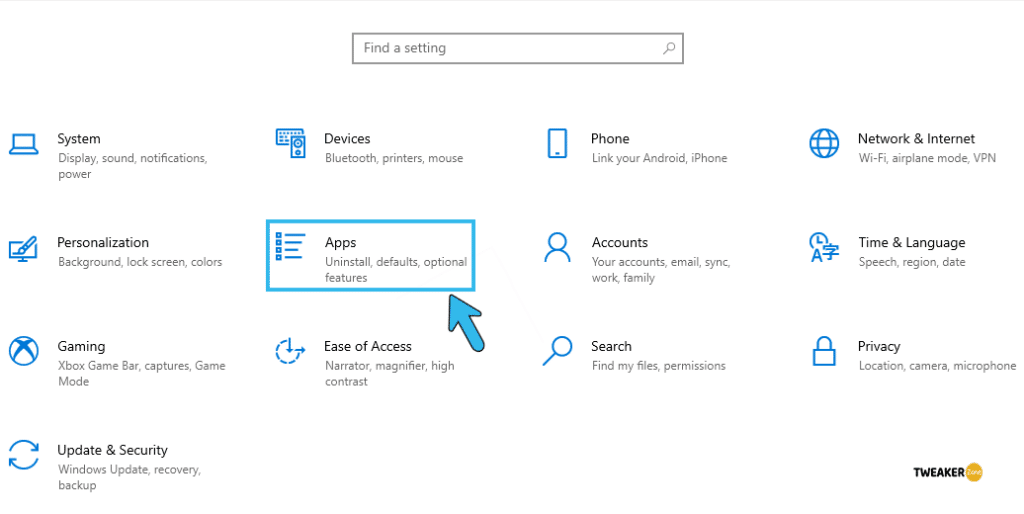
- Step 2: A new window will pop up where you need to find “Apps” and open it up.
- Step 3: From the newly-opened list, search for “Minecraft” and click on it.
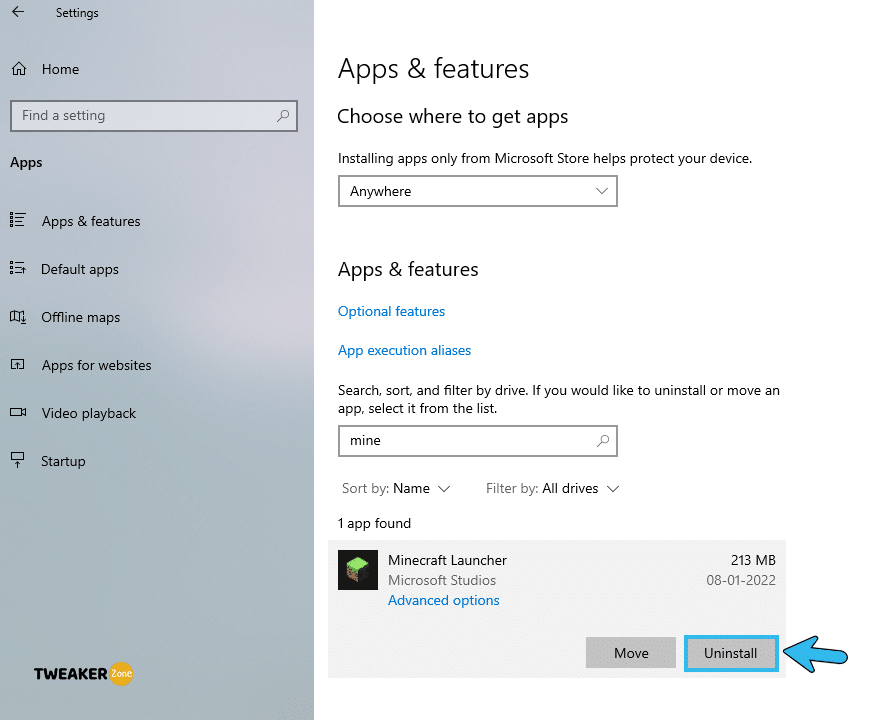
- Step 4: Select uninstall and wait till the game is completely removed from your system.
- Step 5: Reboot your device and reinstall the game again.
2. Modify Graphics Settings
Although it is one of the old-school techniques to solve the GLFW Error, it is often effective in fixing the issue without altering any core data. However, your gaming experience may get a little compensated with modified graphics settings.
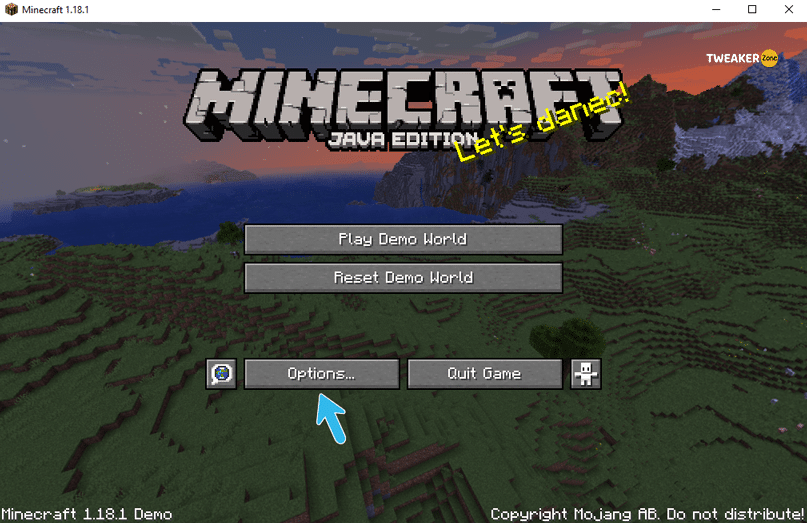
- Step 1: Open Minecraft on your PC and click on the “Option” icon.
- Step 2: Navigate to the “Video Settings” and find “VBOs,” “Render Region,” and “Clear Water” options.
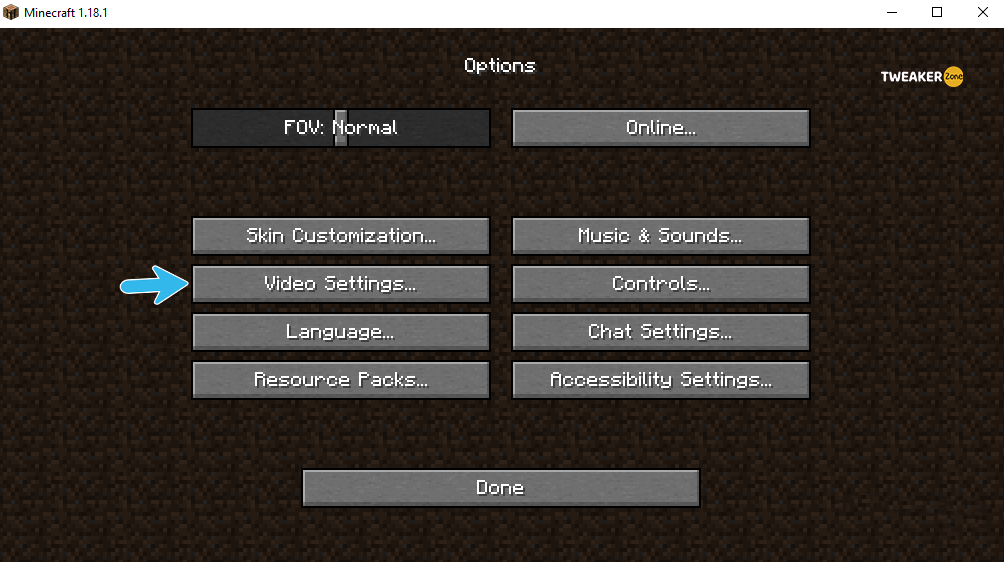
- Step 3: Disable “VBOs,” “Render Region,” and “Clear Water“ three options and quit the game.
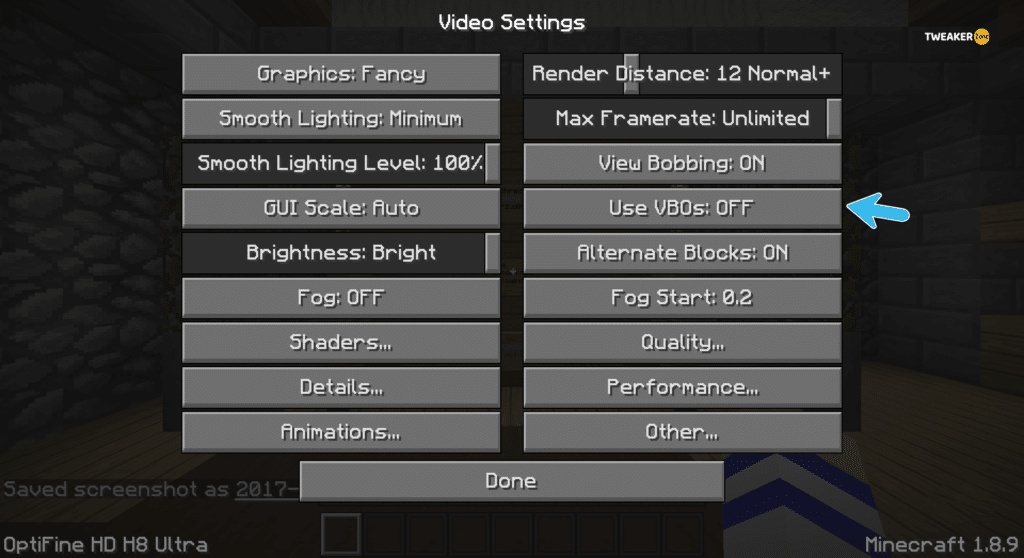
- Step 4: Relaunch the game to enjoy it in a new graphics setting.
3. Update Your Windows
You may not know, but just updating your windows can provide a practical GLFW error 65542 fix. If the driver is not supported by the obsolete version of your windows, it can create OpenGL errors. So, to solve it, follow these steps.
- Step 1: Click on the “Search” (magnifying glass icon) button on the bottom-left corner of your windows taskbar panel.
- Step 2: Type “Windows Update Settings” on the search box and hit enter.
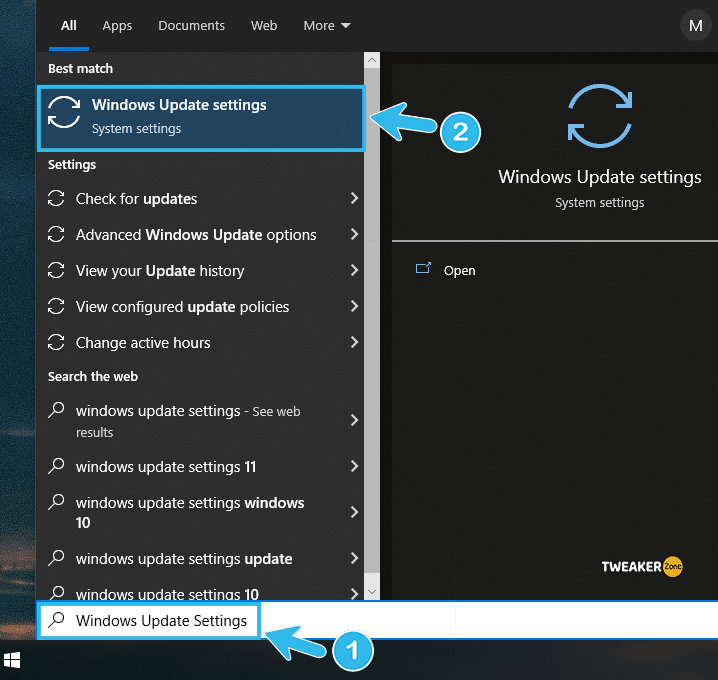
- Step 3: Search for the “Windows Update” option on the left column of the newly-opened window.
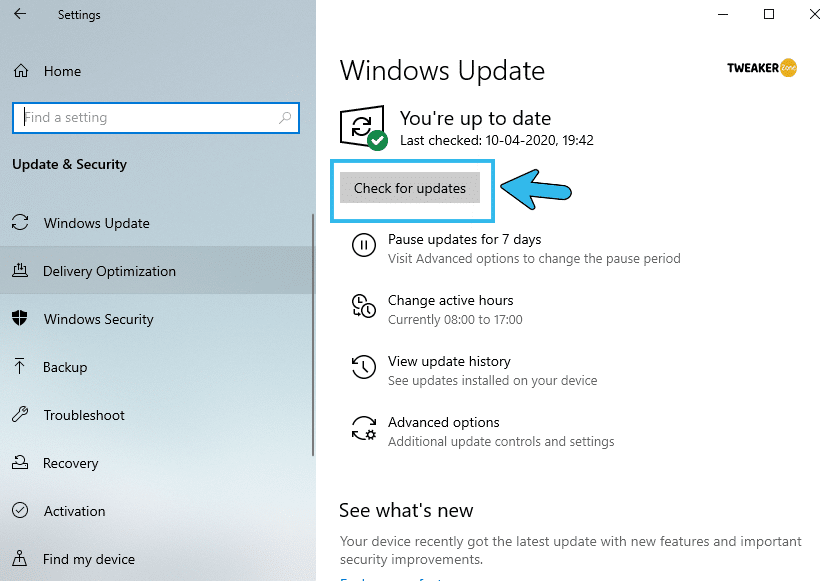
- Step 4: Navigate to “Check for Updates” and click on it.
- Step 5: Click on “Install New Updates” if the dialogue pops up.
- Step 6: Restart your system and try to rerun the game.
It will be even better if you schedule a time to check for your system updates routinely. You can also enable the automatic update option from the windows settings.
8 Pro Methods To Fix Minecraft GLFW Error 65542
If your issue persists even after trying the standard fixes, you need to take alternative routes to fix the Minecraft GLFW Error 65542 in the windows system. Here are all the pro methods that can solve this issue to assure you a flawless gaming experience.
4. Update GPU Driver
Your GPU driver may be running on an old version that can conflict with the optimum settings for Minecraft. And updating the driver can typically solve the issue on Windows PC.
- Step 1: Right-click on the “Windows” icon or “Start” button (Depending on the version of your windows).
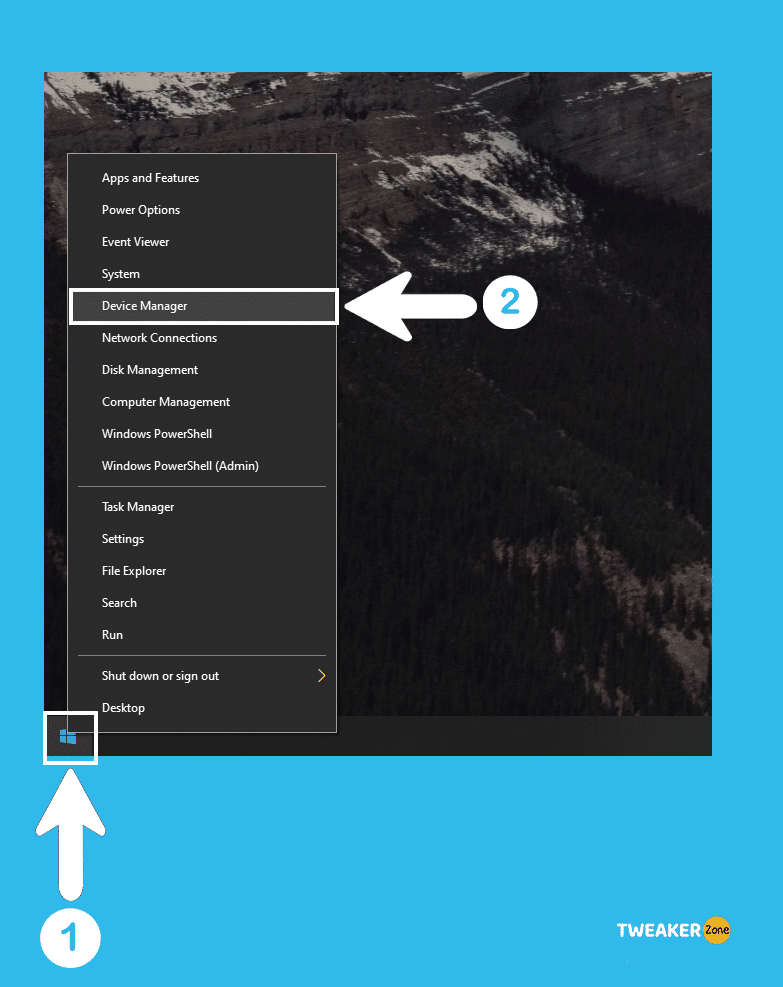
- Step 2: Navigate to “Device Manager” and click on it.
- Step 3: Navigate to the “Display Adapter” section on the new window and expand it.
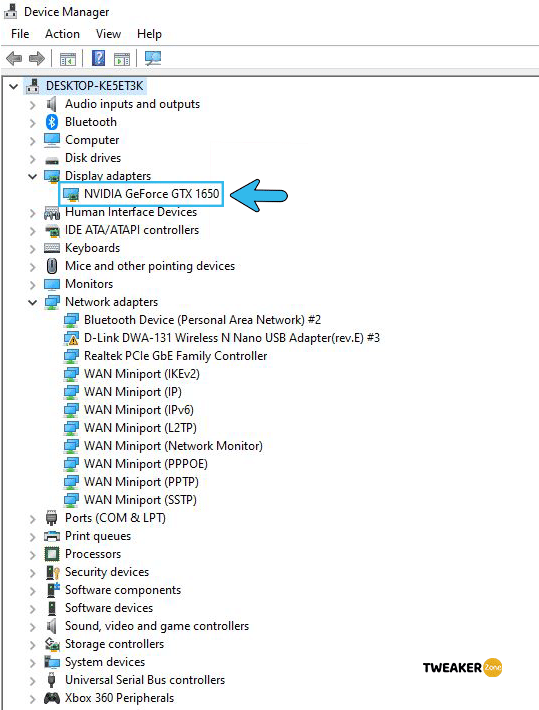
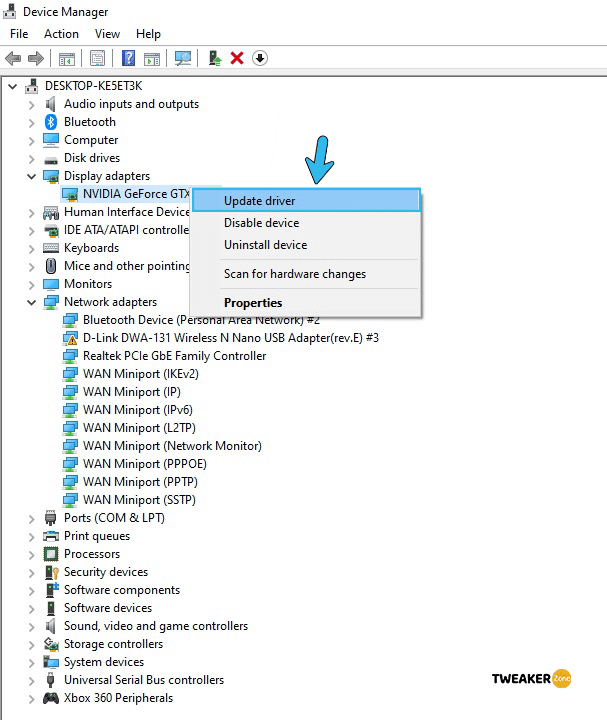
- Step 4: Navigate to your graphics card and right-click on it to find the “Update Driver” option.
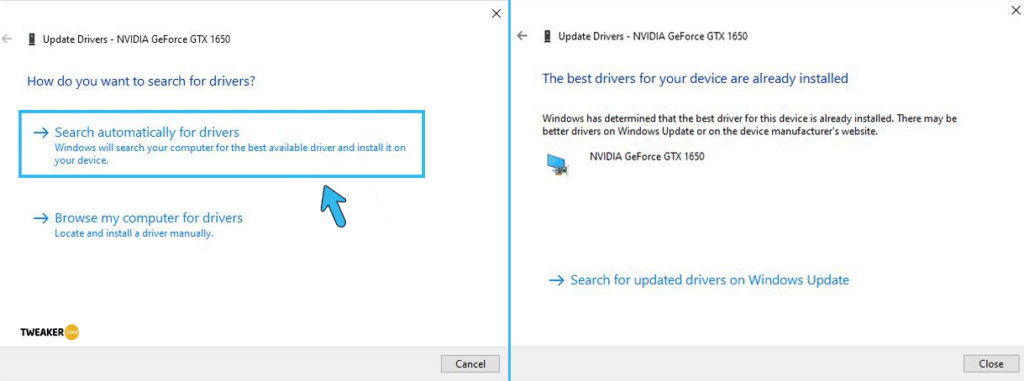
- Step 5: Click on the “Search automatically for drivers” option and follow the instruction.
- Step 6: Reboot your device once the updating process is completed.
5. Reinstall Graphics Card Drivers
If updating the graphics driver still can’t solve the GLFW error 65542: WGL Minecraft, you should completely uninstall the driver and then reinstall it again. And to do that, follow these steps.
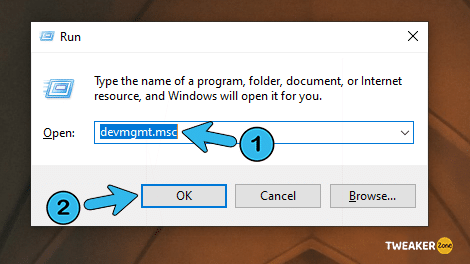
- Step 1: Press “Windows Key + R” to open the “Run” dialogue box on the windows system.
- Step 2: Type “devmgmt.msc” inside the box and hit enter.
- Step 3: Click on “Yes” to grant admin access if UAC pops up.
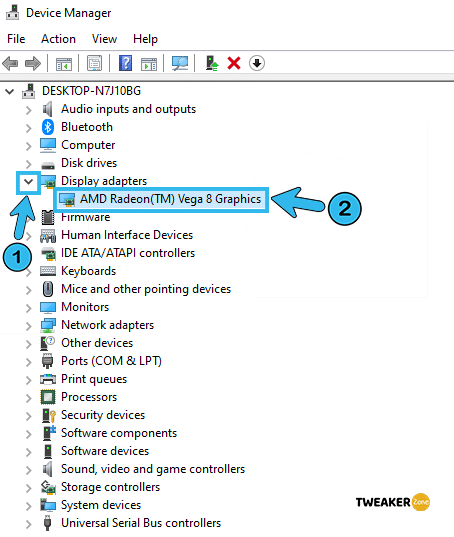
- Step 4: Under the “Device Manager” window, find “Display Adapter” and expand it.
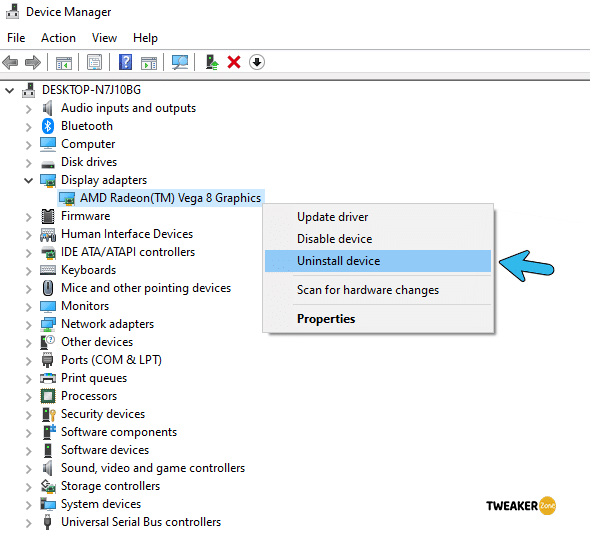
- Step 5: Navigate to your graphics driver and right-click to select the “Uninstall” option (Uninstall both the integrated and dedicated graphics driver)
- Step 6: Reboot the system and then visit Nvidia, AMD, or Intel Graphics driver pages to download the latest driver.
- Step 7: Install the new driver and restart the game.
Your screen may flicker a few times after you uninstall the graphics driver. But don’t worry; this flicker will automatically stop once you install the latest driver package from the official sites of your graphics card.
6. Install the Latest Java File Package
If you don’t know how to fix GLFW error on the Minecraft Java edition, you should start by disabling and reinstalling the Java again. Incompatible or obsolete Java editions can create interference issues on OpenGL. And to fix it, follow these steps.
- Step 1: Right-click on the “This PC” or “My Computer” icon, depending on your windows version.
- Step 2: Navigate to “Properties” from the menu and click to open the “Settings” panel.
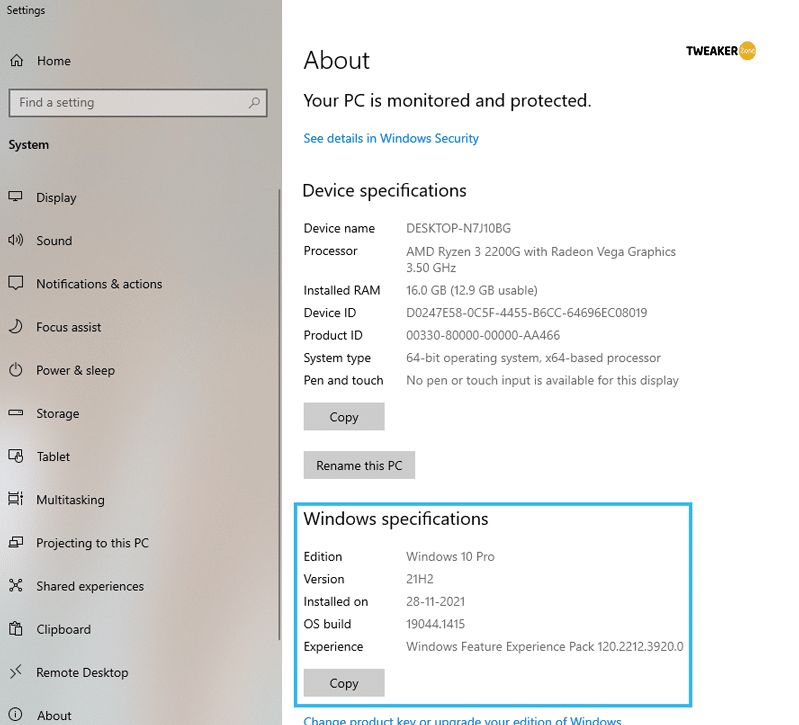
- Step 3: Check the OS architecture of your windows operating system.
- Step 4: Download the Java file package according to your OS architecture (either 32-bit or 64-bit).
- Step 5: Press “Windows Key + E” to launch the file explorer and navigate to either “C:\Program Files\Java” (32-bit) or “C:\Program Files (x86)\Java” (64-bit).
- Step 6: Manually copy the Java file package you have already downloaded and paste it into this folder.
- Step 7: Download any Minecraft mod manager and edit your profile.
- Step 8: Click on the “Executable” option under Java setting and paste the correct path of your java folder.
- Step 9: Hit “Enter” to change the java folder path and reboot your system.
You should carefully select the original folder name where you’ve installed the manual java file package. The mod will only work if the folder name matches the java file package.
7. Disable OpenGL
OpenGL is a programming interface that renders 2D and 3D vector graphics. If you have any glitches and bugs in that, this issue can arise. So, you need to disable that interface to solve this glitch.
- Step 1: Launch Minecraft and click on the “Option” icon.

- Step 2: Navigate to “Video Settings” and scroll down till you find “Advanced OpenGL settings” in the menu.

- Step 3: OFF or disable the OpenGL and “Save” the settings.
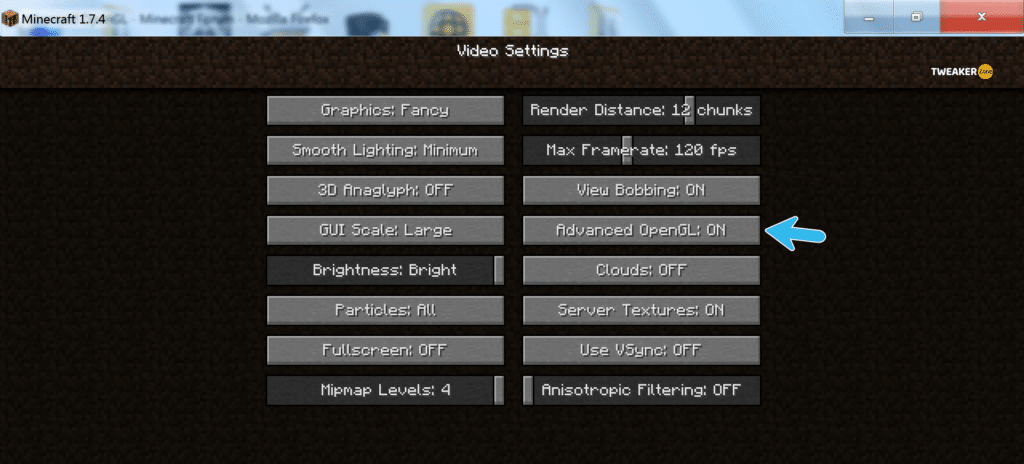
- Step 4: Restart your game to launch Minecraft without OpenGL assistance.
You may not be able to play the game in the highest graphics settings after disabling the OpenGL. So, running the game in either a low or moderate visual setup is recommended to experience smooth and lag-free gameplay.
8. Disable Showing OpenGL Errors
Many gamers don’t prefer to turn off OpenGL completely as it can significantly decrease the overall gaming experience. So, you can try Fix issue by disabling the option to show OpenGL error even if it pops up while playing the game.
- Step 1: Launch the Minecraft game and click on the “Option” button.
- Step 2: Navigate to “Video Settings” and scroll down till you find the “Others” option.
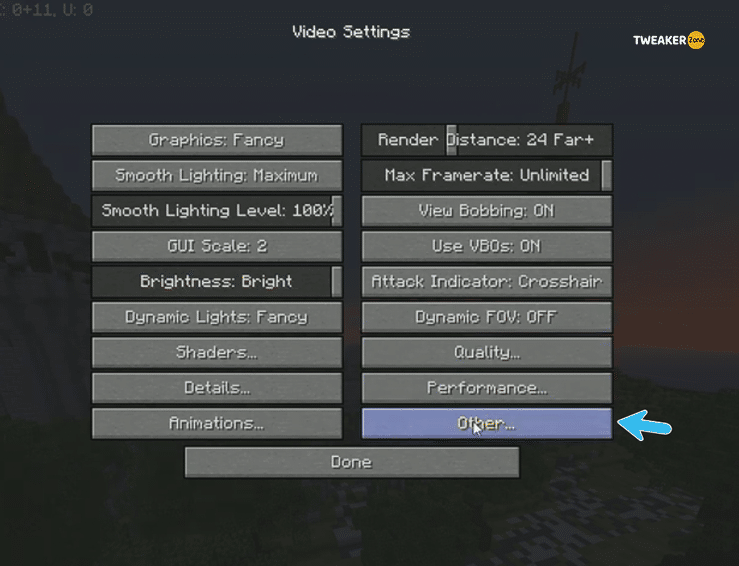
- Step 3: Click to open a new menu and navigate to the “Show GL Errors” option.
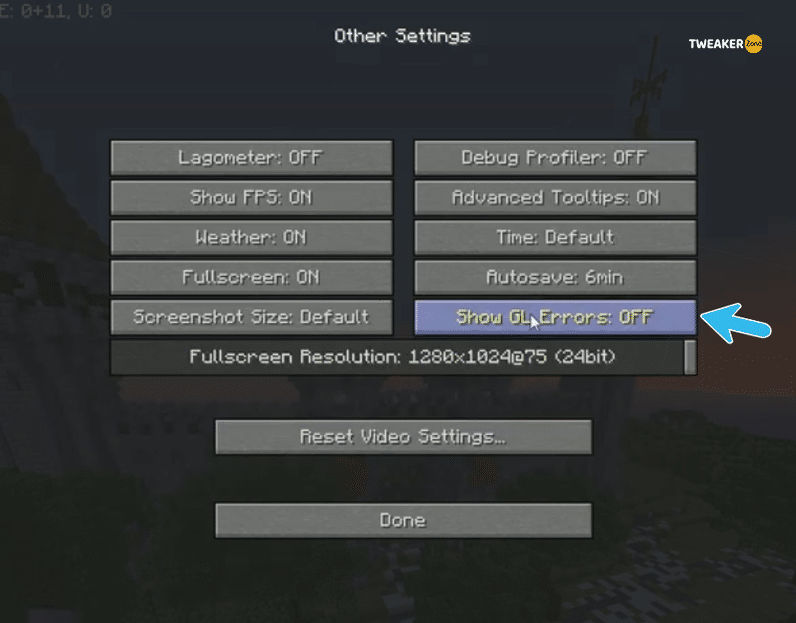
- Step 4: “disable” that feature and restart your game.
9. Add OpenGL.DLL Manually
Dynamic-link library or DLL is an essential shared library file that works as the backbone of any game or application. And by manually adding the DLL file of OpenGL, you can fix Error 65542 in your windows system.
- Step 1: Download the “OpenGL” file on your computer.
- Step 2: Extract the zip file with either WinZip or 7-Zip application on the windows system.
- Step 3: Copy the extracted “opengl32.dll” file according to the architecture of your OS (either 32-bit or 64-bit).
- Step 4: Go to “C:\Program Files\Java\<Your JRE Version>\bin” and paste the “opengl32.dll” file.
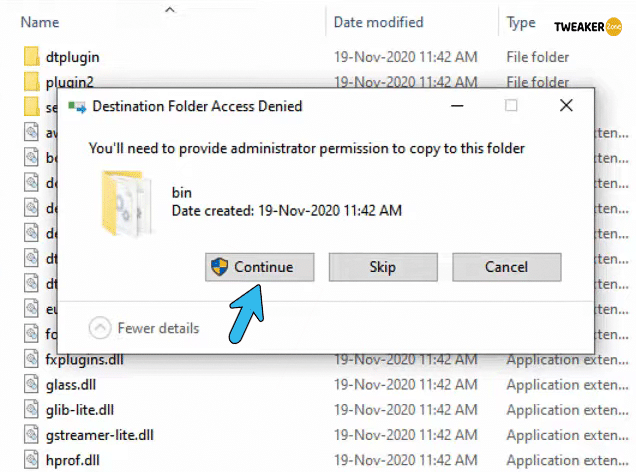
- Step 5: Grant admin permission if you get any prompt by User Account Control (UAC).
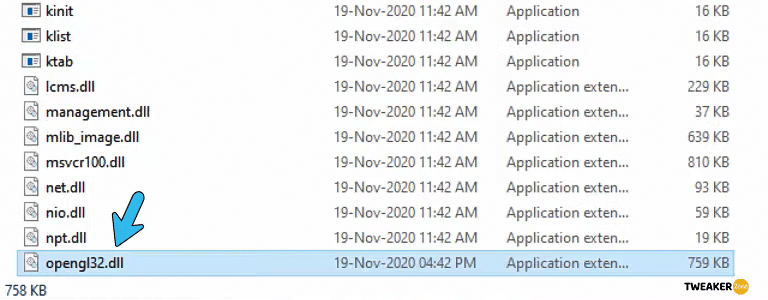
- Step 6: Reboot your system and relaunch your game.
10. Uninstall DisplayLink (If Applicable)
You may not know, but DisplayLink driver has an immense reputation for conflicting java-based Minecraft setup. So, if you are getting this error, you better uninstall the DisplayLink USB Graphics completely.
- Step 1: Press “Windows Key + R” to launch the “Run” dialog box.
- Step 2: Type “appwiz.cpl” inside the box and hit enter to open the “Programs and Features” menu.
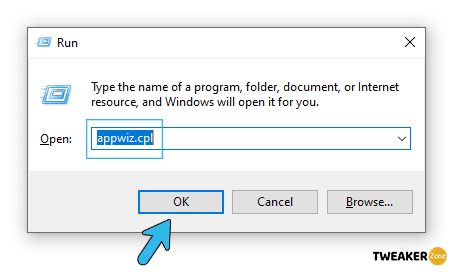
- Step 3: Scroll down till you find the “DisplayLink Graphics Driver” option.
- Step 4: Right-click and select the “Uninstall” option from the context menu.
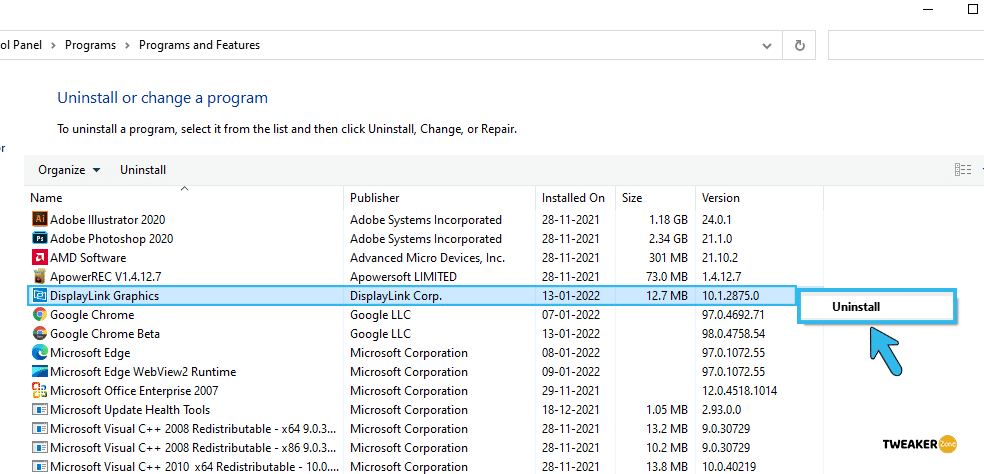
- Step 5: Select “Yes” if you get an authentication prompt and let the driver uninstall from your system completely.
- Step 6: Once uninstalled, reboot your computer and relaunch Minecraft.
11. Use Display Driver Uninstaller
If your already-installed Minecraft setup has any missing DLL or glitch during the setup process, you may not fully uninstall the game with the manual method. And in that case, you need to download a third-party uninstaller to fix the error 65542 in your system.
- Step 1: Download “Display Driver Uninstaller” on your system. (Ignore if you get any prompt from your antivirus; it is completely safe.)
- Step 2: Unzip the package once it is downloaded and find the “DDU.exe” file.
- Step 3: Double click on the file and let the Display Driver Uninstaller start.
- Step 4: Follow the on-screen prompts and navigate to the “Clean and restart” option.
- Step 6: Click on that option to erase your game from the system completely and then reboot it.
Once the old Minecraft package is completely uninstalled from your system, download the latest version of the game and reinstall it.
Additional Fix – Update Your Hardware
Although Minecraft was launched by Mojang Studios a decade ago, the developers constantly improved several factors, including the graphics and ambient structures. And a low-end PC can’t handle that. So, to solve the error, your hardware should meet the minimum system requirements.
- CPU: Intel Core i3 3210 (or Higher) / AMD A8 7600 (or Higher)
- RAM: 4GB DDR3
- Hard Drive: 180 MB (System Space) / 1 GB (Disk Space)
- Graphics Card: NVIDIA GeForce 400 / AMD Radeon R5 / Intel HD Graphics 4000
- Monitor: 1024 x 768 (60Hz Refresh Rate)
- Network: 256 MBPS Broadband Connection
- Operating System: Windows 7 64-bit (or Higher) / Yosemite MacOS (or Higher)
You should concentrate mainly on upgrading CPU, GPU, and RAM to increase the overall Minecraft gaming experience. It is also better to use a dedicated graphics card rather than a shared one.
FAQs
Q. How do I fix GLFW error 65542?
Updating your GPU driver and installing the latest version of Windows OS is likely to solve the Minecraft GLFW error 65542. If it doesn’t, you can try adding the OpenGL.DLL manually or can disable the error message to show up. You can also uninstall DisplayLink if you are using it.
Q. How do you fix OpenGL on Minecraft?
There are two primary ways to fix OpenGL errors on Minecraft. First, you can manually add the OpenGL.DLL file directly to the root folder of the game. And secondly, you can open the in-game setting and navigate to video settings to permanently disable showing OpenGL Errors.
Q. What version of OpenGL does Minecraft use?
Minecraft currently supports several versions of OpenGL, although it finally depends on the version of OpenGL with which your graphics card is compatible. The minimum recommended version is OpenGL 1.3, but you won’t get the best performance. And Mojang recommends at least OpenGL 4.4 or higher.
Q. How do I fix OpenGL not supported?
You should start by updating your GPU driver. If it doesn’t work, you can completely uninstall the driver and reinstall the latest version. Besides, you can also update your Windows OS to the newest version. You can also upgrade your graphics card to enable a compatible OpenGL version.
Conclusion
Minecraft GLFW Error 65542 is quite a common issue reported by Minecraft patrons. However, it is not a problem that should stop you from enjoying your favorite game! We are confident that if you follow the steps that we have mentioned above, the error message issue will be eliminated in no time, and you can enjoy an uninterrupted and smooth gaming experience in no time!
Let us know if our recommendations have helped you or not! Are you facing other problems while playing your favorite game? Let us know – and we will try to solve the issue!
Leave a Reply
View Comments