
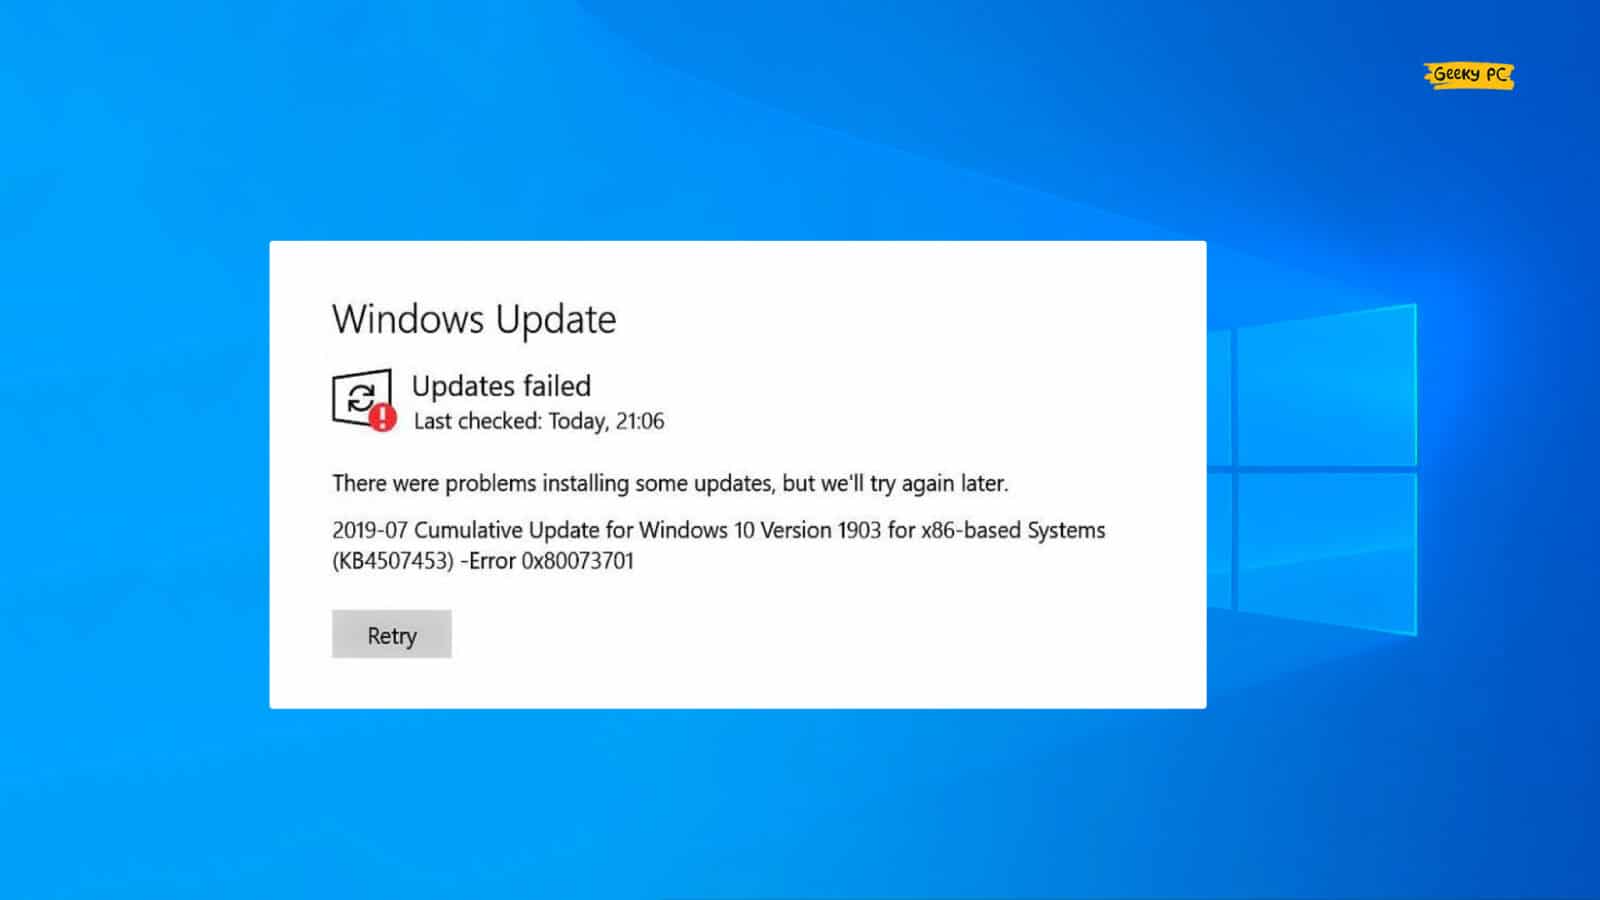
You need to keep your Windows updated to run all your computing smoothly, no doubt about it! But don’t you ever try to bang your head on the wall once you start getting the Windows Update error 80073701 during the update process? We all do!
The 0x80073701 error can be effectively resolved just by setting your time and date correctly. Besides you should also flush your IP and DNS. Many people also fixed it by repairing the Windows image and other system files in the root directory. Running the SFC scan can also be helpful.
However, these are not all that can resolve the errors during the Windows update. But before we dive deep into the solution part, let’s understand what this error actually means.
What Are The Primary Causes Of Error Code 0x80073701?
Although windows error 80073701 is pretty common, it can create some serious issues on your system, especially if you fail to update your OS due to this error.
However, in a broader spectrum, this issue can typically arise for six main reasons, which are as follow.
- You have mismatched time, time zone, and date settings on your device.
- Your IP is not configured correctly, and Windows Update fails to make a secure connection.
- Any startup application is interfering with the Windows update process.
- The firewall installed on your system is restricting the update service.
- You have a missing or corrupt component in the Window Update process.
- There are outdated drivers installed on your system.
Besides these primary causes, this update error code can also occur if you have any malicious files on your root or installation directory. It can even happen if the Windows OS image is corrupted or malfunctioning.
6+ Easy Fixes For The Update Error Code 80073701
Before trying any advanced methods that need some serious tweaks on your system, you should proceed with the generic fixes first.
And in almost 80% of cases, these generic fixes alone can effectively resolve the Windows Update error 80073701 in your system.
1. Change Date and Time Settings
If you have the wrong date and time on your system, you may encounter errors while updating your Windows device.
These errors can even trigger if you have the wrong time zone set on your device. So, before trying anything, check your time and date settings first.
- Step 1: Right-click on the clock located at the bottom-right corner of your taskbar.
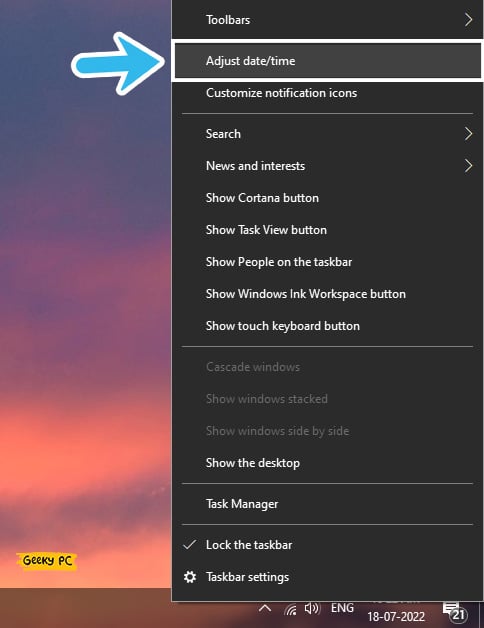
- Step 2: Select “Adjust date/time” from the option to launch the settings app.
- Step 3: Now, click on the drop-down menu under the “Time Zone” header and select your region.
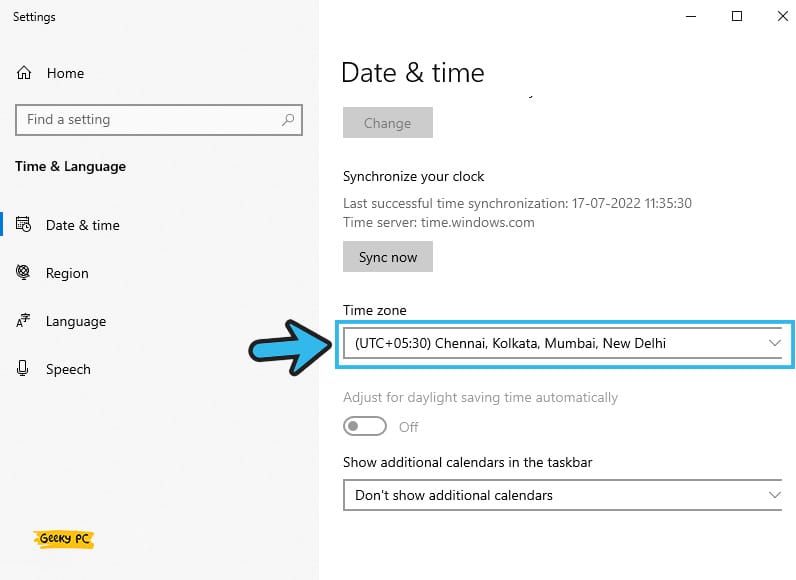
- Step 4: Scroll down again and click on the “Add clocks for different time zones” option.
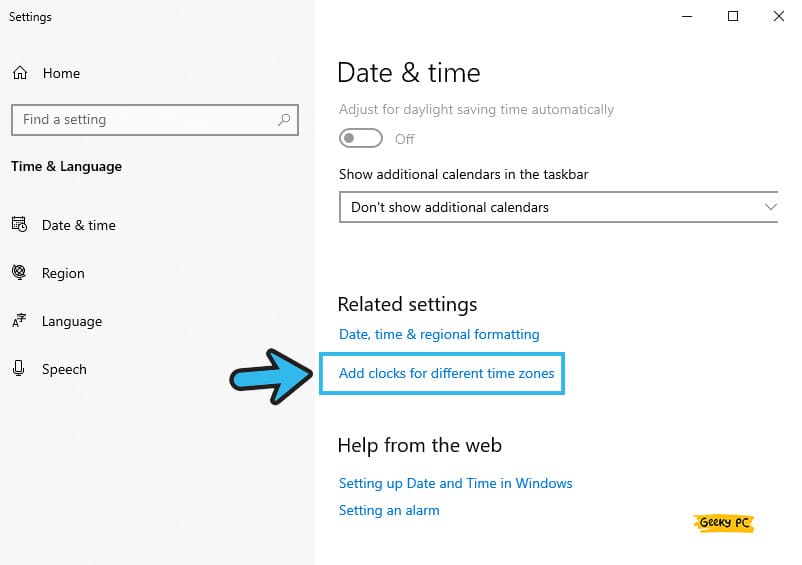
- Step 5: Once the new window pops up, navigate to the “Internet Time” tab from the header menu.
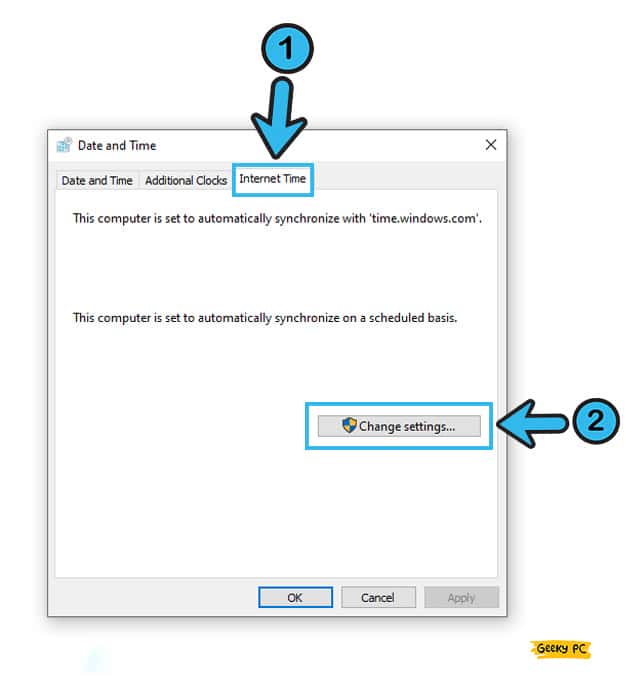
- Step 6: Click on the “Change Settings” option to select a time server.
- Step 7: Tick the box beside the “Synchronize with an internet time server” option once the new window appears.

- Step 8: Now, select any server from the drop-down menu and click “OK” to save the settings.
Alternatively, you can also toggle the switch beside the “Set time automatically” to disable it on the very first step. And then, you can click on the “Change” button under the “Set the date and time manually” option and enter the right date and time.
If you are also facing a similar situation, follow our comprehensive guide to fixing the “Error Code 0x0” in Windows systems.
2. Release Your IP Address
If you have the wrong IP configured on your system, various issues can trigger, especially while updating your Windows to the latest version.
So, it is better to check and rectify your IP parameters to let your device connect securely to the internet. And it will likely eliminate the issues while updating windows from the Microsoft server.
- Step 1: Press the “Windows Key + R” buttons together to launch the “Run” command.
- Step 2: Once the command window appears, type “CMD” and hit enter.
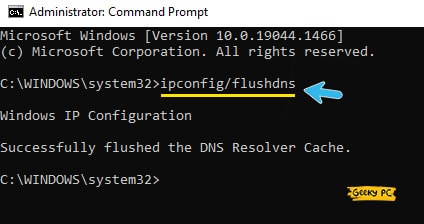
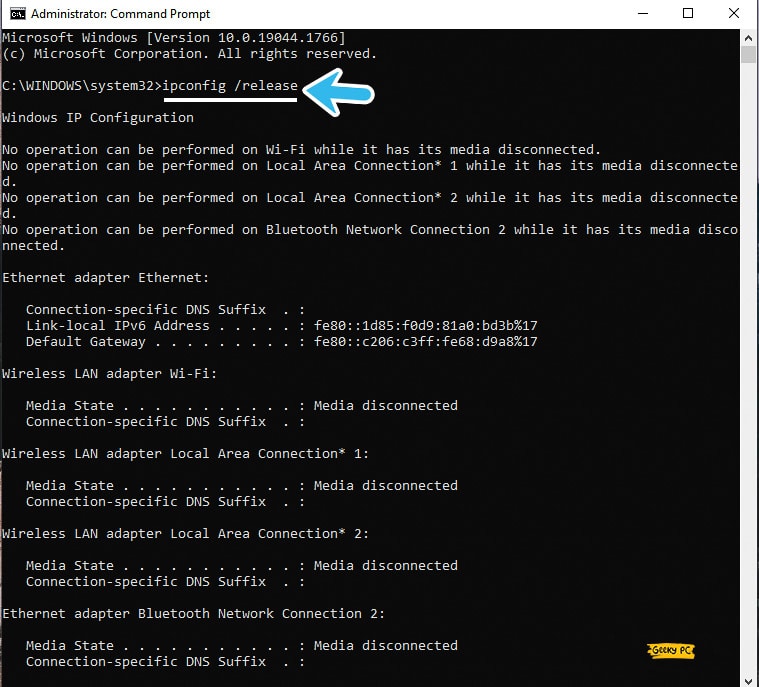
- Step 3: After the black CMD window launches, type the following commands and hit enter after each line; “ipconfig /flushdns,” “ipconfig/release,” and “ipconfig/renew.”
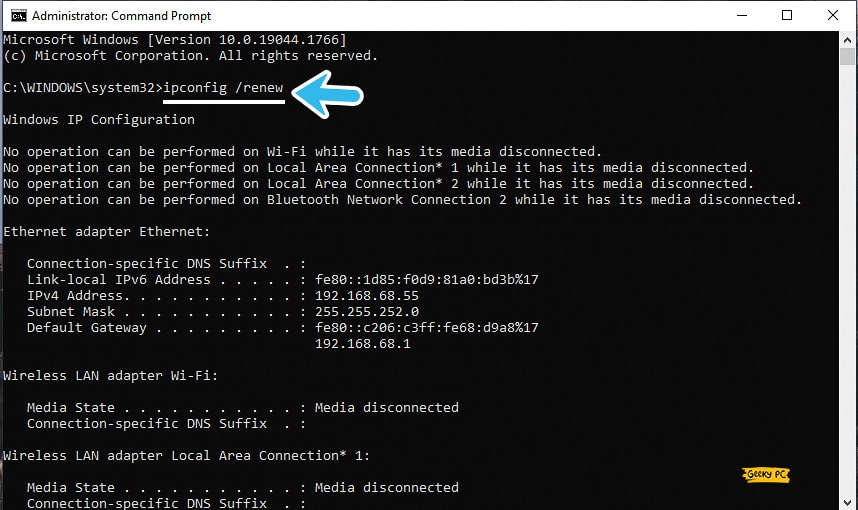
- Step 4: Once your IP and DNS are thoroughly flushed, exit from the CMD window.
- Step 5: Proceed with the Windows update again to check whether the problem still triggers.
You shouldn’t flush your IP and DNS if you are using a static IP connection provided by your ISP. Alternatively, you can note down your IP, DNS, Subnet, and other parameters from your current internet settings and then proceed with these steps.
And once you are done flushing it, you can manually set those parameters again.
3. Execute A Clean Boot
If you are frequently getting the error_SXS_assembly_missing 0x80073701 on your Windows devices, it may happen that any Microsoft service or startup application is interfering with the update application.
In such cases, you should perform a clean boot to resolve it.
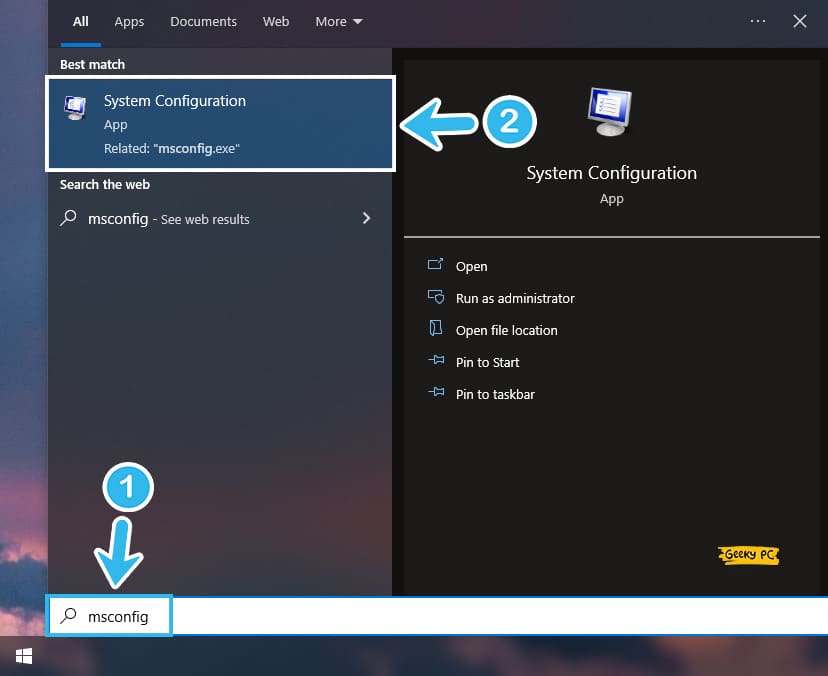
- Step 1: Click on the “Magnifying Glass” icon located at the bottom-left corner of your taskbar.
- Step 2: Once the search field appears, type “msconfig” and click on the very first result that appears.
- Step 3: After the “System Configuration” window launches, navigate to the “Services” tab from the header menu.
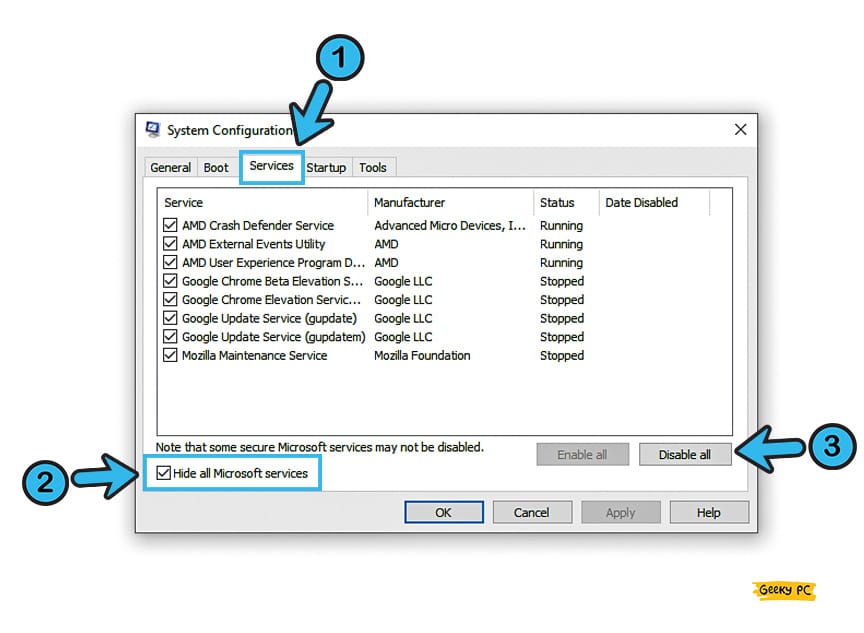
- Step 4: Now, tick the box beside the “Hide all Microsoft services” option.
- Step 5: Once the Microsoft services are hidden, click on the “Disable All” button.
- Step 6: Click “OK” to save the settings and exit from the configuration app.
- Step 7: Now, restart your device in a clean state without any startup application.
Many people have already reported getting an unexpected ethernet error once they have disabled all the startup applications.
4. Stop Windows Defender Firewall Temporarily
One of the most robust security software, Windows Firewall, now comes preinstalled with the latest version of the Windows OS.
However, this firewall service can interfere with the Windows update system to block it. So, it is better to disable it temporarily before you proceed further.
- Step 1: Click on the “Start” or “Windows” icon (depending on your Windows OS) located at the bottom-left corner of your taskbar.
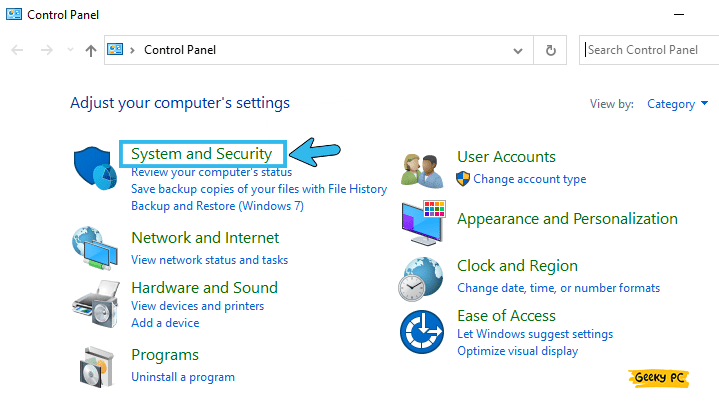
- Step 2: Find the “Control Panel” option from the menu and click to open it.
- Step 3: Once the new window appears, click on the “System and Security” tab.
- Step 4: Now, navigate to the “Windows Firewall” option and click on it.
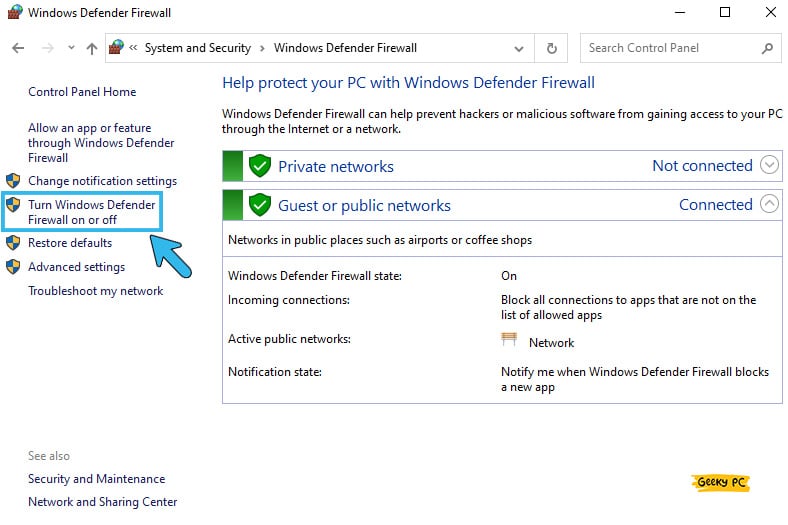
- Step 5: Navigate to the left column and click on the “Turn Windows Firewall on or off” option.
- Step 6: Navigate to the right panel and put a tick mark on the box beside the “Turn off Windows Firewall (not recommended)” option.
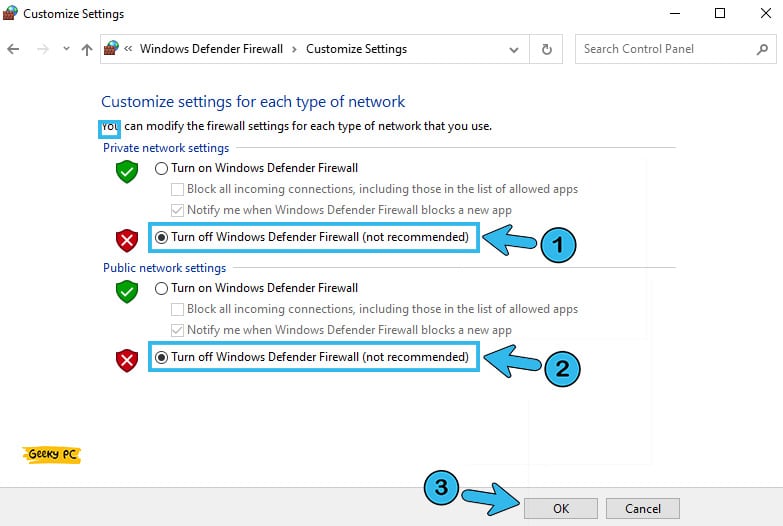
- Step 7: Click “OK” to save the settings and try to update your windows again.
Many people have started getting a group policy error once they have disabled the Windows Firewall from their system, especially if they are using the device under a network administrator.
If you are also witnessing a similar situation, follow our comprehensive guide to fixing the “This policy is blocked by group policy” error in Windows systems.
5. Restart Windows Update Process
Sometimes, the windows update process starts malfunctioning for various reasons. And you may frequently get the error code 0x80073701 on your system for that.
In such cases, you should restart the overall windows update process again to give it a fresh start.
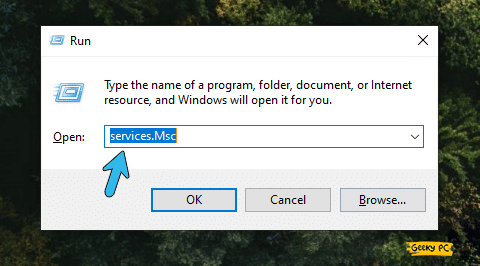
- Step 1: Press the “Windows Key + R” buttons together to launch the “Run” command.
- Step 2: Once the new field appears, type “services.msc” and press the “OK” button.
- Step 3: After the new window launches, navigate to the left panel and click on the “Services (Local)” option.
- Step 4: Now, navigate to the right panel, scroll down, and locate the “Windows Update” service.
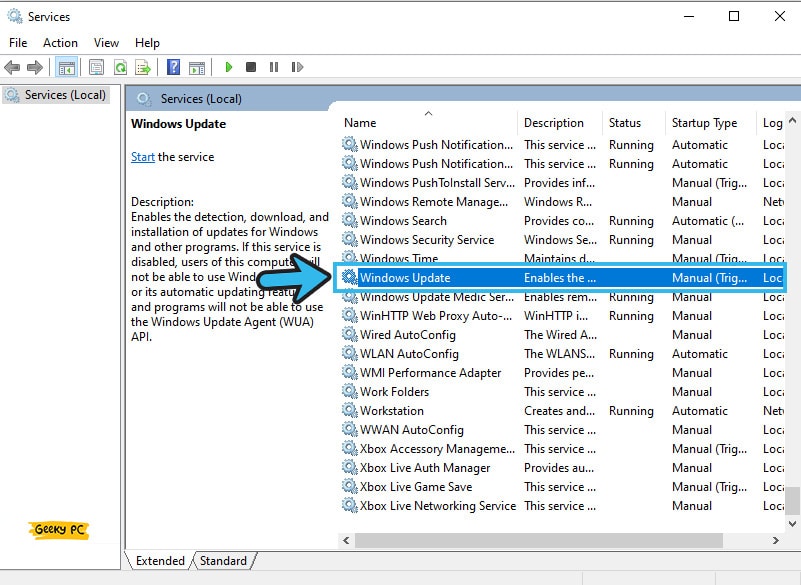
- Step 5: Double-click on the service to launch the “Windows Update Properties” Window.
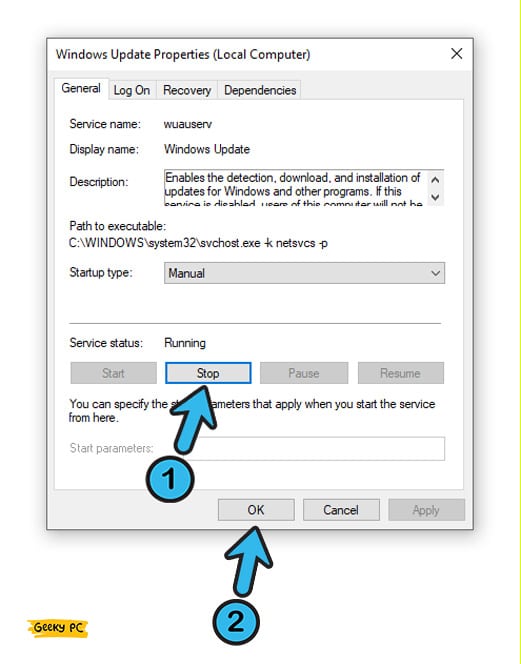
- Step 6: Once the new window launches, click on the “Stop” button to disable it.
- Step 7: Now, exit from the window and return to the “Services” window.
- Step 8: Navigate to the “Windows Update” service again, right-click on it, and select the “Restart” option.
- Step 9: Once the service is resumed, try to update your windows again.
You may witness a nonfunctional “Start” or “Windows” button once you restart the windows update process, as it may have interfered with the running applications.
In that case, you should follow our detailed guide to fix the “start button not working” error in Windows 10-based devices.
6. Restart Windows Update Services
Restarting the Windows services again may not solve the error in many cases. However, you can give the update service a fresh reboot by closing all the startup statuses and then restarting those.
And if you do that correctly, your Windows update service will start a fresh operation.
- Step 1: Press the “Windows Key + R” buttons together to initiate the “Run” command.
- Step 2: Once the command field launches, type “services.msc” and hit enter.
- Step 3: After the “Services” app launches, navigate to the left column, and click on the “Services (Local)” option.
- Step 4: Now, navigate to the right panel and find the “Background Intelligent Transfer Service” option.
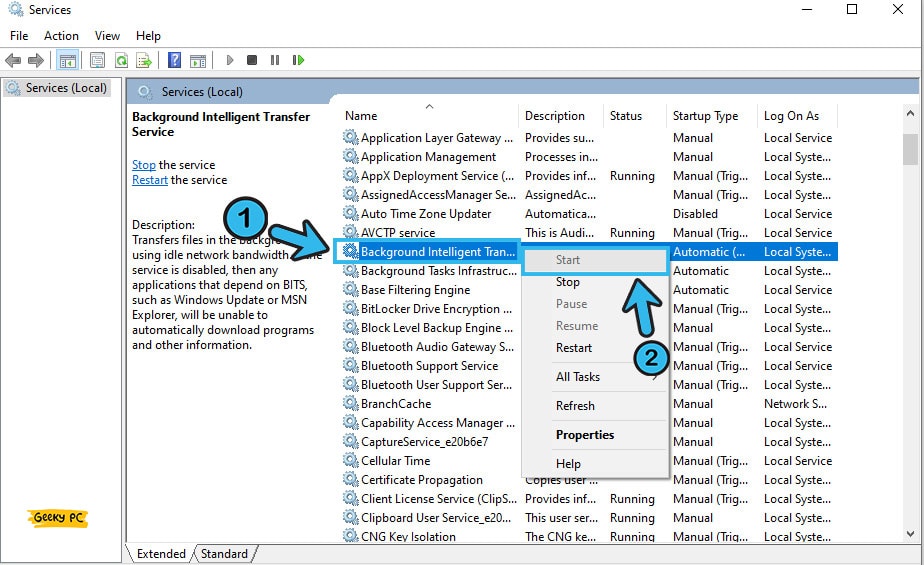
- Step 5: If the service is stopped, right-click on it, and click on the “Start” option.
- Step 6: If the service is already running, right-click on it again, and select the “Restart” option.
- Step 7: Once the service is fully restarted, exit from the “Services” app.
- Step 8: Now, try to update your Windows again to check whether the error still appears.
You may need to disable your antivirus on your system before restarting all the Windows update services. Because, at times, the security software starts interfering with the background services and disrupting those.
However, disabling the antivirus for too long may make your system vulnerable.
6+ Advances Fixes For The Windows Update Error Code 0x80073701
If none of the generic methods we have listed above is sufficient to resolve the windows update error 80073701, your problem may be way more deep-rooted than you can possibly assume.
And in such cases, going with the advanced fixes is the only option left to resolve it.
7. Check With The Windows Update troubleshooter
The latest Windows versions, such as Windows 10 and 11, come with a troubleshooting option for the updates.
If you are frequently encountering the windows update installation error code 80073701, you should use the troubleshooter to rectify the errors on the Windows update service.
- Step 1: Click on the “Start” or “Windows” button, depending on your Windows variant.
- Step 2: Click on the “Settings” options (the gear icon) to launch the app.
- Step 3: Once the new window appears, scroll down, and click on the “Update & Security” option.

- Step 4: Navigate to the left panel and click on the “Troubleshoot” option.
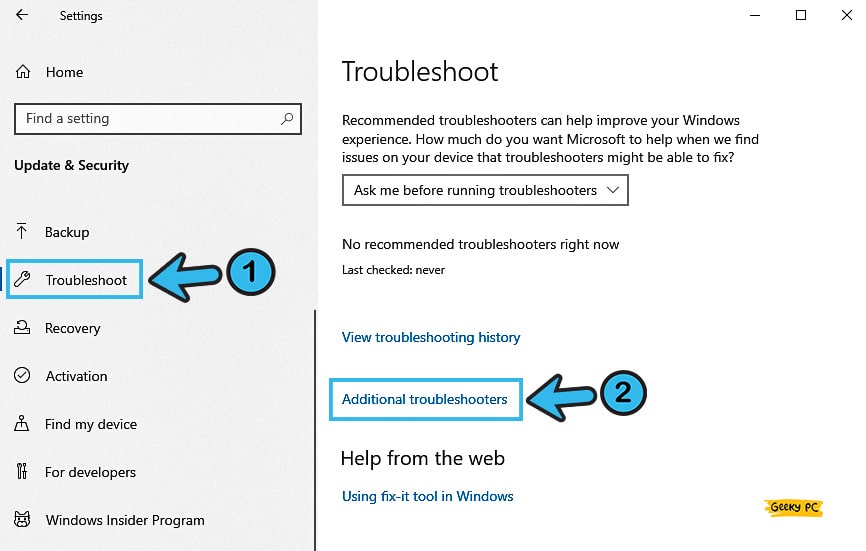
- Step 5: Now, navigate to the right panel and click on the “Additional Troubleshooter” option.
- Step 6: Once the new window appears, click on the “Windows Update” option located under the “Additional Troubleshooter” option.
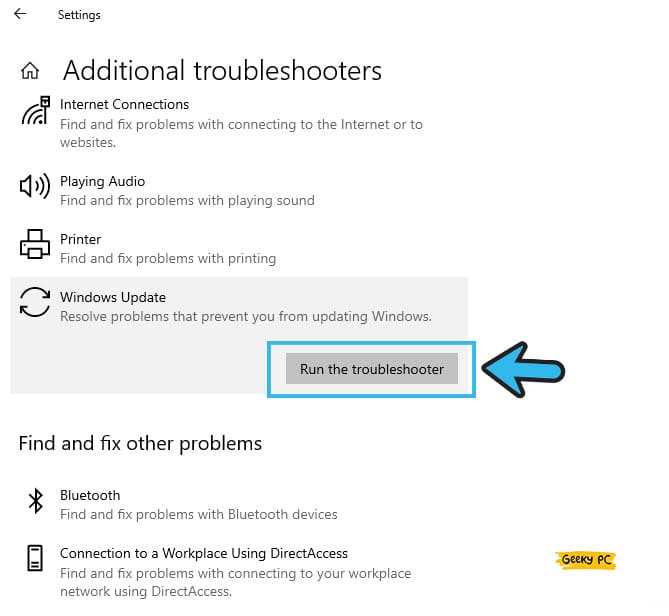
- Step 7: Follow the on-screen instaurations and restart your system once the troubleshooting procedure is over.
You need to keep your internet connection active while doing the troubleshooting, as windows will automatically search and download any missing services of the app that are crucial for the update to work on your system.
You may also need to disable your antivirus temporarily.
8. Repair Windows 10 Image
If you have installed Windows OS on your system with an image file, the image file itself may have been corrupted during the procedure.
In such cases, you should repair your Windows 10/11 image before proceeding with the Windows update procedures.
- Step 1: Press the “Windows Key + R” buttons together to initiate the “Run” command.
- Step 2: Once the new command field appears, type “CMD” and click the “OK” button.
- Step 3: After the “Command Prompt” window launches, type the “DISM.exe /Online /Cleanup-image /Restorehealth” command.
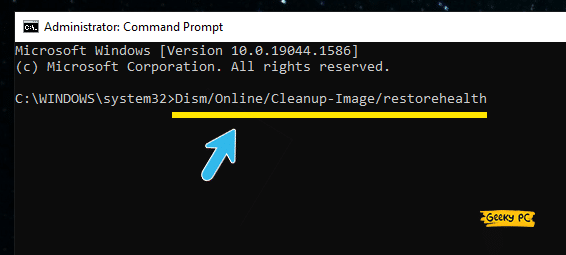
- Step 4: Hit the “Enter” button and let windows execute the “Restore Health” option.
- Step 5: Once the operation is over, exit from the “Command Prompt” menu.
- Step 6: Now, try to update your Windows again and see if the error still appears.
Many people have noticed getting an unresponsive taskbar, especially on Windows 10-based devices, once they have executed the DISM commands.
9. Update Outdated Drivers
Drivers are absolutely essential in Windows-based devices to let all the hardware and processes work perfectly.
And if you are using an outdated driver on your system, it may interfere with the Windows update process. So, you need to update all your drivers periodically.
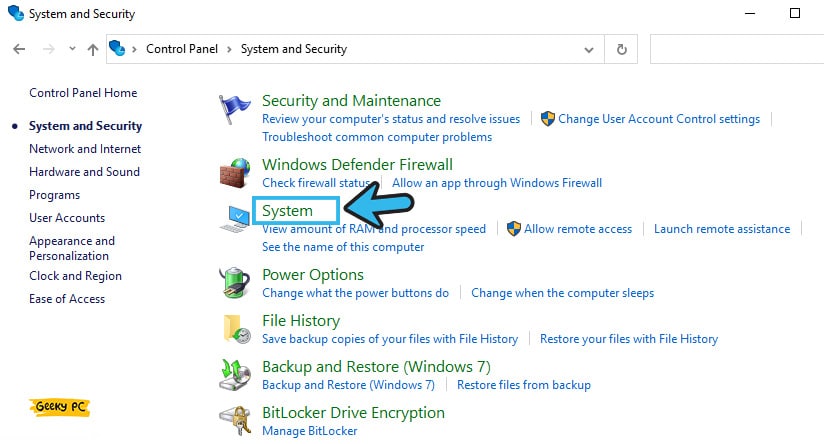
- Step 1: Click on the “Magnifying Glass” icon located at the bottom-left corner of your taskbar.
- Step 2: Once the search field appears, type “Control Panel” and click on the very first result that appears.
- Step 3: After the “Control Panel” window launches, navigate to the top-right corner, and select the “Category” option from the drop-down menu beside the “View by:” header.
- Step 4: Now, click on the “System and Security” option to launch the new window.
- Step 5: Navigate to the right panel and click on the “System” option.
- Step 6: Once the new window appears, click on the “Advanced System Settings” option.
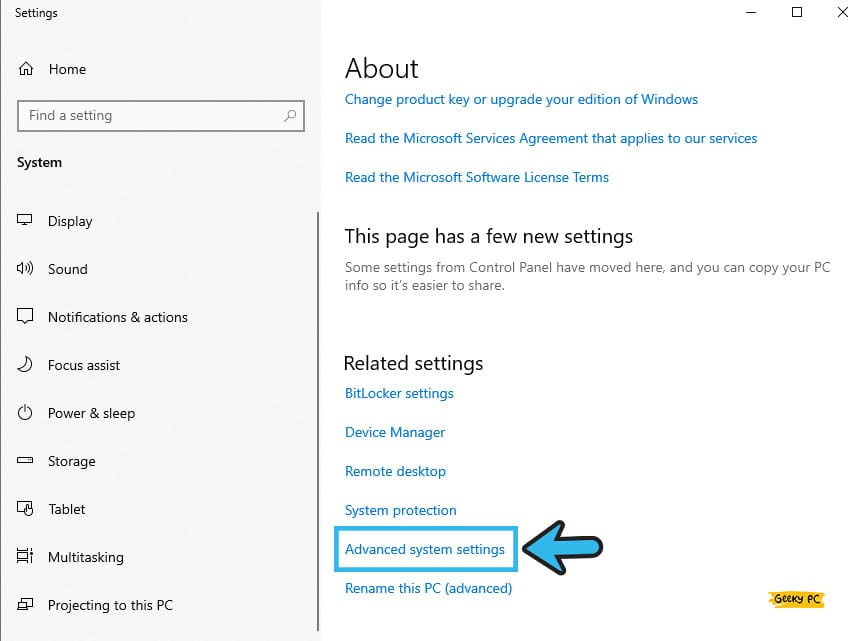
- Step 7: After the new “System Properties” window launches, navigate to the “Hardware” tab from the header menu.
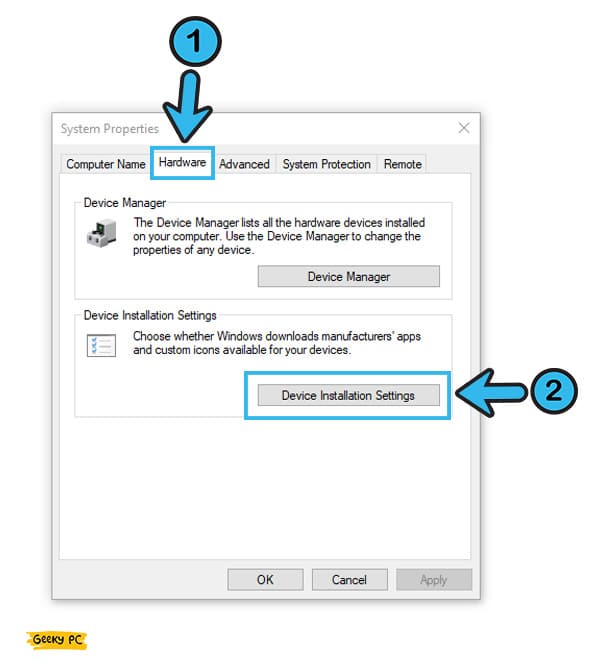
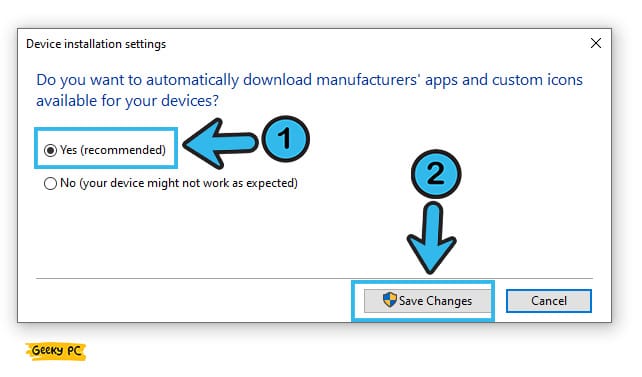
- Step 8: Now, click on the “Device Installation Settings” option.
- Step 9: Once the new window appears, click on the “Yes” button and press the “OK” button.
- Step 10: After all the drivers are fully updated, reboot your device and proceed with the Windows update.
After updating all their drivers, many gamers have reported getting a generic PnP monitor error, especially while using a low-end monitor.
If you are also facing a similar situation, follow our step-by-step guide to fix the “Generic PnP monitor” error in Windows systems.
10. Restore Windows OS To A Previous Point
It may happen that malicious software has already modified your root directories and core setup files after a phishing attack.
In such cases, you should completely restore your entire Windows to a previous restore point while everything was running smoothly.
- Step 1: Depending on your Windows variants, right-click on either the “My Computer” or “This PC” icon.
- Step 2: Click on the “Properties” option to proceed with the system settings.
- Step 3: After the new window launches, click on the “Advanced System Settings” option.
- Step 4: Now, navigate to the “System Protection” tab from the header menu.
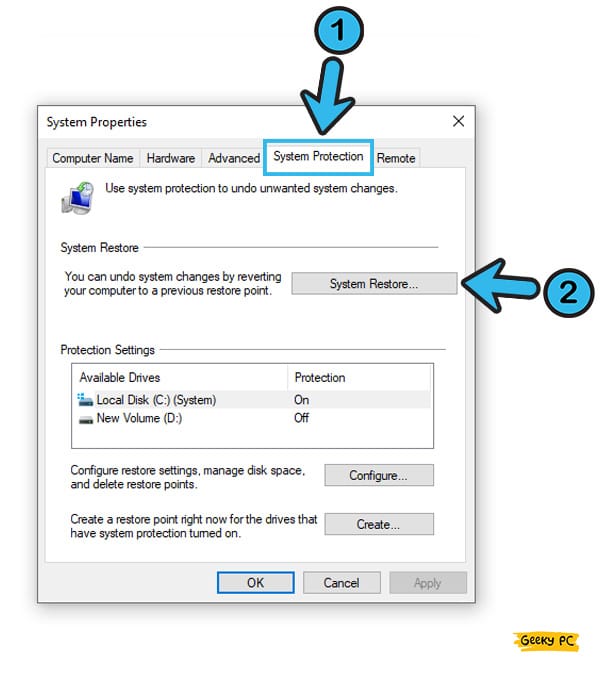
- Step 5: Click on the “System Restore” button and further click on the “Next” button.
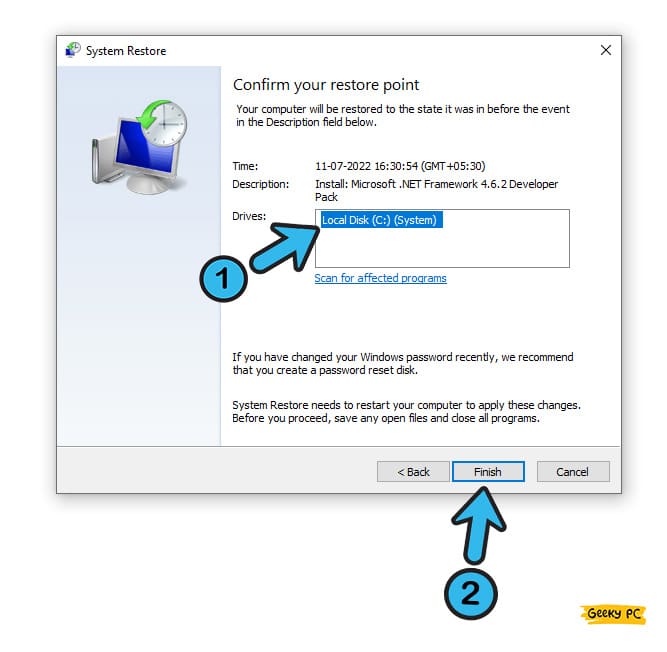
- Step 6: Now, click on the “Show more restore points” option.
- Step 7: Select a previous restore point to set up your Windows on that timeframe’s settings.
- Step 8: Click on the “Finish” option to complete the restoration option.
You may get a gateway error on your internet settings if you restore your Windows to a previous point, especially if you are using a static IP connection provided by your ISP.
In that case, you should follow our comprehensive guide to the “ERR_NETWORK_CHANGED” error on Windows systems.
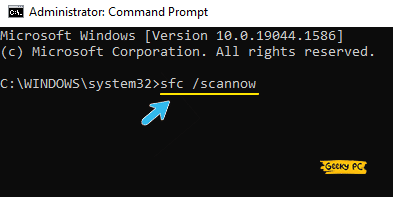
11. Execute SFC Scan
Nowadays, SFC or “System File Checker” tool comes preinstalled with the latest version of Windows OS, such as Windows 10 and 11.
And with that tool, you can automatically check and rectify the errors in your system files and root directories. It is also an effective solution if you are frequently getting Windows update errors.
- Step 1: Press the “Windows Key + R” buttons altogether to launch the “Run” command.
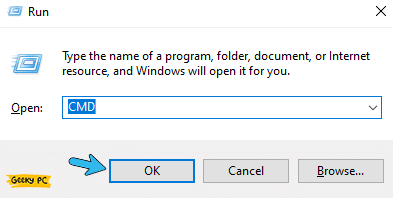
- Step 2: Once the new command field appears, type “CMD” and click on the “OK” button.
- Step 3: After the black Window of “Command Prompt” appears, type the “sfc /scannow” command.
- Step 4: Hit the enter button and let the SFC tool perform all the error checks.
- Step 5: Once the operation is over, reboot your system, and try to update your Windows again.
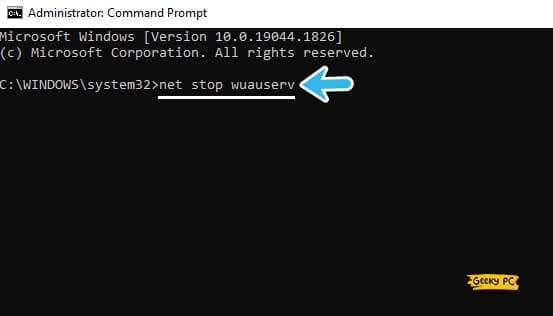
12. Reset All The Windows Update Components
There are several components on Windows Update services, not just one or two. And if any of these components start malfunctioning, you start having multiple errors in a cycle while trying to update your Windows.
So, it is better to reset all the components to make them error-free.
- Step 1: Press the “Windows Key + R” buttons together to initiate the “Run” command.
- Step 2: Type “CMD” in the command field and press the “OK” button to launch the app.
- Step 3: Once the “Command Prompt” window appears, type the following commands and hit enter after each line; “net stop wuauserv,” “net stop cryptSvc,” “net stop bits,” and “net stop msiserver.”
- Step 4: Now, type “ren C:\Windows\SoftwareDistribution SoftwareDistribution.old” and hit the enter button to rename the “SoftwareDistribution” folder.
- Step 5: Type the “ren C:WindowsSystem32catroot2 Catroot2.old” command and hit the enter button to rename the “Catroot2” folder.
- Step 6: Now, type the following commands and hit the enter button after each line; “net start wuauserv,” “net start cryptSvc,” “net start bits,” and “net start msiserver.”
- Step 7: Once all the operations are completed, type “Exit” to close the “Command Prompt” app.
- Step 8: Try to update your Windows again and check whether the issue still prevails.
You should follow these commands with extreme precaution. If you mistakenly input any false command while overriding the root directories, several errors can occur promptly. So, it is better to perform these tasks under expert supervision.
What Is Update Error Code 80073701 on Windows Systems?
After the new rollouts, error code 80073701 can frequently trigger on your system when you try to update your Windows OS.
This issue typically triggers if any service on the Windows update module starts malfunctioning. It can even occur if you have corrupt system files and application interfaces.
This update error code can also trigger on your system if you are having a network connection error and trying to update your Windows OS through Microsoft servers. It can even occur if you have any corrupted windows update components installed on your system.
Conclusion
It is perfectly safe to try the generic fixes we have mentioned above to rectify the Windows Update error 80073701.
However, if you really need to proceed with the advanced steps, you should better create a “restore point” on your system to make a space to roll back if any additional error triggers during the advanced tweaks.
So, that’s all the solution we have for today. If you think we have missed any or if you have other practical solutions for this error, feel free to drop your suggestion in the comment box below.
FAQs
Q. What is the error 0x80073701 in Windows?
The error code 0x80073701 can trigger in windows-based devices, especially during the update process, due to any missing system files in the root directory. If you have any vital components missing from the system files, the update process can’t run smoothly.
Q. Why are you keep getting error code 0x80073701?
There can be several reasons why you keep getting the error code 0x80073701 on your system. However, the primary reason is that you have corrupted system files and windows update components on your system.
Q. What is the best way to fix a Windows Update error code 80073701?
Troubleshooting is the best option to rectify the 80073701 error code on your system, as it can automatically identify and fixes the corrupted system files on your root directory. However, you may need to disable your antivirus and firewall before proceeding with the troubleshooting tool.
Q. Can 0x80073701 trigger in Mac systems?
No, the particular 0x80073701 error code is limited to Windows-based devices only. However, Mac systems are also prone to update failures if you have corrupted system files in the core directories under the installation module.